A* Implementation in FB: Part One
So I'm sitting at the computer, reading a QB Express issue, when I begin to think about how awesome it would be to make a tutorial or article for the coolest QB/FB magazine around (you're welcome Pete ;)). But I don't know anything to write about, and I'm not a good programmer (but I try). But wait, I do know something. A*! I've gotten pretty good at implementing this into FB, so I decided I'd share what I know.
So what the heck is A* (pronounced a-star)? A* is a pathfinding algorithm (although some would love to argue this fact with me). Pathfinding algorithm?! English please? Ok, ok. Sorry. A* is a way for the computer to find a path from one point to another, with obstacles in the way. "Oooh, now I get it." "So why would I want this" you ask? Well, A* can be used in many different games. For instance, you can use it to help an NPC (None Player Character) find its way around objects.
Ok, so now that we have a use for it, how does it work? Well, that's half of what this tutorial is all about. The other half will be spent implementing this in to FB.
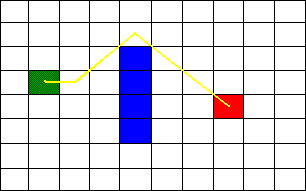
Well... To start, let's begin with the simplest form of obstacle, a wall. Below is a graphic to show our current problem.
(Note: I drew these based on pictures made by Patrick Lester in his tutorial. His tutorial is what got me into A* in the first place.)

The green square is our starting square, the red one is the target square, and the blue squares represent a wall. When you are calculating your path, you must keep track of two lists. The Open list, and the Closed list. The Open list is a list of squares that should be looked at, and the Closed list is a list of squares that have already been looked at. This will all fall into place later. When you start searching for your path, the first things to do are:
- Add the starting square and the 8 adjacent squares to the Open list, ignoring un-passable squares (walls or whatever you decide to implement)
- Calculate F, G, and H scores for each of the squares
- Make the starting square the parent square for each of the adjacent squares.
What are these F, G, and H scores you ask? Well... First of all, F is the sum of G and H:
F = G + H
G, is the movement cost to go from the current square (at this point, the starting square) to the square you are looking at. For instance, I use a movement cost of 10 to move to a normal "Ground" square. However, I use a value of 20 to move to a hill square, and 50 to move to a water square (Water is hard or even dangerous to attempt to cross). By using movement costs, you can have the computer try to choose a path around hills or water. You'll get it, trust me.
H is the distance from the current square to the target square. Actually, since you really can't tell the distance without knowing the path (which you are trying to figure out), you have to make a guess. For most problems, getting the Manhattan Distance is sufficient. The Manhattan Distance is found by using the following formula:
H = D * (ABS(TargetX - SquareX) + ABS(TargetY - SquareY))
Ah! Math! It hurts! Don't worry, it's not that hard. D is the minimum Cost to move from one square to another. In this case, it is 10. The Target and Square coordinates, are just that. The Target Square's X and Y (8,5 in this example) and the Square you are looking at's X and Y. So, for example, let's determine the F, G, and H scores of the square to the upper Left of the starting square. Refer to the diagram below.

First of all, the G score is 10, as will it always be in this example because there is only ground and wall. The H Score, is 10 times the distance from the square we are checking, to the target square. As you can see above, the target square is a total of 7 units away from the square we are checking. That gives us an H score of 70. The F score is the sum of those two numbers, so our F score is 80. See how easy that is? After assigning those two numbers to that square, we go onto the other 7 adjacent squares.
So Now we have 8 squares with F scores and everything. You need to do one last thing to them. Make the current square (the starting square right now) their parent square. Basically, just record the X and Y value of the starting square so you know what the parent square of those squares is. Don't worry, you'll understand why later. Now, you go through the Open list of squares (remember we added those 8 squares to it when we started) and choose the square with the lowest F score. If you did the above correctly, it will be the square just to the right of the starting square. Then, you do what you did above, checking each of the 8 adjacent squares. This time, 4 of the squares are on the Open list already, and one is on the closed list. Well, you ignore the closed list square, since you've already checked it. But what about the squares already on the Open List? Don't ignore them! Instead, check to see if this way to the square is better. You see, by making the starting square the parent square of the squares around it, you are saying that is the best route to get to that square (sorry, that was confusing). But, if this is a better route, then you'll want to change that squares parent to this square.
So how do you check that? Simple. You use the G scores. Take a look at the following equation:
NG = MovementCost + CurSquareG
If NG (a temporary G score) is less then the G score of the square you are checking, then this is the better way to go. Make the parent of that square your current square. If you don't get this, just use it. It will make sense eventually, I assure you.
Keep on repeating this process until you get to the target square. It's that simple! Here is some Pseudo-Code to help you out: (Taken directly from Patrick Lester's tutorial)
- Add the starting square to the open list.
- Repeat the following:
- Look for the lowest F score square on the open list. This is the current square.
- Switch it to the closed list.
- For each of the 8 squares adjacent to this current square:
- If it is un-passable or is on the closed list, ignore it. Otherwise, continue on...
- If it isn't on the open list, add it. Calculate the F, G, and H scores, then make the current square the parent of this square.
- If it is on the open list already, check to see if this path to that square is better, using the G cost as the measure (remember the equation above). A lower G cost means that this is the better path. If so, change the parent of this square to the current square, and recalculate the F, G, and H scores.
- Stop when you add the target square to the open list.
- Save the path. Working backwards from the target square, go from each square to its parent square until you reach the starting square. That is your path.
After you've done all this, the path should look something like this.
Well, that's it for this tutorial. I hope it wasn't too confusing for you. I know I'm not the best artist and I'm definetly not the best author. Next month, I'll show you how to implement this into FB code. Until next time.
Torahteen