QB Express
Issue #27 ~ March 8, 2008
"A magazine by the QB community, for the QB community!"
In This Issue
Staff
- Pete Berg (Editor)
- MystikShadows
- Imortis Inglorian
Contributors
- Mentat
- Dean Menezes
- Kiyote Wolf
- Hezad
- Wallyfblu
- Seb McClouth
- Lachie Dazdarian
- Z!re
- h4tt3n
- Regular Columns
- Articles & Editorials
- Tutorials
From The Editor's Desk
Written by Pete
No, your eyes don't deceive you... it's another issue of QB Express...ALREADY!
It has been less than a month since the last issue came out, and for the first time since the fall, QB Express is getting released on a regular schedule again!
This month, we've got a collection of fantastic articles and tutorials that pack quite a whallop -- so watch out! This may not be the biggest QB Express issue that's ever come out, but it certainly is no slouch... with SEVEN tutorials and THREE articles, as well as one of the biggest news briefs sections we've had in a long time.
MystikShadows reviews Dabooda's game Sokoban; h4tt3n gives us part two of his Spring Simulation series; Mentat brings us "Going Deep: Football and 3D Graphics"; Hezad teaches us how to generate awesome moving plasmas using the Electric Field equation; Wallyfblu teaches us about Window Procedure; Dean Menezes brings us "CGI and QBasic"; and Kiyote Wolf helps us reinvent the Commodore Wedge. And as always, we've got all the latest news from around the QB and FB community, and much, much more. QB Express #27 truly delivers a knock-out punch!
But I won't keep rambling and leave you down for the count...go ahead and read the issue!
Submit To QB Express
You all know the drill. This magazine can't exist without people SUBMITTING articles, editorials, tutorials, reviews, news and feedback. This is not just a solo effort by me... it's a group effort by people throughout the QB community. If you have anything to submit, or have time to write something, DO IT!
If you want to write about something, but can't think of a topic, or need inspiration, check out the "Official QB Express Article Requests" thread! There have been quite a few articles requested -- and even if none of them strikes your fancy, we can help you come up with something that you would like to write about. If you're interested in getting your own monthly column or just want to write an article or two, by all means, do it! Anything that is submitted will be included!
I also want feedback and letters to the editor regarding this magazine. I want suggestions and critiques. What do you like? What don't you like? What could be done better? Let me know!
All submissions and feedback can be sent to pberg1@gmail.com. You can also PM me on the Pete's QB Site or QBasic News message forums. If QB Express is going to continue to be so good, YOU need to contribute!
-Pete
Letters
Letter From MystikShadows
Hello everyone,
No doubt, another great release in a line of great releases. You weren't
kidding when you said it was worth the wait. It sure was.
I'm very please to see actual articles about the community, or lack there
of. That people are writing about. I gotta say though that it feels
somewhat familiar, I think other peole have noticed this but for 2 people to
write about it, I think it indicates something here. Although some of the
first to notice this weren't exactly respected and revered for stating so,
it seems that this issue of a community is getting to be more important than
it used to be. Or, at least seen in a very different way. But the fact
that today people can write about this subject and not get thrown in some
corner somewhere might be a good sign. Time will tell. But it's no
surprise that fb.net is not a community forum. It's just pretty sad that
those that noticed this earlier than this had to pay a very different price
than those writing about it now. The real question is what should be done
about it, I gave my suggestion already, it's just that,a suggestion. Be it
that suggestion or another, I think this is always going to be a big lack
and I don't see it going away and dissipating all that fast (if at all).
the FB forums need to be support forums, it's always good to have one place
to go to get this kind of atmosphere, but that's just about a quarter of
what's needed to make a complete online presence to a project. In my
opinion. I'm not sure what happened to na_th_an and some of the others like
them. IF a complete community existed, I'm not sure if they'd come back,
maybe, but I think the focus should be on not losing any more. na_th_an
were some of the more participating community members we were blessed with
(literally) so I think that for them to decided to leave indicates a pretty
big lack somewhere. The only thing I don't like about Pritchard's article is
that it seems to talk in the past tense. IE, it gives the impression of
admitting defeat and I don't think we're there yet, but I do think it's time
things start to take another direction.
Lachie's article about the community I think is worth the read, there's a
lot of points made there as well. I wish I could contact all the people
that left just to ask them why they left. Maybe some of them just moved on,
maybe some of them found something big was mussing, we won't know until we
can just sit down and ask them. But I bet we'd all learn a whole lot from
some of their replies. And if na_th_an just happens to hop on to this QB
Express release, I'm still waiting for part 8 of his IF series. ;-).
It's always good to see the newsbrief section. More importantly, seeing the
newsbriefs, to me, reflects what's really been happening, if I take the time to
try to find each of these news items in the forums or such it doesn't look
like a lot has been happening. Not the same effect as seeing them all
grouped together in a newsbrief section. And from this newsbrief, people
have been busy. Many games added to the fbgames direction. where's the
fbapps directory, or the fbutility directory? ;-) don't mind me, I'm an app
person. hehe. But that's the newsbriefs. Seems people have been busy
project wise too if you look at the project section. Lots of games in the
making, lots of tools for game designers. I for one want an up from Open on
his FB CAD project, it looked great and I wonder if any more work has been
done on it sinc ehis last update. Sure fb doesn't seem bad for games, look
at everything that's been made, but well, bring me, I sure can't wait to see
apps, tools and utilities built with fb. IO bet you fb isn't bad at those
either ;-). The gallery is one of the better ones I've seen in a while.
Plenty of items in there this time around. to all the authors of these
items, great work and I want to see more of that.
I think codemss's "Writing Tutorials" tutorial is awesome. I'm sure there's
alot of people that think "hey, I wanna write about this or that" but I have
no clue where to start. Well, now they should know. I hope this article
will yield many new creations by many new contributors. I think the
tutorial is rather short (for that type of article) but it surprisingly
covers a lot of ground. So codemss, great job there. I can't wait to see
how many people it will help and what will come out of it. Also, codemss's
"Worm-style Scrolling Engine" tutorial was very elaborate, well thought out
and well written. I think codemss found a new potential career choice ;-).
I'm gonna want a autographed copy of the first book that comes out hehe.
You know, as a programmer most of us seem to forget (often enough) just what
it's like to get back to basics. IF I was to ask some people here "what is
a function? How does it work? I think not many people would think of
specifying everything about function that Mentat did in his "Functions and
Local Variables" tutorial. It was great to read that article even though
I know what functions are. ;-). And well, I think it's a very clear
tutorial at that. One that can and will help many newcomers to the world of
programming. Great work there.
Kiyote Wolf's "GridMulti:Using String Variables..." article is one of the
most intelligent ways I've seen described on how to save and optimize stack
memory thus far in QB. Every point made are worth learning and remembering
and his samples are pretty easy to follow (which is often rare when the goal
is to optimize, you tend to want to shortcut everything which ruins
readability to some extend". So I was happy to see how readable the
examples are in this article. I wonder what other tricks he has up his
sleeve that he'll want to share with us, the readers. ;-).
Ok, show of hands, how many people knew absolutely everything that is
mentioned in Moneo's "Art Of Rounding".tutorial? Yeah, I thought so, I
don't see any hands. and yeah, I have to say, my hand wasn't up either ;-).
When Moneo sets out to explain a concept, well we can all see how thorough
he gets. Experience and ability to research a subject thoroughly hold no
secret or mystery to Moneo. I often wonder what impact tutorials like this
one has on most readers. Sometimes, no matter what people say, rounding
using a standard "Round()" function just doesn't cut it. And one of the
rounding techniques explained here would probably yield more exptended
results. I'd be curious if, in the next QB Express (or in emails to me)
people reading his tutorial could let me know what they thought of it
(specifically as far as the importance of the information inside the
tutorial). It's worth it's weight in gold as far as I'm converened,
specifically for business applications, but I bet some games could also
benefit from these techniques. So if you all want to, let me know, one way
or another, how a tutorial like this one affects and impacts you.
Spring Physics. That to me (probably cause I'm not much into games yet
(working hard at it hehe)) was a rather new subject to me. And I have to say
that Michael "h4tt3n" Nissen's tutorial on the subject was very informative.
IE, I learned a lot from it. I like his way of detailing the subject and
everything he covered in that one tutorial. Very clearly written I love to
read tutorials like that one. I'm so looking forward to his second
installment.
Lachie's "A beginner's guide to fmod" I'm sure will be a popular tutorial.
Who doesn't want to put sounds or music into theor game creations? I can't
think of anyone. And from the looks of this tutorial, how straightforward
it is, and how simple it makes using FMOD seem. I can already see most of
the readers start playing with their porjects and adding music and sound
effects here and there. OF course FMOD is one of the easier things to use
to do just that, but Lachie's tutorial is one of the simplest tutorial I've
read on it. So great work there.
All in all, it's another knock out issue of QB Express, just how I like 'em.
Full of content, activities, artticles, and tutorials. NOw that there's
some more games, perhaps some game reviews would be good to get back into
the issues. I miss reading them. But as I said before, it was well worth
the wait here. I can't wait to get my hands on the next issue. Awesome work
from all the contributors.
MystikShadows
Stephane Richard
I would write a response, but I'm pretty sure that you've covered every single possible topic that I could write about related to the last issue.
Anyway, QB Express is definitely back on track, seeing as it's been less than a month since the last issue came out -- and I promise to keep the issues coming on schedule!
-Pete
Letter from Lachie Dazdarian
Oh, hi.
Anyway, very nice work with the last issue. It provided much more content than I expected it would. I must be honest. I kinda had written off QBE, but without any malicious intent. I sorta lost hope it would pick up again and found comfort in my semi-successful FBGD forum (a FB game dev corner I always dreamed of). But you managed to bring QBE back into picture and kudos for that.
I did not like the few formatting mistakes that happened with the last issue. I'm sorry I'm so anal about that, but I just can't help myself. I hope you'll be compiling the next issue in much less hasty manner (which I know, is not your fault; real life just takes its toll).
Regarding the content in the last issue, I would first like to say that my Where Are We Now? article was quite outdated, and that my opinions about the community changed in the meantime. It was actually written in November of 2007, and I have no idea why the date was removed from the article title (then again, I might have sent the original version like that).
Very nice scoop of the community happenings in the News Briefs. I hope this issue�s News Briefs will be on the same level.
Other stuff?
Hmm...
Excellent contributions by Codemess, this including his article and tutorial.
The Art of Rounding by Moneo was yet another highly educational tutorial that illustrates how little you know about something you think there isn�t much to know about.
BTW, thanks for making FBGD the site of the month.
Sorry for not being able to contribute anything for this issue. For issue #28 I had in mind an article or two about being a game developer and a programmer, and what traits make you a good programmer, but in the same time a bad game developer. Anyway, just some thoughts I�m having lately.
Right.
Until next month, make me a darn game! ;)
-Lachie Dazdarian
I understand your lack of enthusiasm for QB Express, considering all the delays and the downturn in amount of content the last few issues. Real life is a downer sometimes.
It's good to hear that you're not giving up on QBE just yet! I look forward to any articles you write in the future, because we (the readers -- me included) love reading your thought-out, detailed and opinionated articles. (Your tutorials and game reviews are awesome too!)
And thanks once again for helping out with the News Briefs this month. I know you're busy, but every small contribution really helps!
-Pete
Letter From Seb McClouth
Hi Pete,
First and all I�d like to say once again it�s good to have you back with QBE. I�ve missed the mag really the last couple of months.
I know you�re really busy and all so it�s really great you still try to maintain the site, forum and mag.
As I�ve said before, keep doing this!!
Grtz
Seb
Thanks, I appreciate the props! QB Express and Pete's QB Site will be around for years to come, don't you worry. :)
-Pete
Have a letter for the editor? Send all your rants, raves, ideas, comments and questions to pberg1@gmail.com.
News Briefs
News from all around the QB community, about the latest games, site updates, program releases and more!
Site News
- FreeBasic Games Directory updates with four new games
-
Lachie Dazdarian added four new games to the FreeBasic Games Directory this month. They are (with ratings):

|
- UnAlien - 12/20
- Panda Hack - 11/20
- SKB - 13/20
- Trucs Qui s'Emboitent - 12/20
|
Lachie also updated the watchlist of FB games that may soon be completed (and thus can be added to the games directory): Plix, Alzir, Chuckie's Egg, Moon Project, Bullet Cloud, HEX Factor, Snake, Two Lords, Link Line, Royal Rumble, Armour Ranger, FreeBASIC Nibbles and Gods and Idols.
News Brief by Pete
- Russian Freebasic forum opens
-

ShenZN announced the opening of a Russian forum for Freebasic programming. There are several posts there already, but I don't speak Russian, so I can't exactly tell you what they're about. The site sure does have a nice flying horse / unicorn logo, though! (Way more epic than the standard Freebasic stallion.)
News Brief by Pete
- New Freebasic Sites popping up everywhere
-
Several new personal FB programming websites have been launched in the past month... Here are a few of them.
News Brief by Pete
Project News
- Tommy CactusBoy
-
A newcomer to the QB scene named ACC has posted screenshots and information about a new QuickBasic platformer called "Tommy CactusBoy," and it looks fantastic. Check out these screenshots:
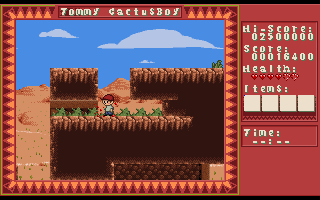

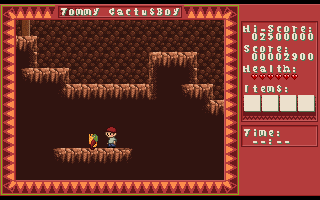
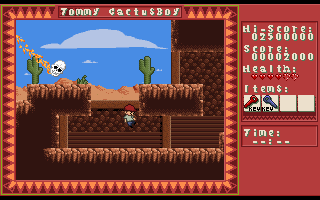
Here's a bit of info from ACC about the game (no demos have been released yet):
I'm planning three little episodes like early 90ies platform games. The first one is "save the princess" plot (nothing fancy). You go as Tommy and try to find where Lydia (the only girl how seems to care about him) is gone. Tommy already got troubles of his own, since his parent disappeared years ago. He must now work all alone in his "cactus farm" -- other kids in town are making fun out of him and nickname him "CactusBoy" because of that (the village where he lives only got two resources: cactus and chicken feathers).
In this first part, you'll have to survive against Calamidades (some sort of cactus-eating dogs, no way affiliated with Chupacabras :) ), mad crows, lost souls (in this haunted mine)...
If you're wondering, the character himself and his background were made when I was asked to make a few pages of comics --weird weird people--. I had something like three days to do them and I really was in a hurry. So I tied a couple of stories altogether and somehow, it turned out to this. Recently I felt the urge to do something with it...
I look forward to Tommy CactusBoy -- it sounds truly original, and a whole lot of fun!
News Brief by Pete
- Vince DeCampo releases Hex Factor
-
Vince DeCampo has released a few beta versions of a FreeBasic game called "Hex Factor" in the past month. The latest release was Beta .994, and it's already looking great:

You can download the game here: HexFctr.zip. Vince is looking for feedback and beta testing, so if you play the game, be sure to weigh in on it on the FreeBasic Games Directory forum!
News Brief by Pete
- Armour Ranger
-
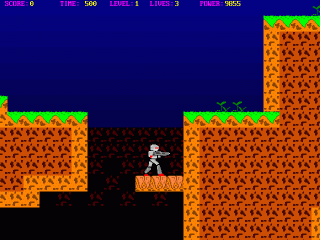
SSJX has released an early version of a platformer / shooter (a "Turrican / Metroid type game") called Armour Ranger.
The engine demo lets players "wander around a large cave and shoot some things", and features a "Turrican-style stream weapon," destructable blocks, many enemies, and cool little explosions.
The demo is still quite rough, and has many timing issues to be worked out, but the game definitely has potential. There aren't nearly enough platformers / Metroid-style games made in FB, so Armour Ranger is an exciting little project.
Visit SSJX's website to download the demo and find out more.
News Brief by Pete
- Panda Hack Roguelike
-
N3trunn3r released an ASCII-based roguelike game called "Panda Hack," which has a unique (and kind of twisted) premise:
Panda Hack is a Rogue like where the game purpose is to hunt pandas and to make money by selling their meat. Collect money, buy ammo, fight the demons to get darts and finally kill some pandas and sell their meat. Then get to the next zone... to kill even more pandas.

You can download Panda Hack here.
News Brief by Pete
- New Stuff from Lachie
-
Lachie Dazdarian has been busy this past month.
First off, Lachie posted a teaser image of his upcoming game Barren (formerly known as LONG / Legend of Noname General):
If you don't know, LONG (now Barren) is a point and click adventure game I've been developing since 2002, and am determined now to finish it in the next 2 months.
As much as the game is close to completion (like I said, 2 more scenes to add out of some 26 total), it's quite far from it. Because, there are 2 very demanding animations to be drawn and coded (one of them is the end game animation), and the music (which is composed) and sound effects need to be implemented. Don�t forget all those final nitpicks and extra unplanned changes.
Nevertheless, I'm hopeful and finally see the end of this project.
Secondly, Lachie has released an update to his screen-by-screen scrolling engine that he put out last month.
This engine could be very helpful if you're trying to create a simple game and don't want to start from scratch.
Way to go, Lachie!
News Brief by Pete
- No Freebasic Racing games? Let's start a competition!
-
There was an interesting post, started by Vince DeCampo at the Freebasic.net forums about how there have been no finished racing / driving games released for Freebasic thus far. This got people thinking: why haven't there been any racing games for FB?
The discussion soon turned to starting a Freebasic driving game competition, and the king of FB competitions himself, ciw1973, said that he would foot 100 GBP in prizes (though he doesn't have time to organize the competition himself). A competition has not formally started yet, but by the sounds of things, one will begin soon.
News Brief by Pete
- Dr_D releases 3D racer demo: 502 Rally
-
Just as people are talking about how there have been no Freebasic driving games (see the last post), Dr_D steps in to buck the trend!
He recently released a demo of a 3D racing engine, which looks remarkable so far:

The game is in early stages right now, but it is definitely worth a test drive.
News Brief by Pete
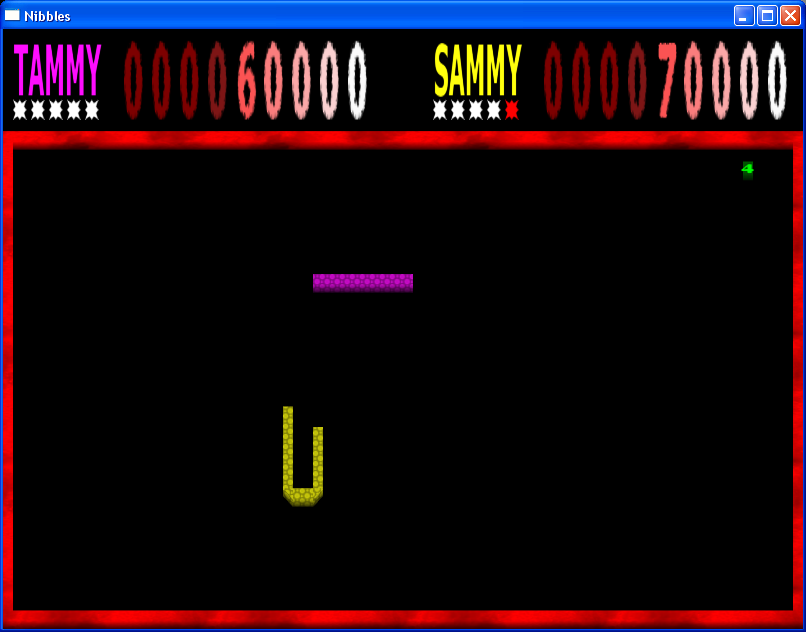
- Snake and Nibbles!
-
In the past month, several different versions of the time-honored "snake" game format have been released in Freebasic: "Freebasic Nibbles" by Lithium, and "Snake" by hd_ and "Multiplayer Snake Game Made in 30 minutes" by KristopherWindsor. The premise is that you're an ever-growing snake that has to eat things...without running into any walls, obstacles, or your own body. It was probably one of the first games you played in QBasic...or on your cell phone...and now you can play Freebasic versions!
Lithium's version, "Freebasic Nibbles," can be found here:
And "Snake" by hd_ can be found here.
Finally, KristopherWindsor's 30-minute two-player snake game can be found here.
Gulp. Gulp. Gulp.
News Brief by Pete
- Phycowelder's 2D Map Editor
-
Phycowelder has released an openGL Map Editor, to create overworld maps for your games.

Here is a list of features:
-a random path/river generator /W clean tile AI
-and a random tree planter and dirt patches
-UNWRAP_TILE.EXE makes the main 512x512 BMP into 16x16 bmp tiles for the utility.
-the Template BMP is only a basic design for setting up Chipsets that use my Mapping AI.
I'm going to add a few utilities!
-to shorten the tile requirements for the game/engine
-also to use either separate tile images or a master tile image
-also for FBGFX loading or OPENGL loading!
(i haven't tested it yet going to next, but i suspect that the open GL tiles are reversed on the Y-axis so when i make the map formatting utility i have to switch those, maybe.)
-and a utility to choose loading mode fbgfx or openGL to walk around in!
-Tutorial/help PDF
You can download the demo here: MAP_GEN.zip
News Brief by Pete
- Suggestions?
-
Several FB game programmers are looking for feedback on their upcoming projects. Here are a few of them. Be sure to chime in with your thoughts!
- Penguins?
Conexion posted a penguin-related question...
The racing game I'm programing (Tentatively titled: "Pengo: The Last to First") features a 2.5D racing system with a variety of fun and colorful levels as well as different forms of travel (Karts, boats, etc)
Now, I have quite a few different design ideas down... but I'm curious... what would you guys rather see?
A variety of penguins in different styles racing against each other?
Or
A variety of different creatures racing? (Turtles, Spiders, Trees, etc..)

There's a lot more info about this game in this thread.
-
Breakout?
Tusike is looking for help and suggestions with his new Breakout clone. Help him out!
News Brief by Pete
Have news you'd like featured in QB Express? Email us!
Gallery
Written by Pete
Every issue QB Express features a preview and exciting new screenshots from an upcoming QB game. If you would like your game featured, send in some screenshots!
Gods and Idols
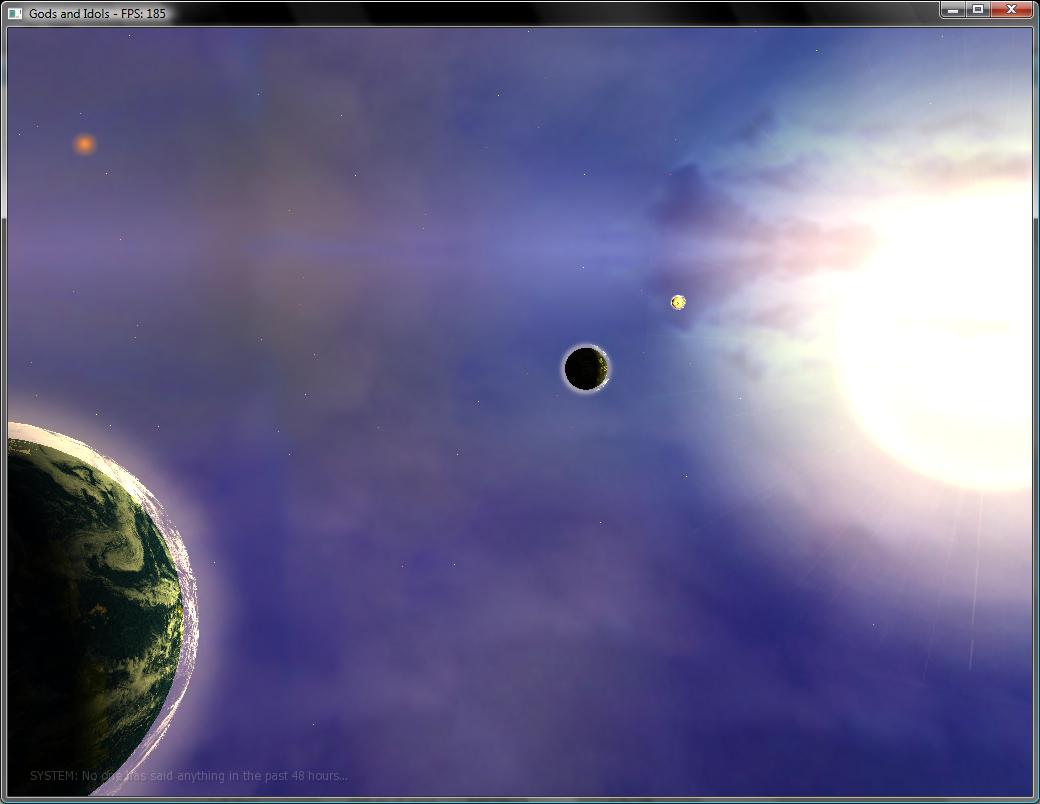
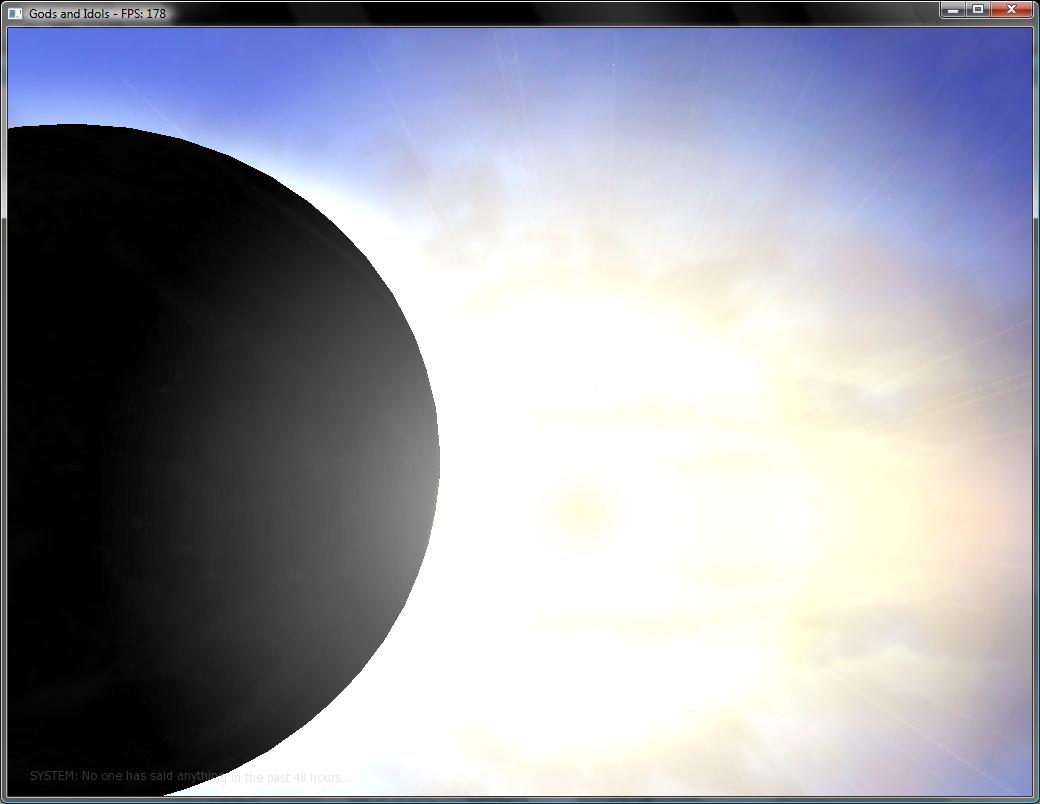
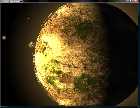
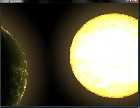
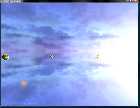
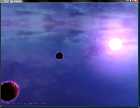
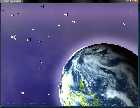
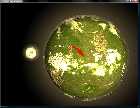
Z!re is working hard on a ridiculously ambitious, massively multiplayer online RTS called "Gods and Idols." Though Z!re hasn't released many details about the mechanics / gameplay elements of Gods and Idols, he has released dozens of screenshots that show off different beautiful views of space and celestial objects created with the engine. The screenshots are absolutely beautiful, though they don't reveal much about the game (which leads me to believe that the gameplay elements are in the very infancy of their development).
Below, you'll find many screenshots that Z!re has released, including several QB Express Exclusive shots, as well as a short FAQ Z!re wrote about this game in a Freebasic.net thread.
Enjoy! These screenshots are just the kind of thing you'd want to check out in a section called the "Gallery."

F.A.Q.

Q: What is Gods and Idols?
A: Gods and Idols is an MMORTS built on the FVe2 game engine.
The game is set in space where players take the role of godlike beings, nudging their worshipers in the direction the player wants
Q: What is the game play like?
A: As a godlike being, players are able to order their worshipers to perform research, build structures or amass fleets.
Players can also take a more direct approach, and use their immense powers to destroy entire planets.
Players do not have direct control over individual spaceships or worshipers, instead they'll issue general directives for their worshipers to follow.
Q: Is Gods and Idols Free?
A: Yes, you can play for free without any restrictions.
For players wanting some more fast-paced and aggressive play, you can always sign up for the monthly challenge.


Q: What is the monthly challenge?
A: Once per month all players who are taking part in the challenge play get reset to 0 points, and given a new planet. After one month has passed the player with the highest score will collect the cash prize. There is a small fee for entering the challenge play.
Q: When is it going to be released?
A: The release date for a public playable release is set for March 31st.
Q: Where can I find more information?
FVe2 Engine techdemo: http://www.youtube.com/watch?v=v-vp4Dt1PLc
Official Gods and Idols site: http://www.godsandidols.com
More Screenshots!


Sokoban - Game Review
A review by Stéphane Richard (Mystikshadows)
INTRODUCTION:
On January 18th 2008, dabooda, a rather newcomer to the freebasic forum (at least as far as I've seen) announced
his game called Sokoban in This FreeBasic forum thread. This game is the first creation
from his DBOS (DaBooda Old School) initiative. And what a first creation it is. It's no wonder it got the comments it did on that thread. QUite a great piece of programming work.
Sokoban is a perfect example of a great old school game. It has many features in it that make it a complete and very playable game. Features like parallax scrolling, pretty neat graphics for the game and
an impressive user interface that lives up to the reputation of that kind of game. All in all Sokoban reflects the spirit of old school gaming perfectly.
ABOUT SOKOBAN:
Sokoban is a game where you move boxes around a predetermined area. You move them by pushing them in a selected direction. The main goal is to get out of the current area in order to move to the next. This means that you have to be careful where you move those boxes so that
they don't block you from reaching the exits. This can happen rather easily so a little thinking over before moving boxes is probably your best bet to make sure you get out of the area.
The maze like areas start rather simply and work their way up in complexity and in possible situations where you just might lock yourself in the area. Sokoban also has an editor available to create very unique challenges which adds to the playability factor of the game.
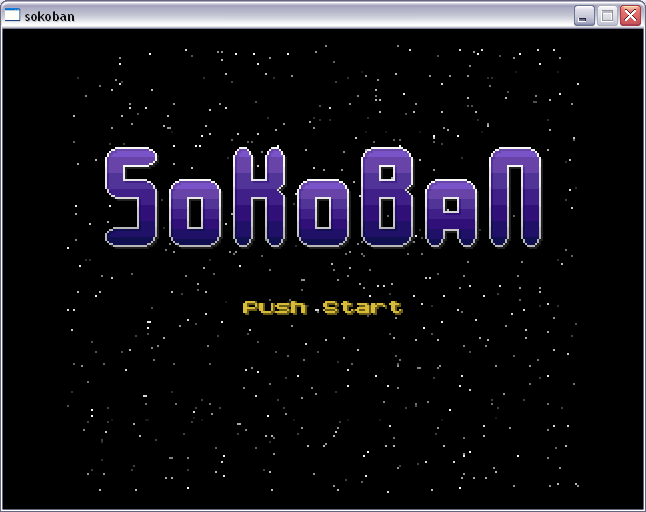
SOKOBAN SCREENSHOTS:
The first screenshot below presents the title page of the game. You can't see it here but there's a parallax scrolling background (the stars) and with that, after a few seconds looking at the title screen, things start to scroll up to presents some journal entries that describe the situation.
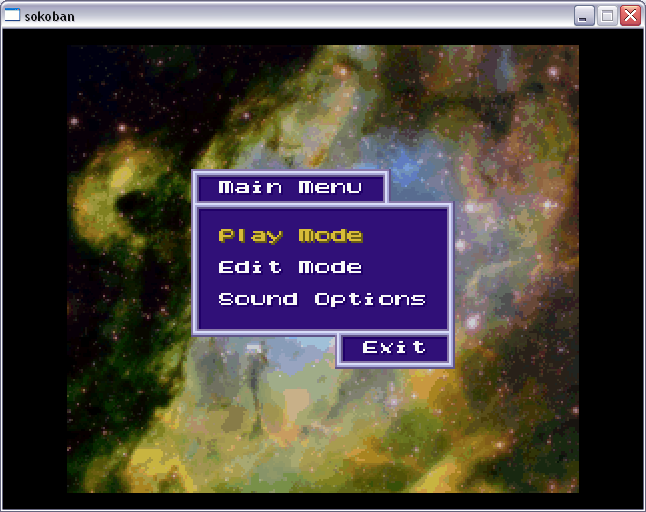
The second screenshot (below) is that of the game's main menu. As you can see it's very classic of the type of game, and sound effects are there when selecting menu options and such. The sound options allows you to adjust the volume of the music and the sound effects to your liking.
This last screenshot is a sample game play area. As you can see here. It features great graphics in the background and for the play area itself too. I really like the high-tech look the game gives with the space background and high-tech design.
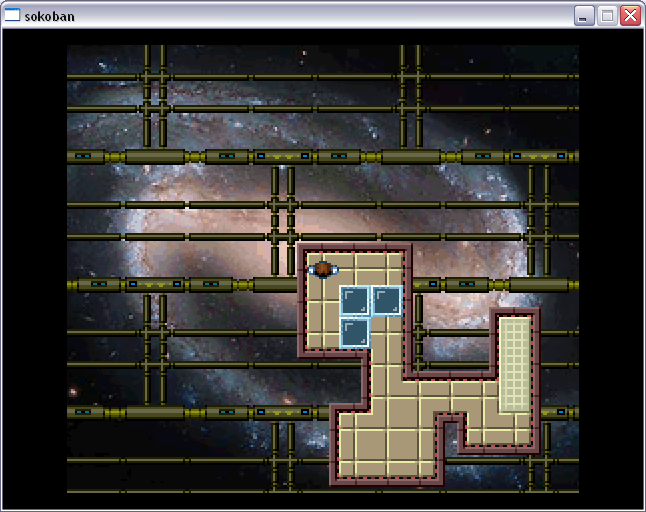
There are plenty of other screens I haven't shown here like the screen that allows you to enter your name, another great one done in the spirit of old school games once again and others. I think dabooda really has a knack for this type of game as far as playability and overall look and feel of the game. Add to that excellent music and sound effects and it's plain to see that this game is a complete game with all the features you'd expect from this type of game.
And now, let's start the actual review of the game. The review is done in my usual style of review using the same gaming parameters I always use in my evaluations and reviews of games.
PLAYABILITY: Score (4/5)
I gave this a 4 out of 5 because of how great the game reflects the spirit of old school gaming. The fonts, the colors, the combination of graphics, look and feel of the game everything fits in perfectly. The game is rather easy to learn (even by trial and error) but for those of you that have to have a manual, well one of those is available too that explains everything you need to know about how to play the game.
Also, let's not forget that added to that is music and sound effects that add to the game's playability just because of of the way it sets you in the mood to do things fast. Great selection of both music and sound effects.
OVERALL ENTERTAINEMENT: Score (4/5)
This deserves a 4 our of 5 because of all of the elements included in the game. The combination of good graphics (for the type of game), quick and easy setup, concise but good story line involved, the goal of a typical Sokoban game all contribute to the entertainement value of the game. No screen is overfilled with details making all parts of the game veyr easy to see and very clear to follow. If you add sound and music to the mix you have a very complete playability value that is as complete as it can be.
REPLAY VALUE: Score (3/5)
It seems that this specific implementation of Sokoban is lacking something compared to other implementations of the game. Other Sokoban games offer a choice of tilesets for example. Also Most other Sokoban games have an original level set (some have more than one original). However, since it does have an editor available, it's possible to create some very original challenges in a rather easy way. This helps greatly with the replay value of the game because it adds abilities to create challenges maybe in the goal of an championship competition for example.
TECHNICAL FEATURES: Score (4/5)
The technical level of this implementation is pretty awesome in itself. The game features many old school expected characteristics and features that help it live up to the reputation of a great old school game. Everything is there, graphics of course, but also a parallax scrolling engine, smooth font and text scrolling, sound and music. All combined in a pretty convincing way to give all aspects of a Sokoban game it needs to make it a very successful implementation.
THE FINAL VERDICT: 15/20 (75%)
It's no secret that this game deserves every point given to it in this review. The first reason is how well implemented the game is as far as programming is concerned. The game is pretty stable and works very smoothly even in my PC which isn't the fast thing in the computer industry with a rather poor video card in comparison to what's available out there. It combines all the expected feature of a good classic old school game visually as well as music and sounds too. In other words, it's a complete playable sobkan implementation that is must definitaly worth downloading and giving it a good try (or 12).
There are two places where you can get the game and read about it. The first is dabooda's website itself and the second place is Lachie's FB Game directory Sokoban Entry. This review is my own personal evaluation of the game. If you really want to make up your own mind about the game, the best thing to do is to download it from one of the links provided and try it for yourself. Have fun playing this one, I know I did.
MystikShadows
Stéphane Richard
mystikshadows@gmail.com
QBinux Update
Written by Seb McClouth
Hey all
As some of you might have read in PCOPY #60�s qbinux article, QBinux is still alive. I did however make a big mistake and that is saying I named Novix Filesystem� In these I�d like to apologize for this since it was already named by Z!re.
QBinux has been undergoing several re-writes and the current form pleases me best. Most of the code is now translated from C (original source) to Basic and works. There have been some traps in original C-functions which I�ve managed to port to Basic. But ofcourse I didn�t do this alone and I�ve included the contributors names. Just like Linux I like to aim QBinux at a program by the community for the community, and that is still my intention.
There have been some people who wanted to become alpha and beta testers. Until now I�ve only gotten one review from the alpha-test. Because I�m still working on the beta-release, I�d like to ask people who want to beta-test QBinux to mail me at mcclouth.software@gmail.com and as soon I as have working beta, I can release it to the beta-testers.
Well, the recent alpha-release was based upon Linux kernel 1.0. There were lots of traps like I�ve said before. And I�d like to share one with you: complementing.
I had come up with the following code for it:
FUNCTION Complement (VALUE AS INTEGER)
temp$ = ""
temp1 = VALUE
temp2 = 0
mirrortemp$ = ""
temp3 = 0
compltemp$ = ""
mirrorcompltemp$ =""
temp4 = 0

FOR a = 0 TO 20  'I'm assuming for the test we only need 20 bits
  If temp1 AND 2^a THEN 'as Ted told me to test, I'm testing here if it goes
      temp$ = "1"+ temp$ 'Why did I assume again this has to be one?
      temp2 = temp2 + (temp1 AND 2 ^ a) 'to test if temp2 = temp1 then
     IF temp2 = temp1 THEN EXIT FOr        'we leave the for-next-thing
ELSE
     temp$ = "0" + temp$
END IF
NEXT

'The above code gives us the bits for temp1

FOR a = 1 to len (temp$)
mirrortemp$ = MID$(temp$, a, 1) + mirrortemp$  'mirror the bit from temp$ for check
NEXT

'from here I'm lost in remarks, but it works.

FOR a = 1 TO LEN(mirrortemp$)
IF MID$(mirrortemp$, a, 1) = "1" THEN
  IF a = 1 THEN
    temp3 = temp3 + 1
  ELSE
    temp3 = temp3 + 2 ^ (a-1)
  END IF
END IF
NEXT

IF temp3 = temp1 THEN 'compare temp3 and temp1
FOR a = 1 TO LEN(temp$)
   IF MID$(temp$, a, 1) = "0" THEN
      compltemp$ = compltemp$ + "1"
   ELSEIF MID$(temp$, a, 1) = "1" THEN
      compltemp$ = compltemp$ + "0"
   END IF
NEXT

FOR A = 1 to LEN(compltemp$)
mirrorcompltemp$ = mid$(compltemp$, a, 1) + mirrorcompltemp$
NEXT

FOR a = 1 to LEN(mirrorcompltemp$)
IF MID$(mirrorcompltemp$, a, 1) = "1" THEN
   IF a = 1 THEN
      temp4 = temp4 + 1
   ELSE
      temp4 = temp4 + 2 ^ (a-1)
   END IF
END
NEXT
Well, I didn�t wrote it alone. Mac, Burger2227, Patz, gave me some idea�s by the examples they provided. The code still wasn�t clean enough. It still isn�t but Burger2227�s code for the bitcalcuation:
SUB Dec2Bin
COLOR 14: LOCATE 2, 30: PRINT "Decimal to Binary"
COLOR 10: LOCATE 5, 20: INPUT "Enter a decimal number: ", num&
DO
remain = num& MOD 2    'remainder is used for binary result
num& = num& \ 2           'discard any remainder with integer division
Bin$ = LTRIM$(STR$(remain)) 'make string number
Binary$ = Bin$ + Binary$    'add remainder to binary number
LOOP UNTIL num& = 0
COLOR 11: LOCATE 10, 30: PRINT "Binary number = "; Binary$  'binary result

END SUB
Did give me a possibility to make atleast one part more understanding. Linux is afterall a C-based (and yeah ASM too) based operating (like all the others). This is only a little excerpt of QBinux but with the first public release of core version 0.01 I�m releasing the source code as well.
And I hope that people will continue giving feedback and adjusting/adapting the original code just like the real deal, Linux.
I�ll try to keep you guys updated in every QBE coming from now, concerning the progress of QBinux.
And please give me feedback!
Grtz
Seb
Monthly Awards
Written by Pete
Site of the Month
N3trunn3r's Coder Hideout
http://n3trunn3r.110mb.com
Webmaster: N3trunn3r
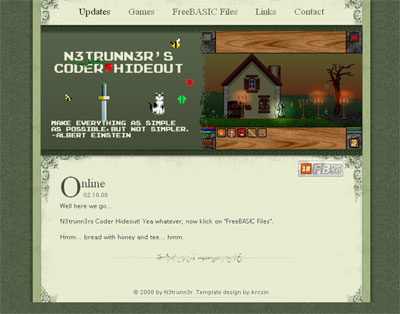
There have been several new personal FB sites launched in the past month, but the cream of the crop is N3trunn3r's Coder Hideout. Although it is a very small site, and was just launched less than two weeks ago, it provides quite a bit of quality content, and boasts an eyecatching design.
This site features downloads of N3trunn3r's games: Endless Adventures ("Endless Adventures is a about a dude (you) who is going on adventures and then hitting the goblin with his sword... ah, you know."); and his new Roguelike, Panda Hack ("the game's purpose is to hunt pandas and to make money by selling their meat.")
Aside from the games, though, this site has a very useful resource: a FreeBasic Library Archive, where N3trunn3r has compiled a collection of the most useful FB libraries that will help you create your own programs. It's still a small collection, consisting of PNG, Pload and BMP libraries, but it will certainly grow over time. This is something that has been sorely needed in the FB community for some time, and I'm glad N3trunn3r has stepped up to do it!
For its collection of useful Freebasic libraries, original games and great design, the N3trunn3r's Coder Hideout is our Site of the Month!
Programmer of the Month
Dr_D
games.freebasic.net/forum
Dr_D (also known as Dr_Davenstein), has been wowing us with his 3D OpenGL Freebasic demos for years. It seems like every month, he's got a new Kart racing demo, or 3D walkaround demo to show off -- and every single one of them is better than the last.
This past month, Dr_D released a demo of his kart racing game called 502 Rally, that looks incredibly promising. Not only does it run smoothly and quickly in super high resolution, it has beautiful textures and 3D models that will make you drool. The 502 Rally Demo is undoubtedly one of the best looking programs ever released in FreeBasic, and it is definitely worth a few minutes of your time. Just imagine how good it's going to be when the game is finished!
For his amazing work with Freebasic and OpenGL, and his constant contributions to the FB gaming scene, Dr_D is the QB Express Programmer of the Month.
A Basic Comic
Written by Anonymous
This is a series of "text-based comics" about the medieval QB/FB "kingdom", submitted by writer who asked to remain anonymous. A bit odd, but it's an interesting concept.!
-Pete
Topics: Allegory, Satire, and Basic Politics
Setting: Medieval Europe
The Kingdom of QB is subject to hard times, as the majority of its citizens have revolted, and left to form the FreeBASIC army.
The army tries to conquer the QB kingdom to free its remaining citizens, and reclaim the wealth in the castle's treasury.
Meanwhile, a small, nomadic group has joined the QB Kingdom, renaming it the QB64 Kingdom, and placed its leader Galleon in charge of the kingdom.
QB64 Kingdom: a castle and kingdom
- Clippy: the drunk hobo who positions himself so as to trip the king when he walks by
- Galleon: the king who eats donuts
- Mac: land tenant / farmer, and former king
- OLPC: the king's assistant, and a scout focused on the invading army
- Pete: brainwashed yet bilingual Power Basic user and castle manager
FreeBASIC: a strong army of knights on horseback
- Dr_D: the weapons R & D department manager
- LachieD: the annoying captain
- Sir Mud the Great: a professor of medicine and black magic
- V1ctor: the noble and honorable leader
Other
- MystikShadows: a pizza delivery boy who tries to gather his own following / army, but is accepted everywhere
***** Comic 01 *****
OLPC to Galleon: The FreeBASIC army is coming!
Galleon: I was hoping they wouldn't attack for another year! Doom is inevitable!
V1ctor: Surround the castle! Fire the nuke cannon at the castle's back door! Take no prisoners alive!
LachieD: Aren't you glad this strip is non-partisan?
***** Comic 02 *****
MystikShadows to Galleon: The pizza is --
*trip*
*clunk + smash*
MystikShadows: I think my leg broke!
Galleon to Clippy: Get out of the way, Clippy.
***** Comic 03 *****
OLPC to Galleon: The enemy army has new weapons technology and is coming this way!
Galleon: Don't worry; I am making a tool that will help us rule the earth!
Galleon: It features a cloaking device, time machine, and brain washer.
Galleon: I would have finished it by now, but I took a break to setup my iPod.
***** Comic 04 *****
Mac to Galleon: You know why I really don't like FreeBASIC? I have never seen higher taxes, but they claim they are free.
Galleon: I know, and I will help the people advance without raising taxes. BTW...
Galleon: Tell the executioner I have some more people who won't donate $1M to the music-for-all fund.
***** Comic 05 *****
Sir Mud the Great to his henchmen: I have invented the greatest disease cure ever!
Sir Mud the Great: If fully explored, this has the potential to improve everything!
Sir Mud the Great: I must now reinvent the wheel, and tell everyone about it!
***** Comic 06 *****
Narrator: The Kingdom has gathered an army, and is on battle lines, preparing for war against FreeBASIC.
(Showing bird's eye view of both armies, grouped just outside the castle)
Narrator: Both sides are marked with courage, determination, and patriotism...
Clippy to V1ctor: Your shoelace is untied.
***** Comic 07 *****
Setting: Pizza Parlor
MystikShadows (behind cash register) to customers: Enjoying your pizza? I'd like to take a few minutes to make you reconsider this civil war.
MystikShadows: It has caused unrest, poverty, political comics, war, hate, and separation. Deep down inside, we all want the same thing.
MystikShadows: We can all be united! Join my new army now and promote world peace!
***** Comic 08 *****
OLPC to Galleon: The FreeBASIC army is coming to attack us! We need a defensive strategy!
Galleon: Don't worry; I have a plan to save the entire QB64 Kingdom!
Galleon: We will rename the empire, "_QB64 Kingdom!"
Galleon: Then when they come looking for "QB64 Kingdom," they won't find it!
***** Comic 09 *****
Galleon to OLPC: I have a brilliant plan! We'll prepare our empire for world domination by conquering Mars and building a secret army there!
OLPC: The FreeBASIC army has already conquered Mars, and has a robot guarding it by disintegrating any space craft within its range.
OLPC: Besides, we haven't even invented indoor plumbing yet.
***** Comic 10 *****
Title: Galleon reelection campaign
Galleon to the audience: Thank you all for attending tonight. If reelected, I promise to be a benevolent dictator even more than last year.
Galleon: I promise to give the citizens the freedom they deserve, and even more...
OLPC (in the audience) to Galleon: Think you'll let us humble subjects read the laws this year?
Comics
By Ryan North
Aside from the "text-based" comics you just read (above), I didn't receive any comics this month. So, instead, I'm going to provide you with a few strips from my personal favorite web comic, Dinosaur Comics by Ryan North -- which coincidentally have to do with game programming AND make references to QBasic. And if you're wondering, the basic premise of Dinosaur Comics is that every strip uses the SAME EXACT six panels, and only the text/dialogue is changed. And somehow, every strip is completely different. Hurray!
-Pete


Going Deep: Football and 3D Graphics
Written by Mentat
The Once Upon A Time:
Today�s a practice game and you�re a quarterback for your high school football team. Your receivers are all trying to shake off the other team. Yet you have a hard time seeing them because the opposing team is in the way. So you sort out the players and throw the ball to a relatively open player (on your team of course).
After practice you go home, get on your computer, and stare at the screen trying work on your 3d computer game. You�re stumped on how to draw things closer to you over things farther away. Well, at a decent speed at any rate. Do you sort? It seems the only option. Or you could just use OpenGL or something like that. But then I wouldn�t have a plot to tell, and besides, your too stubborn. Sorting 3d objects is time consuming, and is difficult for complex objects. What if one part of the object is in front of another but the other half is behind!?
Since you have yet to bathe, and you stink to the high heavens, you go and take a shower. A good long shower. Both the football game and your own program runs through your mind. The receiver isn�t shown in front of the safety. It�s so intuitive! Yet no matter how hard you try, you can�t seem to perfect your own graphics. It�s so easy for you to sort out distance and �draw� images in the correct order in your mind. Why can�t the computer? Of course you know that the computer draws pixels to the screen, while in reality oodles of photons bounce off the oodles of atoms. Back to sorting. Sort by triangles? Even more work and time to do something so obvious. What about breaking the triangles into smaller parts�uh�no. Hm.
The hot water is running out and you�re becoming quite frantic. Wait a minute�what about breaking the triangles into pixels! And then load the pixels and their corresponding depths into a buffer. By the Greek Gods, it just might work!
The Point
So what�s the point of this tutorial? A method of not drawing stuff in the back over stuff in the front. Basically, I�m going to use a big array to store the depths of individual pixels. So lets say I want to draw a triangle. With a couple nested loops, I can iterate through all points of the triangle and draw each pixel if it�s depth is less than the pixel-depth of the array. For example, I�ll convert point (Vx,Vy,Vz) to a pixel coordinate (Px,Py), then I�ll check Vz to the number at the array location (Px,Py), and if Vz is less than the previous depth, I�ll draw (Px,Py) and then store Vz to the array. The depth array is pretty much like a screen you don�t see, and it holds the depth of each point.
For me, this means a little extra work regarding points. I normally draw 3d triangles with the built in LINE(#,#)-(#,#) command. Now we need to draw each individual pixel. Not to worry, I�ve got the math.
The Foundation
First thing is first. Before I get into the actual math, I�ll have to establish some standards and I�ll have to say this: the code isn�t optimized. Feel free to copy and paste, but I�d rather you read and use your own interpretation, so you have a better understanding. Depth testing can be used in conjunction with other buffers or arrays. And there are different ways to use this, and to draw.
Another thing is that I�ve used the term array and buffer loosely. From now on, by buffer I mean a chunk of memory used by the command ALLOCATE(#). An array is�well an array. For simplicity, I�ll use an array.
And now for the conventions. I�ll use f<name> to indicate a function or a subroutine. fPixel draws the pixel and depth tests. a<name> is an array. aDepth is the depth array. I use i, j, c, and r in FOR loops. FOR i=1 to 7. The suffixes x and y are generally coordinates, the prefix p means pixel, and v means 3d vertex. And pay attention to capitalization. If I write aHat, I mean for an array to be called hat, while I mean Abbot to be a simple variable. But hopefully you�ll see what I mean.
Now for the good stuff. First, let�s set up the screen and buffer. This is in FreeBASIC, by the way.
The Frame
'Depth Demo
�set up the screen
CLS
SCREEN 18
'resets the depth array
DECLARE SUB ResetDepth
'Declare the variables
DIM SHARED Pi AS SINGLE
DIM SHARED Wdth AS INTEGER
DIM SHARED Height AS INTEGER
DIM SHARED OffsetX AS SINGLE
DIM SHARED OffsetY AS SINGLE
DIM SHARED ScaleX AS SINGLE
DIM SHARED ScaleY AS SINGLE
DIM SHARED MaxDepth AS USHORT
'Loop variables
DIM SHARED r AS SHORT
DIM SHARED c AS SHORT
DIM SHARED i AS SINGLE
DIM SHARED j AS SINGLE
'3.14159265358979323...
Pi = ATN(1) * 4
'screen dimensions
SCREENINFO Wdth, Height
�set to the same dimensions of the screen
DIM SHARED aDepth(0 TO Wdth - 1, 0 TO Height - 1) AS SINGLE
'middle of the screen
OffsetX = Wdth / 2
OffsetY = Height / 2
'depth scale
ScaleX = Wdth / TAN(90 * 180 / Pi)
ScaleY = Height / TAN(90 * 180 / Pi)
'maximum depth
MaxDepth = 65365
'Load up the depth array, otherwise nothing can be drawn to it.
fResetDepth
SUB fResetDepth
FOR r = 0 TO Height-1
FOR c = 0 TO Wdth-1
aDepth(c, r) = MaxDepth
NEXT c
NEXT r
END SUB
The Hypocrisy
If you�ve read my previous tutorial, then you may be wondering why I made so many global variables. This is a demo, and I want it to be small and simple as possible. Actually, I would just put them into a global UDT and make them private. Again, this code isn�t made for an actual game or large program.
Now look at that last �paragraph� in the code. If you�re just as absent minded as I, you may have forgotten to set a �back� to the array. Otherwise the depth for every pixel is 0. And that�s just not good. Also pay attention to aDepth(#,#). I had to make sure it is aligned with each screen pixel.
The Almighty Dot
Onward to making our beautiful pixels. This is a subroutine which will host the depth testing. The wonderful thing about our pixel function is that extra things can be added. Pixels alone may not seem much, but they�ll be the base for drawing lines (we shouldn�t use the built in LINE(#,#)-(#,#) command), and then triangles.
SUB fPixel(Px AS SINGLE, Py AS SINGLE, Vz AS SINGLE)
	IF Px >= 0 AND Px <= Wdth - 1 AND Py >= 0 AND Py <= Height - 1 THEN
		IF Vz <= aDepth(Px, Py) AND Vz>=1 THEN
			PSET (Px, Py)
			aDepth (Px, Py) = Vz
		END IF
	END IF
END SUB
The Conversion
Of course, we�ll need to convert the vertex to a screen pixel before we plug in this sub. I didn�t add anything for color, partially because the FB compiler would black out the screen. Also, there are all kinds of things you can do with colors. You can add fog, blur, fade, etc. If I went in all of that then I wouldn�t be able to finish. With a modified array/buffer, you can add transparency, lighting (I think), and more special effects. There�s a lot of stuff you can do to a pixel.
Now about the this specific sub. First we check to make sure the pixel is on the screen, and therefore on the array. If so, then check for the depth of the pixel, and if so, PSETify it and put in a new value for the array. Simple, right? Just say yes. Finding the pixel on a triangle will be messy. I originally only used a single sub, and I had point-point equations all over the place. Functions can incur an overhead, but they do a good job at simplifying code. I�ve tested the code so, and it does work, albeit slowly.
After this, we need a function to convert a 3d vertex to a screen pixel. I�m assuming you know how to convert 3d vertices to 2d pixels. Otherwise this isn�t the best tutorial for you.
FUNCTION fGetX (Vx AS SINGLE, Vz AS SINGLE) AS SINGLE
RETURN OffsetX + (Vx � OffsetX) * ScaleX / Vz
END FUNCTION
FUNCTION fGetY (Vy AS SINGLE, Vz AS SINGLE) AS SINGLE
RETURN OffsetY + (Vy � OffsetY) * ScaleY / Vz
END FUNCTION
The Mathematics
Now for lines. Don�t be fooled; lines aren�t as simple as they look. If the absolute value of the slope is greater than one, then there are more pixels per x than there are per y. So if we drew this type of line by iterating x, it will be spotty and incomplete. But if we iterate with x for a slope of less than 1 then it will fill out quite nicely. So if ABS(Slope)>1 THEN ITERATE Y ELSE ITERATE X. If you don�t know what I�m talking about, you will. Normally, we are taught Y=MX+B, but there�s nothing stopping us from using X=MY+B.
Goody, now for some good ol� algebra. We have a point (Px1, Py1) and point (Px2, Py2), and we want to find a point on a line made by them, which I�ll call (Px?, Py?). First, let�s get an equation from the first two. As you probably know, M = (Py2 � Py1) / (Px2 � Px1). If you like, you can use an alternate : (Py2 � Py1) / (Px2 � Px1) = -(Py1 � Py2) / (Px2 � Px1) = --(Py1 � Py2) / (Px1 � Px2) = (Py1 � Py2) / (Px1 � Px2) = M. 1-2 or 2-1, it doesn�t matter, just make sure the numerator and denominator match. I prefer the latter. And make sure Px1 <> Px2.
So now we have Y = B + X*(Py1 � Py2) / (Px1 � Px2). Now to solve for B, simple enough. Plug and chug a point. Py1 = B + Px1*(Py1 � Py2) / (Px1 � Px2). Py1 - Px1*(Py1 � Py2) / (Px1 � Px2) = B. Now plug back in to the original equation:
Y = Py1 - Px1*(Py1 � Py2) / (Px1 � Px2) + X*(Py1 � Py2) / (Px1 � Px2).
Interestingly enough, we can factor this.
Y = Py1 + (X � Px1)* (Py1 � Py2) / (Px1 � Px2)
In most algebra books, you often see this equation as: Y-Py1 = (Py1 � Py2) / (Px1 � Px2) (X � Px1) or even Y � Py1 = M * (X- Px1). It�s just convention.
And to solve for X if you iterate with Y:
X = Px1 + (Y � Py1)* (Px1 � Px2) / (Py1 � Py2).
Now why did I make you jump through these math hoops when you can look this up in an algebra book? Because (1) We need to tweak it so the computer can understand it, (2) some people understand better when they know the reasoning and how it works, and (3) I wanted to show how flexible this equation is, because we�re going to bend and twist it to find the depth and coordinates of pixels we�re looking for.
The Line
For the line sub, so you can see what I�m talking about. By the way, if you didn�t know this, but you can put the argument of functions on multiple lines if each line (except the last) ends with a _.
SUB fLine (Vx1 AS SINGLE, Vy1 AS SINGLE, Vz1 AS SINGLE, _
Vx2 AS SINGLE, Vy2 AS SINGLE, Vz2 AS SINGLE)
'Temporary coordinates
DIM AS SINGLE Vx3
DIM AS SINGLE Vy3
DIM AS SINGLE Vz3
DIM AS SINGLE Px
DIM AS SINGLE Py
'if the slope is less than 1, iterate along the x points
IF ABS(Vx1 - Vx2) > ABS (Vy1 - Vy2) THEN
FOR Vx3 = Vx1 TO Vx2 STEP ABS(Vx2-Vx1)/(Vx2-Vx1)
Vy3 = Vy1 + (Vx3 - Vx1)* (Vy1 - Vy2) / (Vx1 - Vx2)
'Now do you see the versatility of this equation?
Vz3 = Vz1 + (Vx3 - Vx1)* (Vz1 - Vz2) / (Vx1 - Vx2)
�lets get the pixel coordinates
Px = fGetX(Vx3, Vz3)
Py = fGetY(Vy3, Vz3)
�Now draw it!
fPixel(Px, Py, Vz3)
NEXT I
ELSE
FOR Vy3 = Vy1 TO Vy2 STEP ABS(Vy2-Vy1)/(Vy2-Vy1)
Vx3 = Vx1 + (Vy3 - Vy1)* (Vx1 - Vx2) / (Vy1 - Vy2)
Vz3 = Vz1 + (Vy3 - Vy1)* (Vz1 - Vz2) / (Vy1 - Vy2)
Px = fGetX(Vx3, Vz3)
Py = fGetY(Vy3, Vz3)
fPixel(Px, Py, Vz3)
NEXT I
END IF
END SUB
The Humility, and What Came of It
Ugh, I ran it and it was messy when the slope was around 1. But I�m going to use vertical lines for filling in triangles. I don�t know why it�s so messy. It makes you appreciate the existing graphics library. Well, me at least. Remember what I said about blurring? Well, this would be a good reason to use it.
The Valiant Function
Well, I could have put this in earlier but I wanted you to see the Y = Y1 + (X � X1) * (Y1 � Y2) / (X1 � X2). Well, now to make our lives easier (or not);
FUNCTION fPoint (X AS SINGLE, X1 AS SINGLE, X2 AS SINGLE,_
Y1 AS SINGLE, Y2 AS SINGLE) AS SINGLE
RETURN Y1 + (X � X1) * (Y1 � Y2) / (X1 � X2)
END FUNCTION
We�re going to use it again. So the first parameter is the accompanying coordinate you want to find. The second and third is the same coordinate type for the known point. The last two are the same type of coordinates for what you�re trying to find. If it�s too confusing (it certainly is tough for me), then use the original equation.
The Three Sided Triangle
Now for some triangles. The actual point of this tutorial. With depth testing, triangles should be draw correctly and are truncated against the screen if they�re too close. Which means no point-of-infinity and no flipped objects �behind� the eye. In theory. Notice how parameters on multiple lines can make the function look relatively neater. I could fit it on two lines, but what�s an extra line more?
SUB fTri (Vx1 AS SINGLE, Vy1 AS SINGLE, Vz1 AS SINGLE,_
Vx2 AS SINGLE, Vy2 AS SINGLE, Vz2 AS SINGLE,_
Vx3 AS SINGLE, Vy3 AS SINGLE, Vz3 AS SINGLE)
�sweeping point
DIM X AS SINGLE
DIM Top AS SINGLE
DIM Bottom AS SINGLE
DIM TopDepth AS SINGLE
DIM BottomDepth AS SINGLE
�set the points such that X1 < X2 < X3
IF Vx1 > Vx2 THEN
SWAP Vx1, Vx2
SWAP Vy1, Vy2
SWAP Vz1, Vz2
END IF
IF Vx2 > Vx3 THEN
SWAP Vx2, Vx3
SWAP Vy2, Vy3
SWAP Vz2, Vz3
END IF
IF Vx1 > Vx3 THEN
SWAP Vx1, Vx3
SWAP Vy1, Vy3
SWAP Vz1, Vz3
END IF
�draw left half of the triangle
IF Vx1<>Vx2 THEN
FOR X = Vx1 TO Vx2
Top = fPoint(X, Vx1, Vx2, Vy1, Vy2)
Bottom = fPoint(X, Vx1, Vx3, Vy1, Vy3)
TopDepth = fPoint(X, Vx1, Vx2, Vz1, Vz2)
BottomDepth = fPoint(X, Vx1, Vx3, Vz1, Vz3)
fLine(X,Top,TopDepth, X, Bottom, BottomDepth)
NEXT X
END IF
�draw right half of the triangle
IF Vx2<>Vx3 THEN
FOR X = Vx2 TO Vx3
Top = fPoint(X, Vx2, Vx3, Vy2, Vy3)
Bottom = fPoint(X, Vx1, Vx3, Vy1, Vy3)
TopDepth = fPoint(X, Vx2, Vx3, Vz2, Vz3)
BottomDepth = fPoint(X, Vx1, Vx3, Vz1, Vz3)
fLine(X,Top,TopDepth, X, Bottom, BottomDepth)
NEXT X
END IF
END SUB
The the End
If you�ve tested the code (I�ve been writing and adjusting the whole demo as I write), you�ll notice that the triangles can get quite hollow (though at farther distances they become solid). Nevertheless, I�ve tested it and the pixels that do manage to get drawn work quite well, and that is the point of this tutorial. I did have some code that solved the problem, but it was messier and had its own problems. I had two intersecting triangles and it gave me two crossing triangles, which is good enough. So you, the football player, can now get back to your program.
If you have any questions (or comments) regarding the information I covered, then feel free to ask me at milkmaroo<delThis>@suddenlink.net . Just remember to delete <delThis>; I put it there so I don�t have Spam bots finding me. Chances are that there are errors in this tutorial and in the code (though I did test it). As for my own sources, I used a variant of RelSoft�s way to fill in triangles with two points (originally I anchored a point and swept another, a horrible technique). The idea of using an array for pixels came upon me as I took a shower, though I don�t play on a football team. I�m definitely not the first to figure it out. Thanks to Pete for hosting this tutorial in the QB Express. And of course, my knowledge of FB and QB due to each respective community. Plus whomever I didn�t name.
Post Script: Of Things to Come
I�m hoping for the next tutorial to be based on more rendering. If you have some suggestions on what you want to be illustrated in rendering, then you may ask me via e-mail. Just please keep in mind that I�m still new to 3d rendering.
Download a copy of this tutorial, including source code: Depth_tutorial.zip
Download the source code individually: DEPTH.BAS and Depth_test.bas
Spring Simulation Tutorial, Part 2
Written by Michael Nissen (h4tt3n)
1. INTRODUCTION
Hello and welcome to part 2 of my little spring tutorial!
In part 1 we went through all the underlying physics that we need to know about in order to create a realistic spring simulation, and we looked at a simple one dimensional code example.
In this next part we will go 2D and look into the mysteries of damping, which we need in order to make our springs behave in a more realistic way. In order to do all this we first need to know a little bit about vectors...
2. VECTORS
When you experimented with the code example from part 1 of this tutorial, you might have noticed how the force, acceleration and velocity values could be either positive or negative as the spring bounced back and forth. Surely there has to be something wrong here, because you can't drive at -20 mph! This is because these values arent "regular" numbers but in fact one dimensional vectors.
So, what's a vector? you might ask. Put very shortly, a vector is like a "regular" number, except it has both a value and a directon. A normal number, which we also call a scalar, only has a value. To stay with the driving analogy, the speed of a car is a scalar. If we want to say something about both the speed and direction of the car we can use a vector. Vectors are commonly depicted as arrows, like this:
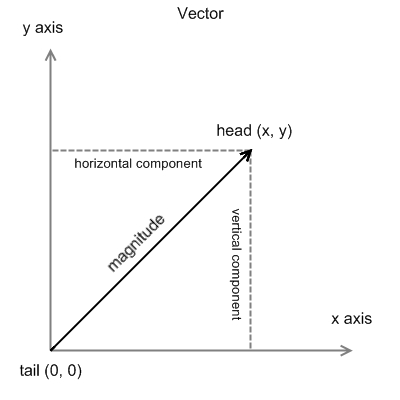
In 2D space a vector has a tail, usually at the coordianates (0, 0), and a head at the coordiates (x, y). The x and y values can be any negative or positive number, and they're called the horizontal component (x axis) and vertical component (y axis). In addition, any vector has a total length, also called the magnitude, which is defined by the distance between head and tail.
Thats a lot of things to have in mind, but all we need to do in order to use vectors in our programs is to store two numbers: the vector's length along the x and y axis, which define the position of the vector's head. Per definition the position of the tail is always (0, 0), so we don't need to store that. We don't always need to know the magnitude of the vector, so we don't calculate or store that either.
Now that we've been around the basics, let's take a look at how to use vectors in a program:
3. GOING FROM 1D TO 2D...
Once you understand the concept of vectors, going from 1D to 2D (or any dimension) is almost trivial. All that we do is use vectors instead of scalars when we calculate and store the vaules of force, acceleration, velocity and position.
Let's look at an example. This is a simple stripped-down simulation of masses and springs chained together, forming a rope-like structure:
'******************************************************************************'
'
'   Michael "h4tt3n" Nissen's FreeBasic mass-spring-damper tutorial, feb 2008
'
'   Example # 2.1
'
'   Simple two dimensional spring simulation. This program simulates an elastic
'   rope made of serially connected springs and masses. (Press esc to quit)
'
'******************************************************************************'

''  set constants. experiment with these and see how the simulation reacts
Const Pi                =     4*Atn(1)          ''  pi (better not change ^^)
Const Timestep          =     0.01              ''  timestep
Const Num_Masses        =     5              -1 ''  number of masses in rope
Const Point_Mass        =     10                ''  mass of each point mass
Const Point_Density     =     0.01              ''  density of each point mass
Const Rope_Length       =     350               ''  rope length
Const Spring_Stiffnes   =     6000              ''  spring stiffnes
Const Grav_Acc          =     800               ''  gravitational acceleration
Const Rest_Length = Rope_Length/Num_Masses      ''  rest length of each spring

''  define types
''  two dimensional vector type
Type Vector_Type
  As Single X, Y
End Type

''  mass type including force-, acceleration-, velocity-, and position vectors
Type Mass_Type
  As Single Mass, Density, Radius
  As Vector_Type Frc, Acc, Vel, Pos
End Type

''  dimension variables
Dim As Vector_Type Length, Normalised_Length, Vel
Dim As Mass_Type Mass(Num_Masses)
Dim As Single Force, Spring_Length
Dim As Integer i, i2, Scrn_Wid, Scrn_Hgt

''  set screen width, height, and bit depth
Scrn_Wid = 800
Scrn_Hgt = 600
ScreenRes Scrn_Wid, Scrn_hgt, 16

''  set startup conditions of masses
For i = 0 To Num_Masses

  With Mass(i)

    .Mass = Point_Mass
    .Density = Point_Density
    .Radius = ((.Mass/.Density)/((4/3)*pi))^(1/3)
    .Pos.x = (Scrn_Wid\2)+(i*Rest_Length)
    .pos.y = 100

  End With

Next

''  main program loop
Do

  ''  calculate the spring forces acting upon each point mass in the rope
  For i = 0 To Num_Masses-1

    i2 = i+1

    ''  spring length (Pythagoras' theorem)
    ''  (we need this to find the magnitude of the spring force)
    Length.X = Mass(i2).Pos.X-Mass(i).Pos.X
    Length.Y = Mass(i2).Pos.Y-Mass(i).Pos.Y
    Spring_Length = Sqr(Length.X*Length.X+Length.Y*Length.Y)

    ''  normalise the spring length vector
    ''  (same as finding sine and cosine to the angle between masses)
    ''  (we need this to find the direction of the spring force)
    Normalised_Length.X = Length.X/Spring_Length
    Normalised_Length.Y = Length.Y/Spring_Length

    ''  spring force (Hooke's law of elasticity)
    Force = -Spring_Stiffnes*(Spring_Length-Rest_Length)

    ''  split spring force into horizontal and vertical vector component
    ''  (each action has an equal opposite reaction, hence the - and + sign)
    Mass(i).Frc.X -= Force*Normalised_Length.X
    Mass(i).Frc.Y -= Force*Normalised_Length.Y

    Mass(i2).Frc.X += Force*Normalised_Length.X
    Mass(i2).Frc.Y += Force*Normalised_Length.Y

  Next

  ''  update acceleration, velocity, and position of point masses
  ''  (except for mass 0, which we'd like to keep fixed)
  For i = 1 To Num_Masses

    With Mass(i)

      ''  accelerate masses:
      ''  acceleration = force / mass
      .Acc.X = .Frc.X/.mass
      .Acc.Y = .Frc.Y/.mass

      ''  add gravity (downwards acceleration)
      .Acc.Y += Grav_Acc

      ''  update velocity:
      ''  delta velocity = acceleration * delta time
      ''  new velocity = old velocity + delta velocity
      .Vel.X += .Acc.X*Timestep
      .Vel.Y += .Acc.Y*Timestep

      ''  update position:
      ''  delta position = velocity * delta time
      ''  new position = old position + delta position
      .Pos.X += .Vel.X*Timestep
      .Pos.Y += .Vel.Y*Timestep

      ''  reset force vector
      .frc.x = 0
      .frc.y = 0

    End With

  Next

  ''  display the rope in graphics
  ScreenLock

    ''  clear screen
    Cls

    ''  draw springs
    For i = 0 To Num_Masses-1
      i2 = i+1
      Line (Mass(i).Pos.X, Mass(i).Pos.Y)-(Mass(i2).Pos.X, Mass(i2).Pos.Y), Rgb(64, 255, 64)
    Next i

    ''  draw masses
    For i = 0 To Num_Masses
      With Mass(i)
        Circle(.Pos.X, .Pos.Y), .Radius, Rgb(255, 64, 64),,, 1, f
      End With
    Next i

  ScreenUnlock

  Sleep 1, 1

Loop Until Multikey(1)

End
Essentially this code works exactly like the the example in part 1 of the tutorial, but the 2D environment presents some new obstacles, that we need to overcome:
Let's start out with an easy one. In order to calculate spring forces we need to know the distance between the two endpoint masses of the spring, which effectively is the same as the spring's length. In order to do that we use Pythagoras' theorem, which in short form states that for any right triangle the square on the hypotenuse is equal to the sum of the squares on the other two sides:
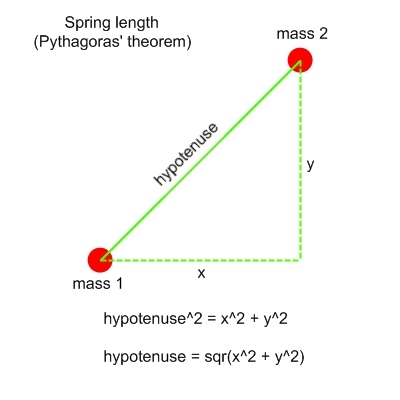
This also means that the hypotenuse - or the spring's length - is equal to the square root of the sum of the two other sides squared. This is how it might look in code:
Lng.X = Mass(2).Pos.X-Mass(1).Pos.X
Lng.Y = Mass(2).Pos.Y-Mass(1).Pos.Y
Spring_Length = Sqr(Lng.X*Lng.X+Lng.Y*Lng.Y)
Now lets move on to a slightly harder obstacle. We only keep track of the forces acting upon each mass along the x and y axis, but the springs may be rotated in any non-vertical or non-horizontal angle. This means that the endpoint masses of the springs may be influeced by forces acting on them in any possible angle.
How do we split these angled forces up into vertical and horizontal force components, which the simulation can handle?
Once again we need to look at vectors and vector math, specifically on how to normalise a vector. Normalising a vector means changing its magnitude to 1 without changing its direction. When a vector has been normalised it is called a unit vector or "hat" vector, because it is written like this... �, with a little hat on top. Normalising a vector is done by dividing all of its components by its magnitude. For 2d vector A it looks like this:
� = A/|A|
or if we look at each vector component separately
�.x = A.x/|A|
�.y = A.y/|A|
where x and y are the vector components, A is the vector, � is the normalised vector, and |A| is the magnitude of the vector. In code form it might look something like this:
Vector_magnitude = SQR(Length.X^2+Length.Y^2)
Normalized_Vector.X = Length.X/Vector_magnitude
Normalized_Vector.Y = Length.Y/Vector_magnitude
A normalised vector is so to speak stripped of any information about magnitude, it only tells us direction. Now, since the force applied by a spring is always along the spring axis - either away from or towards the spring's centre - all we need to do is normalise the spring (as if it were a vector) in order to get the force direction along the x and y axis. Thats what happens in this part of the code example:
Length.X = Mass(i2).Pos.X-Mass(i).Pos.X
Length.Y = Mass(i2).Pos.Y-Mass(i).Pos.Y
Spring_Length = SQR(Length.X^2+Length.Y^2)

Normalised_Length.X = Length.X/Spring_Length
Normalised_Length.Y = Length.Y/Spring_Length
Then we multiply the spring force with the normalized x and y vector components to get the magnitude of the force vector along the x and y axis:
Mass(i).Frc.X -= Force*Normalised_Length.X
Mass(i).Frc.Y -= Force*Normalised_Length.Y

Mass(i2).Frc.X += Force*Normalised_Length.X
Mass(i2).Frc.Y += Force*Normalised_Length.Y
Remember Newton's 3rd law from part 1? It says that for each action - or force - there is an opposite and equal reaction. This is why it says -= for one mass and += for the other.
Ok, now we got that one solved too. Before moving on to the final part, here's another code example showing a somewhat different implementation of spring physics. In this case the example simulates a number of elastic balls, which jump around and interact. Spring forces are only applied when the balls touch, making them bounce away from each other.
'******************************************************************************'
'
'   Michael "h4tt3n" Nissen's FreeBasic mass-spring-damper tutorial, feb 2008
'
'   Example # 2.2
'
'   Simple two dimensional spring simulation. This program simulates a number
'   of elasic balls which jump around and interact. (Press esc to quit.)
'
'******************************************************************************'

''  set constants. experiment with these and see how the simulation reacts.
Const Pi                =     4*Atn(1)      ''  pi (better not change ^^)
Const Timestep          =     0.01          ''  timestep (delta time)
Const Num_Balls         =     12         -1 ''  number of elastic balls
Const Mass_Min          =     400           ''  smallest elastic ball mass
Const Mass_Max          =     8000         ''  biggest elastic ball mass
Const Density           =     0.01          ''  elastic ball density
Const Spring_Stiffnes   =     5e5           ''  elastic stiffnes

''  define types
Type Vector_Type
  As Single X, Y
End Type

Type Ball_Type
  As Uinteger Col
  As Single Mass, Density, Radius
  As Vector_Type Frc, Acc, Vel, Pos
End Type

''  dimension variables
Dim As Vector_Type Dst, Vel
Dim As Ball_Type Ball(Num_Balls)
Dim As Single Force, Ball_Distance, Cos_Angle, Sin_Angle, Dist_Min
Dim As Integer i, i2, Scrn_Wid, Scrn_Hgt

''  set screen width, height, and bit depth
Scrn_Wid = 800
Scrn_Hgt = 600
ScreenRes Scrn_Wid, Scrn_hgt, 16

''  use timer to generate random numbers
Randomize Timer

''  set startup conditions of elastic balls
For i = Lbound(Ball) To Ubound(Ball)

  With Ball(i)

    .Col = RGB(64+Rnd*192, 64+Rnd*192, 64+Rnd*192)
    .Mass = Mass_Min+(i/Ubound(Ball))*(Mass_Max-Mass_Min)
    .Density = Density
    .Radius = ((.Mass/.Density)/((4/3)*pi))^(1/3)
    .Pos.x = .Radius+Rnd*(Scrn_Wid-.Radius)
    .pos.y = .Radius+Rnd*(scrn_hgt-.Radius)
    .vel.x = (Rnd-Rnd)*200
    .vel.y = (Rnd-Rnd)*200

  End With

Next

''  main program loop
Do

  ''  test all elastic balls against each other. calculate forces if they touch.
  For i = Lbound(Ball) To Ubound(Ball)-1

    For i2 = i+1 To Ubound(Ball)

      ''  distance between elastic balls (Pythagoras' theorem)
      Dst.X = Ball(i2).Pos.X-Ball(i).Pos.X
      Dst.Y = Ball(i2).Pos.Y-Ball(i).Pos.Y
      Ball_Distance = Sqr(Dst.X*Dst.X+Dst.Y*Dst.Y)
      Dist_Min = Ball(i).Radius+Ball(i2).Radius

      If Ball_Distance < Dist_Min Then

        ''  cosine and sine to the angle between Ball i and i2 (trigonometry)
        Cos_Angle = Dst.X/Ball_Distance
        Sin_Angle = Dst.Y/Ball_Distance

        ''  spring force (Hooke's law of elasticity)
        Force = -Spring_Stiffnes*(Ball_Distance-Dist_Min)

        ''  split spring force vector into horizontal and vertical component
        Ball(i).Frc.X -= Force*Cos_Angle
        Ball(i).Frc.Y -= Force*Sin_Angle
        Ball(i2).Frc.X += Force*Cos_Angle
        Ball(i2).Frc.Y += Force*Sin_Angle

      End If

    Next

  Next

  ''  update acceleration, velocity, and position of elastic balls
  ''  (using the Euler-Cromer 1st order integration algorithm)
  For i = Lbound(Ball) To Ubound(Ball)

    With Ball(i)

      ''  accelerate balls (acceleration = force / mass)
      .Acc.X = .Frc.X/.Mass
      .Acc.Y = .Frc.Y/.Mass

      ''  reset force vector
      .frc.x = 0
      .frc.y = 0

      ''  update velocity
      ''  delta velocity = acceleration * delta time
      ''  new velocity = old velocity + delta velocity
      .Vel.X += .Acc.X*Timestep
      .Vel.Y += .Acc.Y*Timestep

      ''  update position
      ''  delta position = velocity * delta time
      ''  new position = old position + delta position
      .Pos.X += .Vel.X*Timestep
      .Pos.Y += .Vel.Y*Timestep

    End With

  Next

  ''  keep elastic balls within screen boundaries
  For i = Lbound(Ball) To Ubound(Ball)

    With Ball(i)

      ''  right
      If .Pos.x > Scrn_Wid-.Radius Then
        .Vel.X = -.vel.x
        .pos.x = Scrn_Wid-.Radius
      End If
      ''  left
      If .Pos.x < .Radius Then
        .Vel.X = -.vel.x
        .pos.x = .Radius
      End If
      ''  bottom
      If .Pos.Y > Scrn_Hgt-.Radius Then
        .vel.y = -.vel.y
        .pos.y = Scrn_Hgt-.Radius
      End If
      ''  top
      If .Pos.Y < .Radius Then
        .vel.y = -.vel.y
        .pos.y = .Radius
      End If

    End With

  Next

  ''  display elastic balls in graphics
  ScreenLock

    ''  clear screen
    Cls

    ''  draw elastic balls
    For i = Lbound(Ball) To Ubound(Ball)
      With Ball(i)
        Circle(.Pos.X, .Pos.Y), .Radius    , .Col,,, 1
        Circle(.Pos.X, .Pos.Y), .Radius-0.5, .Col,,, 1
        Circle(.Pos.X, .Pos.Y), .Radius-1.0, .Col,,, 1
      End With
    Next i

  ScreenUnlock

  Sleep 1, 1

Loop Until Multikey(1)

End
4. DAMPING
In the beginning of part 1 of this tutorial I mentioned that the correct technical term is mass-spring-damper system. We've been around masses and springs, but what about dampers?
In the previous code examples you've probably noticed how the springs and rubberballs keep on bouncing - apparently forever - once they've been prodded into movement. We don't see this behaviour in real life, and damping is simply a way of reducing this effect in a somewhat physically plausible way.
Damping a simulated spring works a little like the damper inside a car spring. Without damping the car would bounce up and down for quite a while every time it hit a bump on the road. On the other hand a car with oversized, hard dampers would be very rigid, because they counter the effect of the spring. If you get springs and dampers adjusted just right, you've got a spring that serves your need and at the same time stops bouncing very quickly - like a real world spring.
So, how do we simulate spring damping? Again we need to look at some vector math. First we need to look at the so called dot product of two vectors. Vectors are different from scalars in the way that they can be multiplied by each other in several different ways. The one we are interested in is called the dot product or scalar product, because the result is expressed as a "regular" scalar number.
Let's look at scalar s and 2d vectors A and B. This is how for example "s equals A dot B" is written on paper:
s = A . B (except the dot is a bit higher up)
And this is what it means:
s = A.x * B.x + A.y * B.y
Or in plane words... the product of the horizontal components is added to the product of the vertical components. The useful thing about the dot product is that
A . B = |A| * |B| * cos(v)
where A and B are 2d vectors, |A| and |B| is the magnitude of A and B, and v is the angle between the two vectors.
Next we need to look at how to do a so called scalar projection of one vector onto another vector, as shown in this illustration:
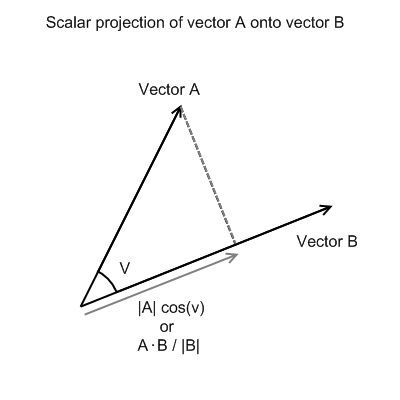
Basically what we do is find out how long a line we would get if we flattened vector A out on vector B, or if we "cast the shadow" of A at a right angle onto B. The scalar projection of A onto B is equal to
|A| * cos(v)
where |A| is the magnitude of A, and v is the angle between vector A and B.
Since we already know that
A . B = |A| * |B| * cos(v)
then we can see that
A . B / |B| = |A| * cos(v)
Or in other words that the scalar projection of A onto B is equal to A dot B divided by the magnitude of B. Now look at this image where we find the scalar projection of the velocity vector on the spring vector:
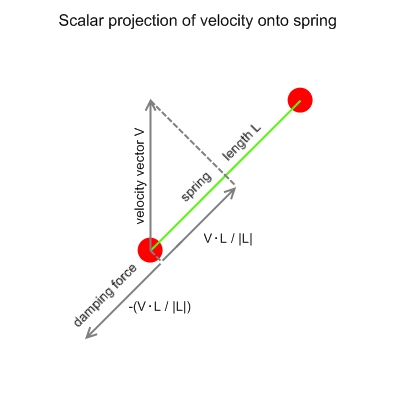
Notice the arrow called damping force? It is simply the negative value of the scalar projection of the velocity vector onto the spring. And it is the heart of our damping algorithm! This force has two very useful qualities:
-It always has the right direction. It always pushes the endpoint mass in the opposite direction of its velocity, thus slowing it down.
-It always has the right size. If the velocity vector is perpendicular to the spring, then the scalar projection and therefore the damping force is very small. If the velocity vector is almost parallel to the spring, then the scalar projection and damping force is big.
The damping force - which is a scalar - is subtracted from the spring force before this is split up into a horizontal and vertical component, so it will always work along the spring axis and never dampen the "sideways" or perpendicular movement of the spring masses.
Voila! And it actualy works. Take a look at this code sample. It is exactly like the first one, except damping has been added:
'******************************************************************************'
'
'   Michael "h4tt3n" Nissen's FreeBasic mass-spring-damper tutorial, feb 2008
'
'   Example # 2.3
'
'   Simple two dimensional spring simulation. This program simulates an
'   elastic rope made of serially connected springs and point masses.
'   Damping is added, which makes the rope look more realistic.
'   (Press esc to quit)
'
'******************************************************************************'

''  set constants. experiment with these and see how the simulation reacts
Const Pi                =     4*Atn(1)          ''  pi (better not change ^^)
Const Timestep          =     0.01              ''  timestep
Const Num_Masses        =     5             -1 ''  number of masses in rope
Const Point_Mass        =     10                 ''  mass of each point mass
Const Point_Density     =     0.01              ''  density of each point mass
Const Rope_Length       =     350               ''  rope length
Const Spring_Stiffnes   =     6000             ''  spring stiffnes
Const Spring_Damping    =     2e2              ''  spring damping
Const Grav_Acc          =     800              ''  gravitational acceleration
Const Rest_Length = Rope_Length/Num_Masses      ''  rest length of each spring

''  define types
Type Vector_Type
  As Single X, Y
End Type

Type Mass_Type
  As Single Mass, Density, Radius
  As Vector_Type Frc, Acc, Vel, Pos
End Type

''  dimension variables
Dim As Vector_Type Lng, Norm_Lng, Vel
Dim As Mass_Type Mass(Num_Masses)
Dim As Single Force, Spring_Length
Dim As Integer i, i2, Scrn_Wid, Scrn_Hgt

''  set screen width, height, and bit depth
Scrn_Wid = 800
Scrn_Hgt = 600
ScreenRes Scrn_Wid, Scrn_hgt, 16

''  set startup conditions of masses
For i = Lbound(Mass) To Ubound(Mass)
  With Mass(i)
    .Mass = Point_Mass
    .Density = Point_Density
    .Radius = ((.Mass/.Density)/((4/3)*pi))^(1/3)
    .Pos.x = (Scrn_Wid\2)+(i*Rest_Length)
    .pos.y = 100
  End With
Next

''  main program loop
Do

  ''  calculate the forces acting upon each point mass in the rope
  For i = Lbound(Mass) To Ubound(Mass)-1

    i2 = i+1

    ''  spring length (Pythagoras' theorem)
    Lng.X = Mass(i2).Pos.X-Mass(i).Pos.X
    Lng.Y = Mass(i2).Pos.Y-Mass(i).Pos.Y
    Spring_Length = Sqr(Lng.X*Lng.X+Lng.Y*Lng.Y)

    ''  normalise the distance vector
    ''  (same as finding cosine and sine to the angle)
    Norm_Lng.X = Lng.X/Spring_Length
    Norm_Lng.Y = Lng.Y/Spring_Length

    ''  relative velocity (needed for damping, see below)
    Vel.X = Mass(i2).Vel.X-Mass(i).Vel.X
    Vel.Y = Mass(i2).Vel.Y-Mass(i).Vel.Y

    ''  spring force (Hooke's law of elasticity)
    Force = -Spring_Stiffnes*(Spring_Length-Rest_Length)

    ''  spring damping
    ''  (scalar projection of velocity vector onto spring)
    Force -= Spring_Damping*((Lng.X*Vel.X+Lng.Y*Vel.Y)/Spring_Length)

    ''  split spring force vector into horizontal and vertical component
    ''  (each mass moves in opposite directions, hence the - and + sign)
    Mass(i).Frc.X -= Force*Norm_Lng.X
    Mass(i).Frc.Y -= Force*Norm_Lng.Y
    Mass(i2).Frc.X += Force*Norm_Lng.X
    Mass(i2).Frc.Y += Force*Norm_Lng.Y

  Next

  ''  update acceleration, velocity, and position of point masses
  ''  (using the Euler-Cromer 1st order integration algorithm)
  For i = Lbound(Mass)+1 To Ubound(Mass)

    With Mass(i)

      ''  accelerate masses (acceleration = force / mass)
      .Acc.X = .Frc.X/.mass
      .Acc.Y = .Frc.Y/.mass

      ''  add gravity (downwards acceleration)
      .Acc.Y += Grav_Acc

      ''  update velocity
      ''  delta velocity = acceleration * delta time
      ''  new velocity = old velocity + delta velocity
      .Vel.X += .Acc.X*Timestep
      .Vel.Y += .Acc.Y*Timestep

      ''  update position
      ''  delta position = velocity * delta time
      ''  new position = old position + delta position
      .Pos.X += .Vel.X*Timestep
      .Pos.Y += .Vel.Y*Timestep

      ''  reset force vector
      .frc.x = 0
      .frc.y = 0

    End With

  Next

  ''  display the rope in graphics
  ScreenLock

    ''  clear screen
    Cls

    ''  draw springs
    For i = Lbound(Mass) To Ubound(Mass)-1
      i2 = i+1
      Line (Mass(i).Pos.X, Mass(i).Pos.Y)-(Mass(i2).Pos.X, Mass(i2).Pos.Y), Rgb(64, 255, 64)
    Next i

    ''  draw point masses
    For i = Lbound(Mass) To Ubound(Mass)
      With Mass(i)
        Circle(.Pos.X, .Pos.Y), .Radius, Rgb(255, 64, 64),,, 1, f
      End With
    Next i

  ScreenUnlock

  Sleep 1, 1

Loop Until Multikey(1)

End
That's it, hope you had fun. In part 3 we will take a closer look at friction forces and go 3D. Homework until then is to add damping to the elastic ball code sample and experiment with it ^^
Cheers, Michael
Download all three of the code_examples.zip, or get them individually: 1 2 3
CGI and QBasic
Written by Dean Menezes
Introduction
The Common Gateway Interface (CGI) is a standard
protocol for interfacing external application software
with an information server, commonly a web server.
The task of such an information server is to respond
to requests (in the case of web servers, requests from
client web browsers) by returning output. Each time a
request is received, the server analyzes what the
request asks for, and returns the appropriate output.
The two simplest ways, for the server, of doing this
are the following:
- if the request identifies a file stored on disk, return the contents of that file;
- if the request identifies an executable command and possibly arguments, run the command and return its output
CGI defines a standard way of doing the second. It
defines how information about the server and the
request is passed to the command in the form of
arguments and environment variables, and how the
command can pass back extra information about the
output (such as the type) in the form of headers.
CGI is usually used with Python and Perl. However,
there is nothing to stop you from using FORTRAN, C, or
even QBASIC.
Which brings us to...
THE QBASIC CGI TUTORIAL:
The first task is to write a very simple program which
just prints out an HTML document. This should include
all the usual <head> ... </head> and <title> ...
</title> commands. However, there are two things to
note.
First of all, the first two lines of the print out are
special. The first line must be
Content-type: text/html
so that the browser knows what kind of document it is
and therefore how to display it. In this case it is a
text document of the subclass HTML. You can also send
back plain ASCII documents by using text/plain
instead. Sound samples and images also have to have
the content type specified appropriately. The second
line must be blank (ie it must contain just a line
feed). This line is reserved for future development.
Let's try it:
PRINT "Content-type: text/html;charset=us-ascii"
PRINT
PRINT "<!DOCTYPE HTML PUBLIC " + CHR$(34) +
"-//W3C//DTD HTML 4.01//EN" + CHR$(34)
PRINT CHR$(34) +
"http://www.w3.org/TR/html4/strict.dtd" + CHR$(34) +
">" ' DOCTYPE declaration
PRINT "<html>"
PRINT "<head>"
PRINT "<title>Hello World</title>"
PRINT "</head>"
PRINT "<body>"
PRINT "<h1>Hello, World!</h1>"
PRINT "<p>"
PRINT "<a
href='http://validator.w3.org/check?uri=referer'> <img
"
PRINT "
src='http://www.w3.org/Icons/valid-html401'"
PRINT "    alt='Valid HTML 4.01 Strict' height='31'
width='88'>"
PRINT "</a>"
PRINT "</p>"
PRINT "</body>"
PRINT "</html>"
END
HTML allows us to use single quotes to quote
attributes, so we don't have to use CHR$(34).
To connect this to the internet, you use your web
server program. Two web server programs are Apache
and Abyss.
Abyss - http://en.wikipedia.org/wiki/Abyss_Web_Server
Apache - http://en.wikipedia.org/wiki/Apache_HTTP_Server
I was sucessfully able to get a CGI program that was
compiled with QB 7.1 running using Abyss. You may
also be able to configure it so it runs the code using
QBASIC /RUN
To set up a CGI program in Abyss:
In the Scripting Parameters dialog, use the
Interpreters table to add the QBASIC interpreter and
the filename extensions it handles. Alternately, add
the program to the list of scripts (screenshot:
http://img149.imageshack.us/img149/752/cgiwu5.png)
When a CGI script is called several environment variables are set.
These variables include:
SERVER_SOFTWARE
SERVER_NAME
GATEWAY_INTERFACE = CGI/1.1
SERVER_PROTOCOL = HTTP/1.1
SERVER_PORT = 80
REQUEST_METHOD (either GET or PUT)
HTTP_ACCEPT
PATH_INFO
PATH_TRANSLATED
SCRIPT_NAME (name of the script)
QUERY_STRING = (string which you got using GET)
REMOTE_HOST =
REMOTE_ADDR (user's IP)
REMOTE_USER =
CONTENT_TYPE =
CONTENT_LENGTH =
You can access these using the ENVIRON$ function.
Usually the information supplied by the QUERY_STRING
variable should come from the user pressing buttons
and entering text in the HTML document. It is this
information we would like to package up and send to
the CGI script. Each group of buttons and text boxes
is called a form, and forms are enclosed between the
HTML tags <form> ... </form>. You also have to tell it
the URL to send the information to, and how the
information is sent. The result is something like
this:
A submit button is the input device that actually
calls the URL. It has a value which is the message
that appears on the button. Here is the code for a
form with just a submit button in it. When you click
on the submit button the URL specified in the form's
action is called.
<form action="whatever.exe"
     method="GET">
<input type="submit" value="Click me">
</form>
A checkbox is a simple on/off button. A checkbox has a
name (its key) and a value that this key has when the
box is checked. As an example, here is the HTML code
for a form with a checkbox and a submit button in it.
<form action="whatever.exe" method="GET">
<input type="checkbox" name="lights" value="on">
<input type="submit" value="Do it">
</form>
Now if the submit button is clicked when the box is
checked then the information lights=on is packaged
into QUERY_STRING. However if the box is not checked
then no information is packaged into QUERY_STRING and
it remains empty. You have to add the message to the
textbox as ordinary HTML text.
Radio buttons are just like checkboxes except they are
grouped together and only one button in the group may
be selected at a time. All the buttons in a group must
have the same name and each one should have a
different value. You can also specify which buttons
(if any) are checked initially. When the submit button
is clicked the name and the value of the selected
button are packaged up for QUERY_STRING.
Here is some example code for five such buttons. They
are all of type radio, and are in the group named
cert. The 15 button is checked initially.
<form action="whatever.exe"
     method="GET">
<input type="radio" name="cert" value="u">  U
<input type="radio" name="cert" value="pg"> PG
<input type="radio" name="cert" value="12"> 12
<input type="radio" name="cert" value="15" checked="checked"> 15
<input type="radio" name="cert" value="18"> 18
<input type="submit" value="Certify">
</form>
Text input devices. These are simply boxes into which
the user can enter some text which is then packaged up
under a particular name. Here is some example code for
two text boxes and a submit button. The <br> tag
causes a line break.
<form action="whatever.exe" method="GET">
Director: <input type="text" name="dir">  <br>
Producer: <input type="text" name="prod">
<input type="submit" value="Fire">
</form>
You can use single quotes instead of double quotes if
you want it to work easier in QBASIC.
Example:
DECLARE FUNCTION FACTOR& (N&)
DEFLNG A-Z
PRINT "Content-type: text/html;charset=us-ascii"
PRINT
PRINT "<!DOCTYPE HTML PUBLIC " + CHR$(34) + "-//W3C//DTD HTML 4.01//EN" + CHR$(34)
PRINT CHR$(34) + "http://www.w3.org/TR/html4/strict.dtd" + CHR$(34) + ">"
PRINT "<html>"
PRINT "<head>"
PRINT "<title>Factor Tree</title>"
PRINT "</head>"
PRINT "<body>"
PRINT "<pre>"
QSTR$ = UCASE$(ENVIRON$("QUERY_STRING"))
N = VAL(MID$(QSTR$, INSTR(QSTR$, "NUM=") + 4))
DO
x = FACTOR(N)
IF x = -1 THEN PRINT TAB(43); N: EXIT DO
PRINT x; "<"; STRING$(39 - LEN(STR$(x)), "-"); "|"; N
PRINT SPACE$(41); "|"
N = N \ x
LOOP
PRINT "</pre>"
PRINT "<form action='factor.exe' method='GET'>"
PRINT "<p>"
PRINT "<input type='text' size='11' name='num' >"
PRINT "<input type='submit' value='Factor!' >"
PRINT "</p>"
PRINT "</form>"
PRINT "<p>"
PRINT "<a href='http://validator.w3.org/check?uri=referer'> <img "
PRINT "src='http://www.w3.org/Icons/valid-html401'"
PRINT "    alt='Valid HTML 4.01 Strict' height='31'
width='88'>"
PRINT "</a>"
PRINT "</p>"
PRINT "</body>"
PRINT "</html>"
END

FUNCTION FACTOR (N)
FOR I = 2 TO SQR(N)
IF (N MOD I) = 0 THEN FACTOR = I: EXIT FUNCTION
NEXT
FACTOR = -1
END FUNCTION
Sometimes, getting lost is the most straightforward path to finding ourselves.
Download a copy of this tutorial: cgi_and_qbasic.txt
Commodore Wedge Reinvented
Written by Kiyote Wolf
Most QBasic programmers remember C= 64 programming since the two were around at the same time. If anybody used a Commodore, they are probably familiar with the term Wedge, a small assembly language routine that rides the screen update at 60 Hz to do stuff automatically, such as monitor keys, play music or update sprites, or more than likely all three at once.
I still have my old QBasic manual, and looking over it for hours on end I finally figured out how to recreate the Wedge interrupt program in a QBasic program. We use the PLAY statement, which creates an interrupt when the play buffer queue gets low to leapfrog out of our code into a side routine and do something useful, then let it leap back to our regular code.
I have been searching my code for an example of this and have since lost the example, but re-coding it (with maybe one error,.. maybe not..) is quite easy. First, set your ON PLAY statement to jump to your Wedge code (your small routine), and set PLAY ON so when the buffer goes empty it will automatically run your Wedge code. Next, initalize your variable, and get your code up to speed, and when you get to the loop of your main routine, just before it put PLAY "T200P32P32". With PLAY ON flagged as ON, your code will now interrupt itself every time the first delay is over, because the only "note" left in the buffer is another "rest", because it is in QBasic to jump to the ON PLAY vector when the buffer drops to only 1 note left. Now, to interrupt this constant Wedge code jumping, simply enter PLAY OFF somewhere in your code to give you main routine full attention again, but if you want to re-enable the Wedge code, make sure you give it a push to start moving again, set PLAY ON and then another PLAY "T200P32P32" statement after to trigger the vector jump again.
The code will still run itself until the buffer catches up, but once it has finished all the "rests" in the queue, the Wedge code will not run again until you let it and then push it into action again. Now, this is of course going to happen very fast, and I'm quite sure that it is not a steady beat because of the haphazard way code is going to process at different speeds. You are going to find that high priority commands such as disk access and most anything is going to run until it is done with the CPU, and then once that task is finished, then next code that will run is going to be your Wedge code. Now because the Wedge code is not stable like a heartbeat, what you can do to moderate it's actions is tie it's reactions into the TIMER or TIME functions to see how much real time occurs between callings of itself, or just don't worry about the differences in time slices because it happens so quickly anyway. Whatever you prefer will of course prevail.
Now, one major bit of information on this, is routines that access memory directly using the DEF SEG routines are drastically going to be affected, especially if your wedge code uses DEF SEG routines of it's own. I have already ran into this and have a solution already. Even though DEF SEG is a regular QBasic command, simply push the DEF SEG command into a SUB or FUNCTION to keep track of the code segment memory address that was fed to it, and make that value a global variable that your Wedge code can find and set the SEG back to when it's done goofing off. That way, if your Wedge code is updating sprites while your main routine is off updating your sprite memory array, your SEG will not be left skewed off course and run the risk of crashing your program. Getting used to a DEF SEG .. SUB is not that hard to do, especially after getting the full use of having a Wedge code piece in your QBasic games can do.
Lastly, the Wedge code is going on, even as it is running itself, so you have to force it not to allow recursion of itself. How do I .. what?? Ok.. what you do is when the Wedge code first runs, have it check for a global flag to tell itself that it is running once already, and if so, return to the regular code without running. After a test for an instance goes false, meaning this code is running only one copy of itself, right after that test, set the global flag to tell itself it's running. The flag set now, set PLAY OFF so the remaining "rests" in the queue die off and get kicked by the "busy flag" test. Now your Wedge code is running. Do your fun stuff.. sing a song,.. move a pixel.. whatever.. Now, if there was a DEF SEG address saved, re-set that flag so the main code will have it's code segment set, then set PLAY ON, then right before the code goes RETURN, do another WorkingFlag = 0 then PLAY "T200P32P32".
*** Example that works

ON PLAY(1) GOSUB STOPHERE
PLAY ON

PLAY "T200P32P32"
SCREEN 0: WIDTH 80, 25: CLS

REM MAIN LOOP
DO
  PRINT "HI WORLD"
  t = TIMER: WHILE TIMER - t < .1: WEND
  COLOR INT(RND(1) * 6) + 1
LOOP

REM WEDGE CODE
STOPHERE:
IF WORKING THEN RETURN
WORKING = -1
PLAY OFF
PRINT "INTERRUPTING COW"
PLAY ON
WORKING = 0
PLAY "T600P32P32"
RETURN
You can use this code to do lots of stuff in the background. Instead of wasting precious cycles doing a blank dull timer to keep your code from running too fast, you can use this to one, slow your code down a tiny bit or more if you code it to, and two, use this code to make things simultaneous, or to watch for things without having to code complex jumping routines to make your program crazy. You can do all this in the background without having to even reference the code in question.
I hope people can use this, because I think it's great to have the C= 64 Wedge back again.
P.S. One drawback of this routine is it will toggle the PC speaker, so at different operating speeds, you may notice strumming of the PC speaker that sounds like a light hum, or maybe more annoying noise, but generally you shouldn't even hear a thing with it. If you use DOSBOX to run and your code already uses the Soundblaster, simply disable the PC speaker if you do encounter this phantom noise. You cannot use standard PLAY statements while this routine operates or even SOUND, since they use the same port to do the same function, so use a Soundblaster bit of code of some kind in your program, or just no sound at all. Other people should be able to drop the volume of the internal speaker on their sound settings, but do not mute it. If you mute it, it will probably enable the speaker internally which will just do the same thing, just drop the volume to zero on the slider.
KW 2/9/08
Download a copy of this tutorial: commodore_wedge.txt
FreeBASIC File/Folder Management
by Stephane Richard (MystikShadows)
NOTE: This tutorial was originally published in PCopy! Issue #40, and is being republished in QB Express this month due to a request for an article on this topic in the QB Express Article Requests thread.
INTRODUCTION:
Many times when programming an application (or even games) you find
yourself coming across the subject of creating files folders (or deleting
them) for more than one reason. Luckily FreeBASIC has everything we need
to help us with all of these functionalities.
In this tutorial I'll cover all of the file/folder oriented statements
and functions that exist in FreeBASIC and well see how and when they can
be used in order to bring some good standard file and folder management
functionality to your programming projects. So let's start off with a
little reference of the commands we'll be using and take it from there.
FREEBASIC FILE AND FOLDER COMMANDS AND FUNCTIONS:
There are several commands and functions available to create, delete,
manage files and folders.
- NAME: CHDIR
SYNTAX: CHDIR
"Drive:\Path"
Result = CHDIR("Drive:\Path")
This function simply goes to
the folder specified as a parameter. This path can include drive name
and path.
- NAME: CURDIR | CURDIR$
SYNTAX:
CURDIR$
CurrentPath = CURDIR$
This function returns the current path
that the system is currently in. If you change folder with the CHDIR
command above and display CURDIR$ again you'll see that it changed to
reflect the new folder location.
- NAME: DIR | DIR$
SYNTAX: DIR FileSpec,
AttribMask, OutAttrib
CurrentFile = DIR("*.*", fbDirectory)
This function looks in
the current path (or in the specified folder) for the occurrence of the
file specification passed in the first parameter. If it finds it, it will
return the name of the first occurrence. If it does not find it, it will
return an empty string (""). Once a first file is found you can use the
DIR() function without parameters in a loop to get the following
occurrences of the file specification you are looking for (more on this
later. fbDirectory and other constants are defined in "dir.bi" include
file.
- NAME: KILL
SYNTAX: KILL
"FileSpecification"
Result = KILL("*.TMP")
This function deletes the file
specification from either the current folder or the folder specified in
the parameter. If the deletion went well, a 0 will be returned. If an
error occurred, that error number will be returned by the KILL function.
- NAME: MKDIR
SYNTAX: MKDIR
"FolderName"
Result
= MKDIR("MyNewFolder\MyNewSubFolder")
This function creates a
folder in the local file system. It will return zero (0) if it worked,
or minus one (-1) if an error occurred.
- NAME: NAME
SYNTAX: NAME "OldName",
"NewName"
Result =
NAME("OldName.Ext", "NewName.Ext")
This function renames a file
to a new given name. It can also rename a group of files using file
masks. IF it works it will return zero (0). If some error occurred and
the file could not be renamed, an error number will be returned by the
function.
- NAME: RMDIR
SYNTAX: RMDIR
"FolderName"
Result
= RMDIR("C:\TEMP\")
This function will attempt to remove a
directory from the specified path or current folder (if just a folder
name is specified as a parameter). It will return zero (0) if everything
worked or minus one (-1) if an error occurred. RMDIR will not remove a
folder in which a file exists.
And now that we have the reference material we need let's see what we
can do with them. We will take each one and see how to use them in given
situations and perhaps implement some safeguards in code to help minimize
errors that could occur. For this we will create our own little
COMMAND.COM so to speak. A little program that will accept input from the
user and perform the current actions required by the commands we'll enter
in the system.
BUILDING OUR OWN COMMAND PROCESSOR:
As a first note, I'd like to point out that this will be a very
simplistic command processor. it's purpose is to highlight the FreeBASIC
commands and functions for file/folder manipulation, so it will essentially
be a simple loop with string manipulation to decipher the commands
entered. But it will be something functional that can later be altered to
perform as expected. It will not allow to execute other files for
examples, just internal commands for the purpose of this tutorial. The
sample program created here can be acquired from
this link so you don't have to type or edit anything.
First off we'll create the core processor/command acquisition system
and we'll add commands to it as we progress in this tutorial. The
framework itself shown here has functions to get parts of the entered
command, this is how we'll know which command has been entered and what to
do with them.
' -------------------------------------
'  BASIC command processor application
'          by MystikShadows
' -------------------------------------

#INCLUDE "dir.bi"

' -------------------------------
'  Sub and Function Declarations
' -------------------------------
DECLARE SUB PrintApplicationInformation()
DECLARE SUB DisplayHelpScreen()
DECLARE SUB ProcessCommand(ToBeProcessed AS STRING)
DECLARE FUNCTION GetWordCount(WorkString AS STRING) AS INTEGER
DECLARE FUNCTION GetWordNumber(WorkString AS STRING, WordNumber AS LONG) AS STRING

' -----------------------------
'  Needed Constant Definitions
' -----------------------------
CONST False = 0
CONST True  = NOT False

CONST HeaderColor  = 15 ' White
CONST InfoColor    = 11 ' Light Cyan
CONST CommandColor = 14 ' Yellow
CONST ErrorColor   = 12 ' Light Red
CONST ResultColor  = 10 ' Light Green

' -------------------------
'  Needed Global Variables
' -------------------------
DIM SHARED CurrentCommand AS STRING
DIM SHARED CanExit        AS INTEGER

' ------------------------------------------------------
'  Start by displaying the title and general information
' ------------------------------------------------------
WIDTH 80, 50
COLOR 7, 1
CLS
CALL PrintApplicationInformation()

' -----------------------------------------------------
'  Main loop where commands are acquired and processed
' -----------------------------------------------------
DO WHILE CanExit = False
   ' ---------------------------
   '  Get command from the user
   ' ---------------------------
   COLOR CommandColor, 1
   PRINT "->";
   INPUT CurrentCommand
   CALL ProcessCommand(CurrentCommand)
   ' -------------------------------------------
   '  We Clear the command, ready for a new one
   ' -------------------------------------------
   CurrentCommand = ""

LOOP

' ========================================================
'  NAME........: PrintApplicationInformation()
'  PARAMETERS..: None
'  RETURN......: No value
'  ASSUMES.....: Nothing
'  CALLED FROM.: Main Program Loop
' --------------------------------------------------------
'  DESCRIPTION.: This Sub simply displays some regular
'                information to the user about this
'                current program
' ========================================================
SUB PrintApplicationInformation()

    COLOR HeaderColor, 1
    PRINT "MystikShadow's Command Processor Application"
    PRINT "Version 1.00a"
    PRINT
    COLOR InfoColor, 1
    PRINT "Type 'HELP' for a list of commands"
    PRINT "Type 'EXIT' to end the program"
    PRINT

END SUB

' ========================================================
'  NAME........: DisplayHelpScreen()
'  PARAMETERS..: None
'  RETURN......: No Value
'  ASSUMES.....: Nothing
'  CALLED FROM.: The Main Program Loop
' --------------------------------------------------------
'  DESCRIPTION.: This Sub displays a list of valid
'                commands available to the user. So that
'                he/she can learn the allowed commands.
' ========================================================
SUB DisplayHelpScreen()

    COLOR ResultColor, 1
    PRINT "Valid Commands Are:"
    PRINT
    PRINT "TIME                       Returns The Current Time"
    PRINT "DATE                       Returns The Current Date"
    PRINT "CD []            Returns Current Path or Changes to PathName"
    PRINT "DIR     Lists files that match FileSpecification
    PRINT "REN      Renames an existing file to a new name"
    PRINT "RENAME   Renames an existing file to a new name"
    PRINT "MD             Creates a Directory on the Disk"
    PRINT "RD             Removes a Directory from the disk"
    PRINT "DEL     Removes a Directory from the disk"
    PRINT "DELETE  Removes a Directory from the disk"
    PRINT
END SUB

' ========================================================
'  NAME........: ProcessCommand()
'  PARAMETERS..: ToBeProcessed AS STRING
'  RETURN......: No Value
'  ASSUMES.....: ToBeProcessed Is Not Empty
'  CALLED FROM.: Main Program Loop
' --------------------------------------------------------
'  DESCRIPTION.: This Sub is the main core of the program
'                it will take the passed command in it's
'                parameter, parse it and perform the
'                corresponding action.
' ========================================================
SUB ProcessCommand(ToBeProcessed AS STRING)

    ' -------------------------------------
    '  First we take care of easy commands
    ' -------------------------------------
    COLOR ResultColor, 1
    SELECT CASE TRIM$(UCASE$(ToBeProcessed))
           CASE "HELP"
                CALL DisplayHelpScreen()
                EXIT SUB
           CASE "QUIT"
                CLS
                END
    END SELECT

END SUB

' ========================================================
'  NAME........: GetWordCount()
'  PARAMETERS..: WorkString AS STRING
'  RETURN......: 0 Or the number of words
'  ASSUMES.....: WorkString is valid string with contents
'  CALLED FROM.: ProcessCommand()
' --------------------------------------------------------
'  DESCRIPTION.: This function accepts a string as a
'                parameter, peruses it and accumulates
'                the number of words it finds in the
'                string.
' ========================================================
FUNCTION GetWordCount(WorkString AS STRING) AS INTEGER

    ' ----------------
    '  Work Variables
    ' ----------------
    DIM  Counter      AS LONG
    DIM  WordCounter  AS LONG
    DIM  Position     AS LONG
    DIM  Skipper      AS LONG

    ' ----------------------
    '  Initialize Variables
    ' ----------------------
    WordCounter  = 1
    Position     = 1
    ' ---------------------------------------------------------
    '  First we put ourselves at the beginning of the 1st word
    ' ---------------------------------------------------------
    IF MID$(WorkString, Position, 1) = " " THEN
       DO WHILE MID$(WorkString, Position, 1) = " "
          Position = Position + 1
       LOOP
    END IF
    ' --------------------------------------
    '  Then we start the Word Count Process
    ' --------------------------------------
    FOR Counter = Position TO LEN(WorkString)
        IF MID$(WorkString, Counter, 1) = " " THEN
           WordCounter = WordCounter + 1
           DO WHILE MID$(WorkString, Counter, 1) = " "
              Counter = Counter + 1
           LOOP
        END IF
    NEXT Counter
    ' ----------------------------------------
    '  Return the number of words accumulated
    ' ----------------------------------------
    GetWordCount = WordCounter

END FUNCTION

' ========================================================
'  NAME........: GetWordNumber()
'  PARAMETERS..: WorkString AS STRING
'                WordNumber AS LONG
'  RETURN......: "" Or the desired word Number
'  ASSUMES.....: WorkString has contents, WordNumber > 0
'  CALLED FROM.: ProcessCommand()
' --------------------------------------------------------
'  DESCRIPTION.: This function accepts a string and a
'                Word Number as parameters, it then finds
'                the given word number and returns it to
'                the calling function.
' ========================================================
FUNCTION GetWordNumber(WorkString AS STRING, WordNumber AS LONG) AS STRING

    ' ----------------
    '  Work Variables
    ' ----------------
    DIM  Counter      AS LONG
    DIM  WordCounter  AS LONG
    DIM  Position     AS LONG
    DIM  Skipper      AS LONG
    DIM  ReturnString AS STRING

    ' ----------------------
    '  Initialize Variables
    ' ----------------------
    WordCounter  = 1
    Position     = 1
    ReturnString = ""
    ' ---------------------------------------------------------
    '  First we put ourselves at the beginning of the 1st word
    ' ---------------------------------------------------------
    IF MID$(WorkString, Position, 1) = " " THEN
       DO WHILE MID$(WorkString, Position, 1) = " "
          Position = Position + 1
       LOOP
    END IF
    ' --------------------------------------
    '  Then we start the Word Count Process
    ' --------------------------------------
    FOR Counter = Position TO LEN(WorkString)
        IF MID$(WorkString, Counter, 1) = " " THEN
           WordCounter = WordCounter + 1
           DO WHILE MID$(WorkString, Counter, 1) = " "
              Counter = Counter + 1
           LOOP
        END IF
        ' ----------------------------------------------------------
        '  If it's the wanted word number we put it in ReturnString
        ' ----------------------------------------------------------
        IF WordCounter = WordNumber THEN
           IF MID$(WorkString, Counter, 1) <> " " THEN
              ReturnString = ReturnString + MID$(WorkString, Counter, 1)
           END IF
        END IF
    NEXT Counter
    ' ---------------------------------
    '  Return the word in ReturnString
    ' ---------------------------------
    GetWordNumber = ReturnString

END FUNCTION
What this does code so far is wait for the user to enter a command in the
system. Once entered, the ProcessCommand() subroutine is called. As you
can see from the code to ProcessCommand() subroutine so far we manage two
commands HELP and QUIT. The last two functions you see in the code are the
string manipulation function we'll need to get the different parts of the
command entered by the user. If you compile the program like it is now,
run it and enter the help command. Here's what you will see on the screen:
After that, just enter EXIT to leave the program. The command list you
see on the screenshot are the commands we will be implementing in this
tutorial. Four of the commands (CLS, TIME, DATE and CD without parameters
are very easy to code for so in the ProcessCommand we'll just add CASE
statements for each of them. Here's what the ProcessCommand() subroutine
should look like:
	SUB ProcessCommand(ToBeProcessed AS STRING)

    ' -------------------------------
    '  We take care of easy commands
    ' -------------------------------
    COLOR ResultColor, 1
    SELECT CASE TRIM$(UCASE$(ToBeProcessed))
           CASE "TIME"
                PRINT TIME$
                PRINT
                EXIT SUB
           CASE "DATE"
                PRINT DATE$
                PRINT
                EXIT SUB
           CASE "CLS"
                COLOR 7, 1
                CLS
                EXIT SUB
           CASE "CD"
                PRINT CURDIR$
                PRINT
                EXIT SUB
           CASE "HELP"
                CALL DisplayHelpScreen()
                EXIT SUB
           CASE "EXIT"
                CLS
                END
    END SELECT
In the case of these commands, as you can see, what goes on is very
straightforward. Simple code is executed in each of these cases. now we
need to add validation and tell the user if they entered a command that
isn't recognized. Since we already have the list of valid command it will
be rather easy to know if the command entered is valid or not. So We'll
add, at the beginning of the subroutine, a condition to ProcessCommand()
to validate the command like so:
	SUB ProcessCommand(ToBeProcessed AS STRING)

    DIM FirstWord AS STRING

    ' -------------------------------------------------
    '  First we test of the command is a valid command
    ' -------------------------------------------------
    FirstWord = TRIM$(UCASE$(GetWordNumber(ToBeProcessed, 1)))
    IF FirstWord <> "TIME"   AND FirstWord <> "DATE" AND _
       FirstWord <> "CLS"    AND FirstWord <> "CD"   AND _
       FirstWord <> "CD.."   AND FirstWord <> "CD\"  AND _
       FirstWord <> "DIR"    AND FirstWord <> "REN"  AND _
       FirstWord <> "RENAME" AND FirstWord <> "DEL"  AND _
       FirstWord <> "DELETE" AND FirstWord <> "MD"   AND _
       FirstWord <> "RD"     AND FirstWord <> "HELP" AND _
       FirstWord <> "EXIT"   THEN
       COLOR ErrorColor, 1
       PRINT "An Invalid Command Was Entered"
       PRINT
       EXIT SUB
    END IF

    ' ------------------------------------
    '  Next we take care of easy commands
    ' ------------------------------------
    COLOR ResultColor, 1
    SELECT CASE TRIM$(UCASE$(ToBeProcessed))
           CASE "TIME"
                PRINT TIME$
                PRINT
                EXIT SUB
           CASE "DATE"
                PRINT DATE$
                PRINT
                EXIT SUB
           CASE "CLS"
                COLOR 7, 1
                CLS
                EXIT SUB
           CASE "CD"
                PRINT CURDIR$
                PRINT
                EXIT SUB
           CASE "HELP"
                CALL DisplayHelpScreen()
                EXIT SUB
           CASE "EXIT"
                CLS
                END
    END SELECT

END FUNCTION
Note that I added "CD.." and "CD\" as valid commands because typical
DOS users didn't put spaces for these two commands (just a hint of user
consideration). Basically, if the command entered isn't one that appears
in the if statement we will warn the user that an invalid command has been
entered.
ADDING COMMANDS TO THE COMMAND PROCESSOR:
Now that we validate our commands it's time to get to the real part of
the tutorial. This is were we start to really look at what the user wants
to do. To do so, we'll need a few other variables in our ProcessCommand()
subroutine. We will put them at the beginning of the subroutine after the
first DIM statement already there.
	DIM SecondWord    AS STRING
    DIM ThirdWord     AS STRING
    DIM WorkFile      AS STRING
    DIM WordCounter   AS INTEGER
    DIM FolderCounter AS INTEGER
    DIM FileCounter   AS INTEGER
These variables will come in handy to implement the rest of the
supported commands. As you can see from the screenshot SecondWord and
ThirdWord are there get the 2nd and 3rd part of the statement (since 2
parameters will be the most we need to deal with we only need SecondWord
and ThirdWord). First we'll Implement the CD family of commands. After the
SELECT CASE that's already there, we will first add statements to get the
second and third word if we need to in order to complete the statements
entered by the user. Here is the code to add at the end of the
ProcessCommand() subroutine:
	' ---------------------------------------------
    '  We get the rest of the words in the command
    ' ---------------------------------------------
    WordConter = GetWordCount(ToBeProcessed)
    IF WordCounter = 2 THEN
       SecondWord = GetWordNumber(ToBeProcessed, 2)
    ELSEIF WordCounter = 3 THEN
       SecondWord = GetWordNumber(ToBeProcessed, 2)
       ThirdWord  = GetWordNumber(ToBeProcessed, 3)
    END IF
Now the first command we will implement is the CD command.
Remember that CD by itself simply displays the current directory to the
user and is already coded for. This part will take care of the other forms
of CD commands. Typically the user will enter CD followed by a folder
name, a .. or a \. Like I mentioned earlier DOS users don't usually enter
spaces for .. and \ so we will add direct support for CD.. and CD\
without spaces. Here's the code to the CD command:
	' -------------------------------------------------------------------------
    '  This SELECT CASE decides which code to executed for the command entered
    ' -------------------------------------------------------------------------
    SELECT CASE FirstWord
           ' -------------------------------
           '  THE CD command implementation
           ' -------------------------------
           CASE "CD", "CD..", "CD\"
                ' -----------------------------------------
                '  Test for the existence of the directory
                ' -----------------------------------------
                IF DIR$(SecondWord, fbDirectory) = "" AND SecondWord <> "\" THEN
                   ' -------------------------------------------------------
                   '  If the directory does not exist, we display a message
                   ' -------------------------------------------------------
                   COLOR ErrorColor, 1
                   PRINT "This Directory does not exist. Path remains unchanged."
                   PRINT CURDIR$
                   PRINT
                   COLOR ResultColor
                ELSE
                   ' ------------------------------------------------
                   '  Test to see if none spaced .. and \ were used
                   '  Execute appropriate command in these cases.
                   ' ------------------------------------------------
                   IF FirstWord = "CD.." THEN
                      CHDIR ".."
                   ELSEIF FirstWord = "CD\" THEN
                      CHDIR "\"
                   ' ---------------------------------------------------
                   '  In all other cases we just CHDIR to the directory
                   ' ---------------------------------------------------
                   ELSE
                      ' -----------------------------------------------
                      '  If it does exist we CHDIR right to the folder
                      ' -----------------------------------------------
                      CHDIR SecondWord
                   END IF
                   PRINT CURDIR$
                END IF
                PRINT
                EXIT SUB
    END SELECT
You can note that we also added a test to see if the folder the user
wants to change to actually exists. We warn them if it doesn't exist and
nothing else happens. If the directory does exist, We use CHDIR to change
to the specified directory. Using this code the user can enter any valid
CHDIR statements after the CD command and it will perform as expected.
The next command on our list is the MD command. This command is
a bit simpler to code for than the CD command because it doesn't have any
variants to it. The user would simply type MD FolderName to create the
desired folder. We will simply test to see if the folder they are trying
to create already exists and warn them if it does. Here's the code for the
MD command. It is added to the SELECT CASE statement we just created
previously.
	  	   ' -------------------------------
           '  The MD Command Implementation
           ' -------------------------------
           CASE "MD"
                ' -------------------------------------
                '  We test to see if the folder exists
                ' -------------------------------------
                IF DIR$(SecondWord, fbDirectory) <> "" THEN
                   ' ------------------------------------
                   '  If it does exist, we warn the user
                   ' ------------------------------------
                   COLOR ErrorColor, 1
                   PRINT "This Directory already exists, unable to create it."
                   PRINT
                   COLOR ResultColor, 1
                ELSE
                   ' -------------------------------------------------------
                   '  If it doesn't exist, we simply go ahead and create it
                   ' -------------------------------------------------------
                   MKDIR SecondWord
                END IF
                EXIT SUB
As you can see, the code is straight forward and rather clear we either
create the folder or we don't (if the folder already exist). This is the
only test we really need to do.
Up next on our list is the RD command which removes a directory
from the disk. Remember that RD will not work if the directory to be
removed already has files in it. Coding for the RD command should be quite
similar to the MD command with the added test to see if there are files in
the folder we want to remove. If there are, we'll warn the user that they
are files. If no files exist in the directory we'll go ahead and use RMDIR
to remove the folder.
	       ' -------------------------------
           '  The RD Command Implementation
           ' -------------------------------
           CASE "RD"
                ' ------------------------------------
                '  First we test if the folder exists
                ' ------------------------------------
                IF DIR$(SecondWord, fbDirectory) = "" THEN
                   COLOR ErrorColor, 1
                   PRINT "This Directory does not exist hence cannot be removed."
                   PRINT
                   COLOR ResultColor, 1
                ' --------------------------------------------------
                '  Next we test if there are files in the directory
                ' --------------------------------------------------
                ELSEIF DIR$(CURDIR$ + "\" + SecondWord + "\*.*") <> "" THEN
                   COLOR ErrorColor, 1
                   PRINT "The Directory has files in it and cannot be removed."
                   PRINT
                   COLOR ResultColor, 1
                ' -----------------------------------------------------
                '  If all is good we go ahead and remove the directory
                ' -----------------------------------------------------
                ELSE
                   RMDIR SecondWord
                END IF
                EXIT SUB
Simply put we do two consecutive tests, the first to see if the folder
exists in the first place, if it does, we're good we can go to the second
test which is to test if the directory has any files in it. If there are
files we warn the user since the directory won't be removed. if there are
no files we go ahead and remove the directory.
The next command on the list is the DIR command. The DIR command
lists files that match the specified File masks. Shortcuts can be used
here such as the standard "*.*" and the "?" to filter out unwanted files.
In this version I am doing two things when a DIR command is issued. I
first list the folders (if any) that match the file mask and then I list
the files that match the file mask. I will also accumulate the results to
tell the user how many folders and files were found for the DIR command
they issued. I added a little feature which if DIR is called without a
file mask I default it to *.* instead of warning them of an invalid
command. here's the code to the DIR command CASE STATEMENT (again to be
added at the end of the SELECT CASE STATEMENT):
	       ' --------------------------------
           '  The DIR Command Implementation
           ' --------------------------------
           CASE "DIR"
                FolderCounter = 0
                FileCounter   = 0
                ' ----------------------------------------------------
                '  We first list the folders in the current directory
                ' ----------------------------------------------------
                IF SecondWord = "" THEN
                   WorkFile = DIR$("*", fbDirectory)
                ELSE
                   WorkFile = DIR$(SecondWord, fbDirectory)
                END IF
                DO WHILE TRIM$(WorkFile) <> ""
                   IF LEFT$(WorkFile, 1) <> "." THEN
                      FolderCounter = FolderCounter + 1
                      PRINT WorkFile & "\"
                   END IF
                   WorkFile = DIR$()
                LOOP
                ' -------------------------------------------------
                '  We then list the files in the current directory
                ' -------------------------------------------------
                IF SecondWord = "" THEN
                   WorkFile = DIR$("*")
                ELSE
                   WorkFile = DIR$(SecondWord)
                END IF
                DO WHILE TRIM$(WorkFile) <> ""
                   FileCounter = FileCounter + 1
                   PRINT WorkFile
                   WorkFile = DIR$()
                LOOP
                ' --------------------------------------------------------------
                '  We finally display the folder and file counts we accumulated
                ' --------------------------------------------------------------
                PRINT
                PRINT "There were " + STR$(FolderCounter) + _
                      " directories and " + STR$(FileCounter) + _
                      " files listed."
                PRINT
                EXIT SUB
Basically, this code is created to show you examples (hopefully
real word examples) on how to use these commands, the things to watch out
for when using them and the likes. This is why I do things like check for
the existence of a folder before I try to CHDIR to it or something.
Nothing happens if there's no files to list. If there are files then they
will be listed one after the other as long as the search yields a file.
Quite straight forward.
And now we have the DEL and DELETE commands. Like DOS you
can used both DEL or DELETE (whatever you are used to) to delete files on
your disk. The only test we need to do here is to see if the file they
want to delete actually exists, if so, then we use the KILL statement to
delete the file. If it does not exist we'll simply warn the user about it
and do nothing else. here's the CASE statement for the DEL, DELETE command
(you guessed it, at the end of the SELECT CASE statement is where it
goes):
	       ' -------------------------------------------
           '  The DEL and DELETE Command Implementation
           ' -------------------------------------------
           CASE "DEL", "DELETE"
                ' ---------------------------------
                '  First we see if the file exists
                ' ---------------------------------
                IF DIR$(SecondWord) = "" THEN
                   COLOR ErrorColor, 1
                   PRINT "This file does not exist, unable to delete it."
                   PRINT
                   COLOR ResultColor, 1
                ' ----------------------------------------------------------
                '  If the file exists we go ahead and use KILL to delete it
                ' ----------------------------------------------------------
                ELSE
                   KILL SecondWord
                END IF
                EXIT SUB
Very simple test that basically says that if the file exists we can
delete it, if it does not exist we just let the user know (in which case
he will just repeat the command with the right file name the next time
around, hopefully). Pretty simple isn't it? I thought so.
And we are at the final command to be implemented, the REN and
RENAME commands. This is the only command that needs all three
parameters, hence we'll have to do some validation on them to make sure
everything is good to perform the renaming of the file in question. First
test will be the old file name is not empty. If it is empty we let the
user know and we do nothing else (EXIT SUB). The next test is to see that
the new file name is not empty. if it is empty, once again, we warn the
user and exit the subroutine. If it is not empty we go to the third test
which is to see that the old file name actually exists on the current or
specified folder. If we're still good after these 3 tests we go ahead and
use the NAME statement to rename the old file name (SecondWord) to the new
file name (ThirdWord). Here is the last CASE STATEMENT to be added to our
codebase:
		   ' -------------------------------------------
           '  The REN and RENAME Command Implementation
           ' -------------------------------------------
           CASE "REN", "RENAME"
                ' ----------------------------------------------
                '  First we test that Old Filename Is not empty
                ' ----------------------------------------------
                IF SecondWord = "" THEN
                   COLOR ErrorColor, 1
                   PRINT "The name of an existing file is needed to rename the file."
                   PRINT
                   COLOR ResultColor, 1
                   EXIT SUB
                ' ---------------------------------------------
                '  Next we test that New Filename Is not empty
                ' ---------------------------------------------
                ELSEIF ThirdWord = "" THEN
                   COLOR ErrorColor, 1
                   PRINT "A new name is needed to rename the file."
                   PRINT
                   COLOR ResultColor, 1
                   EXIT SUB
                ' ----------------------------------------------
                '  Finally we test that the old filename exists
                ' ----------------------------------------------
                ELSEIF DIR$(SecondWord) = "" THEN
                   COLOR ErrorColor, 1
                   PRINT "The file you are trying to rename does not exist."
                   PRINT
                   COLOR ResultColor, 1
                   EXIT SUB
                ' --------------------------------------------------------------
                '  If all went well we go ahead and use NAME to rename the file
                ' --------------------------------------------------------------
                ELSE
                   NAME SecondWord, ThirdWord
                   EXIT SUB
                END IF
As you can see, it's really all about implementing some basic tests
before performing the actual command just to be sure everything is good,
ready and safe to perform the actual command. With these in place the
command processor becomes a bit more stable a tool to use for the user and
for the user's files and folders of course.
A FEW NOTES:
Now remember this sample program is mean to illustrate the use of the
file and folder commands provided by FreeBASIC. Hence the emphasis is on
those commands. Of course I could have used another method than input to
get the user's commands. I could have done things a bit different (like
perhaps add some good Drive, Path and file name validation for example)
but the important part is what I do with the file and folder commands
themselves.
IN CONCLUSION
And there you have it, I believe we've covered all of the commands
offered by FreeBASIC as far as files and folder management goes. Of course
FreeBASIC has more commands (like CHAIN, EXEC, RUN and SHELL) that have
the potential to add more functionality to a program such as this command
processor sample. This sample is designed to respond to user commands but
any of these commands could be coded in a subroutine and called for any
purpose from any type of program really. The choice is yours.
As always, I hope this tutorial helped you in some way or another. I
hope it was clear but readers tend to read things differently. So, if any
of this isn't clear in your head, be sure to email me to let me know what
parts is not clear or whatever other comments or questions you may have
about this tutorial. Until next, happy coding (and command
processing).
Download a copy of this tutorial: filefolder.zip
Window Procedure: A Quick Review
Written by Wallyfblu
Introduction
This is the first article I try to write and I hope I explained it clearly.
This text comes from my need to clarify some aspects about WIN32 GUI programming.
I know there are some good tutorials and articles on the net about this topic, but I want to examine the window procedure, namely the function which handles windows messages.
I assume you already code a simple Win32 GUI app using API.
The Window Procedure: first step
When you start to write a Win32 Gui application, you usually use a window proc that handles the messages you want.
A common scheme is a big "Select Case" where every message is verify in a "Case" statement and the "Case Else" processes the unwanted messages.
A usual window procedure is shown below.
Function WndProc(ByVal hWin As HWND,ByVal uMsg As UINT,ByVal wParam As WPARAM,ByVal lParam As LPARAM) As Integer

Select Case uMsg
	Case WM_INITDIALOG
		hWnd=hWin
			'
	Case WM_COMMAND
		Select Case HiWord(wParam)
			Case BN_CLICKED
				Select Case LoWord(wParam)
					Case IDM_FILE_EXIT
						SendMessage(hWin,WM_CLOSE,0,0)
						'
					Case IDM_HELP_ABOUT
						ShellAbout(hWin,@AppName,@AboutMsg,NULL)
							'
				End Select
				'
		End Select
		'
	Case WM_SIZE
		'
	Case WM_CLOSE
		DestroyWindow(hWin)
		'
	Case WM_DESTROY
		PostQuitMessage(NULL)
		'
	Case Else
		Return DefWindowProc(hWin,uMsg,wParam,lParam)
			'
	End Select
	Return 0
End Function
So, if you need to intercept a new message, you insert a "Case WM_XXX" and write the code you want.
You can use this approach when you have a little amount of messages and little code to manage because when the program growing up, the window proc management become complex.
The inherent problems about this style comes from the rigidity of the code, the function don�t perform a single task (or a little amount of similar tasks) and you lack modularity and readability.
The Window Procedure: second step
In the next step you always use the �Select case� but, after have made the choice, call a function for each message you need to manage, that does the work. The principle is the same, but you use less code in the WP (i.e. Window procedure).
The code might look like this:
.
.
.
	Case WM_INITDIALOG
		OnInit(parameters)
		'
	Case WM_COMMAND
		OnCommand(parameters)
		'
	Case WM_SIZE
		OnSize(parameters)
		'
	Case WM_XXX
		OnXxx(parameters)
			'
.
.
.
You have a better solution, but you still have the same structure.
Now you could say: "Why should I worry about this? If I need to manage a new message, I add the code and here you are.� I try to answer explaining the latest method I used (and I know).
The Window Procedure: next step
This approach is composed of a data structure to store the correspondence between the event that has occurred and work to be done. A framework like this use an array of function pointers and the message number as index.
Dim Shared As WndProc MsgList(WM_USER)

Function WndProc(ByVal hWin As HWND,ByVal uMsg As UINT,ByVal wParam As WPARAM,ByVal lParam As LPARAM) As Integer

Dim As WndProc guifunc

	GuiFunc=MsgList(uMsg)
	If Guifunc>0 Then
		Return guifunc(hWin,uMsg,wParam,lParam)
	End If

	Return DefWindowProc(hWin,uMsg,wParam,lParam)
	Return FALSE

End Function
To assign an array element to a function, we could use a support proc :
Sub Assign(mess As Long, proc As WndProc)
	MsgList(mess)=proc
End Sub
and use it in this way into the main body of program:
Assign(WM_INITDIALOG, Cast(WndProc,@OnInit))
Assign(WM_COMMAND, @OnCommand)
This approach has at least two advantages:
- simple and compact code
- You can put the code above in a .bi file or in a library and include in your code when you need it.
These are some answer to questions asked before and have been a reason for me to go ahead to explore this technique in order to use it in a best way.
Obviously this solution opens other problems and every problem can be managed in several ways.
Now I only list them, because a full discussion is too hard for my strength. :)
- We use a global array of pointers and it is the same for all app dialogs.
- We usually work with few messages and the global array waste space and time because the use of virtual memory
- We use �Dim As WndProc xxxxx� so we bring back all parameters. Maybe a hidden management for WP parameters could be cleaner.
- I�m sure you can find others.
Conclusion
This simple explanation about the WIN32 window procedure management it�s far to be complete and exhaustive.
I hope I�ve explained it in a clearly way despite my poor English.
I hope to receive feedback in order to continue� or halt me.
Attached file: WndProc.zip
I use resource file instead Createwindow etc.
Compile them as: fbc -s gui WndProc.bas WndProc.rc
If you have any idea , suggestion or disappointment please mail me to: wallyfblu@libero.it
Greets to:
All article writers
Codemss for his: Writing tutorials
Download this tutorial: WndProc.zip
Using Electric Field Equation To Generate Awesome Moving Plasmas
Written by Hezad
Hi ! First, I wanna say this is my first tutorial and i won't ask you to be indulgent ! If some physicians read that, they have to know that I'll use this field UNIQUELY in a graphical goal so some developments doesn't mean anything from a physics point of view. For the others, if you wanna clarify, add some informations, shout at me, don't hesitate to contact me : Narky00-at-laposte.net
Today, we will see the electric field equation (don't panic, we'll just use a physics equation for its graphical effects !).

INTRO :
In our case, we'll need to put some special points called charges (Symbol : Q) which can be positive or negative (Q+ or Q-). Two charges with the same sign (+/+ or -/-) push away each other and two charges with different signs (+/- or -/+) attract each other (but we won't use those forces to move points but to colorize the screen).
A vectors field is an equation which associate a vector to any point (called r) in space. Each charge will "diffuse" the electric force everywhere around it :
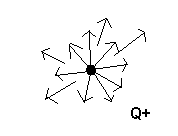
Mathematically, the field equation looks like this :
Nice, uh? But in fact we won't really need the vector notation so we can write it like this :

Some explanations :
- Qi is the charges sign. In our program, it'll be +1 or -1
- x and y are the screen coordinates we will loop through
- xi and yi are the charges coordinates (If there is only 1 charge, Sum isn't necessary anymore)
- pi and epsilon are .. constants, we'll define their value later
HOW TO PROGRAM THIS ?
Okay, let's enter in the main thing ! We'll mainly need :
-
A Charge TYPE containing Position, Charge and Velocity values.
- A CalcE Sub which will calculate the field on each frame.
- A Render Sub which will
cook pastas render screen.
- A MoveCharges Sub which will make plasma to move.
- Some lines for init charges
First, let's build a type which contain x and y values for positions/velocities/vectors and define some constants :
Randomize Timer '' Random seed for later use of rnd

Const SW = 640  '' Screen Resolution
Const SH = 480

Const PI = 3.1415926535897932384626  '' So much precision is not needed ...
Const Epsilon = 8.8541878*10^-12     '' This is the value of Epsilon in Void space

Const MAX_CHARGES = 3
'' We will use a maximum of 3 charges but you can do as you please !

Type Val2d
    x as single
    y as single
End type
That's a good start :) Now, let's build our charge TYPE and declare an array of charges :
Type ChargeType
    Pos as Val2d     '' Position
    V as Val2d       '' Velocity
    Sign as integer  '' +1 or -1
End type

'' Array of charges
Dim shared as ChargeType Charge(MAX_CHARGES)
"Shared" because we'll use this array in subs ! Now, to calculate the field, we need an array of vectors to handle the E field. Theorically, there should be a vector on each point of the screen but it'd make 640*480 vectors to calculate on each frame !! So we'll define the field each 10*10 pixels (=> 64*48 vectors to calculate on each frame) :
'' Array of Vectors to handle E
Dim shared as Val2d E(SW/10,SH/10)
(Remember, SW and SH are Screen Width and Height)
We defined Charges and E field, so we can now write the CalcE Sub ! Let's get a closer look to the previous equations :
Pay attention to the next sentence, i'm sorry if I badly explain the thing but the code should help you to understand if it seems incomprehensible.
We'll need to loop through screen coordinates (remember, each 10*10 pixels) to calculate the corresponding vector. And as you can see in the equations, we'll need to sum some data. So we'll write one more loop IN the previous loop. Once E is calculated, remember we'll use its value for coloring screen ! So we'll divide it by its norm to have a value between 0 and 1 :
Sub CalcE()

    '' Let's Dim some variables we'll need

    Dim as Val2d CurrentPosition
    Dim as Val2d Sum
    Dim as single ENorm


    '' First Loop (the first loop is in fact 2 loops : through x and through y

    For x as integer = 0 to SW/10
        For y as integer = 0 to SH/10

            CurrentPosition.x = x*10  '' We need to multiply per 10 as the loop stops at SW/10
            CurrentPosition.y = y*10  '' Idem

            Sum.x = 0  '' Init of the Sum
            Sum.y = 0

            '' Sum loop :
            For i as integer = 1 to MAX_CHARGES

                '' Here is the main calc ! It may seem a bit complicated but it's
                '' just the Sum part of the equation !

                Sum.x += (Charge(i).Sign * (CurrentPosition.x-Charge(i).pos.x)) / _
                (sqr((CurrentPosition.x-charge(i).pos.x)^2+(CurrentPosition.y-charge(i).pos.y)^2)^3)

                Sum.y += (Charge(i).Sign * (CurrentPosition.y-Charge(i).pos.y)) / _
                (sqr((CurrentPosition.x-charge(i).pos.x)^2+(CurrentPosition.y-charge(i).pos.y)^2)^3)

            Next

            '' Now we just have to multiply the sum per 1/(4*pi*epsilon)
            ''and we'll find E !

            E(x,y).x = Sum.x * (1/4*PI*Epsilon)
            E(x,y).y = Sum.y * (1/4*PI*Epsilon)


            '' And we divide E by its norm to have a value between 0 and 1 !
            ENorm = sqr(E(x,y).x^2+E(x,y).y^2)

            E(x,y).x/=ENorm
            E(x,y).y/=ENorm

        Next
    Next

    '' Done ! E is calculated !
End sub
Fiuh !! That was a big one ! And Now ? Now, let's write the Render Sub ! We'll draw 10*10 squares with the line instruction, and we'll use the value of E.x and E.y for coloring those ones :
Sub Render()

    '' Once again, we'll loop through the screen to render each square :

    Dim as integer x1,x2,y1,y2
    Dim as integer r,g,b

    For x as integer = 0 to SW/10
        For y as integer = 0 to SH/10

            x1 = x*10 : y1 = y*10    '' *10 To have the right screen coords
            x2 = x*10+10 : y2 = y*10+10   '' +10 because we draw a 10 pixels square

            '' Here is the graphic trick : we'll use the E values in the rgb(r,g,b) function
            '' You can play with these lines to totally change the effect :)

            r = 250*cos(E(x,y).x+E(x,y).y)
            g = 255*-cos(E(x,y).y-E(x,y).x)
            b = 60

            '' Why Cosines ? Why + for r and - for g ? Don't know ! I tried this
            '' and it looked awesome so I kept it ^^

            Line(x1,y1)-(x2,y2),rgb(r,g,b),bf
        Next
    Next

End sub
You're still here ? Cool ! It was two big subs ! Now, things will be much easier ! We have to write the Moving Sub ! Well, you could do as you please, but a random movement with screen clipping (don't forget we consider charges as dots so they can get out of the screen !) could be nice :
Sub Movement()

    '' Let's loop through the Charges Array
    For i as integer = 1 to MAX_CHARGES

        '' about 1/100 chances of change each frame
        If rnd<.01 then
            charge(i).V.x = -2+rnd*4 '' random direction
            charge(i).V.y = -2+rnd*4
        End if

        '' And to finish, let's add the velocity to the position
        '' to make movement :
        Charge(i).pos.x += charge(i).V.x
        Charge(i).pos.y += charge(i).V.y

        '' Clipping
        If Charge(i).pos.x>SW or Charge(i).pos.x<0 then
            Charge(i).pos.x -= charge(i).V.x
        End if

        If Charge(i).pos.y>SH or Charge(i).pos.y<0 then
            Charge(i).pos.y -= charge(i).V.y
        End if

    Next

End sub
Pretty simple, uh ? And it's almost finished ! We just need to init the charges position and velocity and put everything in a Do-Loop loop to make it work !
'' Charges Init :
For i as integer = 1 to MAX_CHARGES
    Charge(i).pos.x = rnd*SW
    Charge(i).pos.y = rnd*SH
    Charge(i).Sign = iif(rnd<.5,1,-1) '' equivalent to if rnd<.5 then Sign=1 else Sign=-1

    Charge(i).V.x = -2+rnd*4  '' Velocity between -2 and 2
    Charge(i).V.y = -2+rnd*4
Next

'' And finally, the main loop !

Screenres SW,SH,16,2

Do
    Screenlock : CLS

    CalcE

    Movement

    Render

    Screenunlock : Sleep 2
Loop until multikey(&h01)   '' Loop until ESC key is pressed
Done !! Now you can enjoy a superb weirdo' moving plasma ! I apologize if this tutorial is not clear or not accurate enough, but as I said, it's my first one and the subject was a bit difficult to approach in a tut' way ! Don't hesitate to contact me by mail or on the c0de/FB Forums
Further Ideas :
- Change coloring routine in the Render Sub.
- Use your mouse to move charges instead of random movement.
COMPLETE CODE :
Randomize Timer

Const SW = 640  '' Screen Resolution
Const SH = 480

Const PI = 3.1415926535897932384626  '' So much precision is not needed ...
Const Epsilon = 8.8541878*10^-12     '' This is the value of Epsilon in Void space

Const MAX_CHARGES = 3   '' We will use a maximum of 3 charges but you can do as you please !

Type Val2d
    x as single
    y as single
End type

Type ChargeType
    Pos as Val2d     '' Position
    V as Val2d       '' Velocity
    Sign as integer  '' +1 or -1
End type

'' Array of charges
Dim shared as ChargeType Charge(MAX_CHARGES)

'' Array of Vectors to handle E
Dim shared as Val2d E(SW/10,SH/10)

Sub CalcE()

    '' Let's Dim some variables we'll need

    Dim as Val2d CurrentPosition
    Dim as Val2d Sum
    Dim as single ENorm


    '' First Loop (the first loop is in fact 2 loops : through x and through y

    For x as integer = 0 to SW/10
        For y as integer = 0 to SH/10

            CurrentPosition.x = x*10  '' We need to multiply per 10 as the loop stops at SW/10
            CurrentPosition.y = y*10  '' Idem

            Sum.x = 0  '' Init of the Sum
            Sum.y = 0

            '' Sum loop :
            For i as integer = 1 to MAX_CHARGES

                '' Here is the main calc ! It may seem a bit complicated but it's
                '' just the Sum part of the equation !

                Sum.x += (Charge(i).Sign * (CurrentPosition.x-Charge(i).pos.x)) / _
                (sqr((CurrentPosition.x-charge(i).pos.x)^2+(CurrentPosition.y-charge(i).pos.y)^2)^3)

                Sum.y += (Charge(i).Sign * (CurrentPosition.y-Charge(i).pos.y)) / _
                (sqr((CurrentPosition.x-charge(i).pos.x)^2+(CurrentPosition.y-charge(i).pos.y)^2)^3)

            Next

            '' Now we just have to multiply the sum per 1/(4*pi*epsilon)
            ''and we'll find E !

            E(x,y).x = Sum.x * (1/4*PI*Epsilon)
            E(x,y).y = Sum.y * (1/4*PI*Epsilon)


            '' And we divide E by its norm to have a value between 0 and 1 !
            ENorm = sqr(E(x,y).x^2+E(x,y).y^2)

            E(x,y).x/=ENorm
            E(x,y).y/=ENorm

        Next
    Next

    '' Done ! E is calculated !
End sub

Sub Render()

    '' Once again, we'll loop through the screen to render each square :

    Dim as integer x1,x2,y1,y2
    Dim as integer r,g,b

    For x as integer = 0 to SW/10
        For y as integer = 0 to SH/10

            x1 = x*10 : y1 = y*10    '' *10 To have the right screen coords
            x2 = x*10+10 : y2 = y*10+10   '' +10 because we draw a 10 pixels square

            '' Here is the graphic trick : we'll use the E values in the rgb(r,g,b) function
            '' You can play with these lines to totally change the effect :)

            r = 250*cos(E(x,y).x+E(x,y).y)
            g = 255*-cos(E(x,y).y-E(x,y).x)
            b = 60

            '' Why Cosines ? Why + for r and - for g ? Don't know ! I tried this
            '' and it looked awesome so I kept it ^^

            Line(x1,y1)-(x2,y2),rgb(r,g,b),bf
        Next
    Next

End sub

Sub Movement()

    '' Let's loop through the Charges Array
    For i as integer = 1 to MAX_CHARGES

        '' about 1/100 chances of change each frame
        If rnd<.01 then
            charge(i).V.x = -2+rnd*4 '' random direction
            charge(i).V.y = -2+rnd*4
        End if

        '' And to finish, let's add the velocity to the position
        '' to make movement :
        Charge(i).pos.x += charge(i).V.x
        Charge(i).pos.y += charge(i).V.y

        '' Clipping
        If Charge(i).pos.x>SW or Charge(i).pos.x<0 then
            Charge(i).pos.x -= charge(i).V.x
        End if

        If Charge(i).pos.y>SH or Charge(i).pos.y<0 then
            Charge(i).pos.y -= charge(i).V.y
        End if

    Next

End sub


'' Charges Init :
For i as integer = 1 to MAX_CHARGES
    Charge(i).pos.x = rnd*SW
    Charge(i).pos.y = rnd*SH
    Charge(i).Sign = iif(rnd<.5,1,-1) '' equivalent to if rnd<.5 then Sign=1 else Sign=-1

    Charge(i).V.x = -2+rnd*4  '' Velocity between -2 and 2
    Charge(i).V.y = -2+rnd*4
Next

'' And finally, the main loop !

Screenres SW,SH,16,2

Do
    Screenlock : CLS

    CalcE

    Movement

    Render

    Screenunlock : Sleep 2
Loop until multikey(&h01)   '' Loop until ESC key is pressed
Download a copy of this tutorial: Electric_Field_Tutorial.rar
Final Word
Whew! That was quite the issue.
After all that reading, you probably *need* a break before next month's QB Express!
But don't rest for too long, because we need SUBMISSIONS for the next issue -- tutorials, articles, editorials, game reviews, comics, "text comics" -- whatever you have that's QB / FB related -- we want it!
ISSUE #27 DEADLINE: April 1st, 2008.
As always, please email your submissions to qbexpress@gmail.com.
(And don't you guys go pulling any April Fools pranks on me either, heheh.)
Also, if you've written articles or tutorials for your own website, or posted them on forums throughout the community, we'd love to reprint your work. Just send us links to the article (and permission) at our email address.
Have a great month, and we'll see you again in April!
Until next time...END.
-Pete
Copyright © Pete Berg and contributors, 2008. All rights reserverd.
This design is based loosely on St.ndard Bea.er by Altherac.


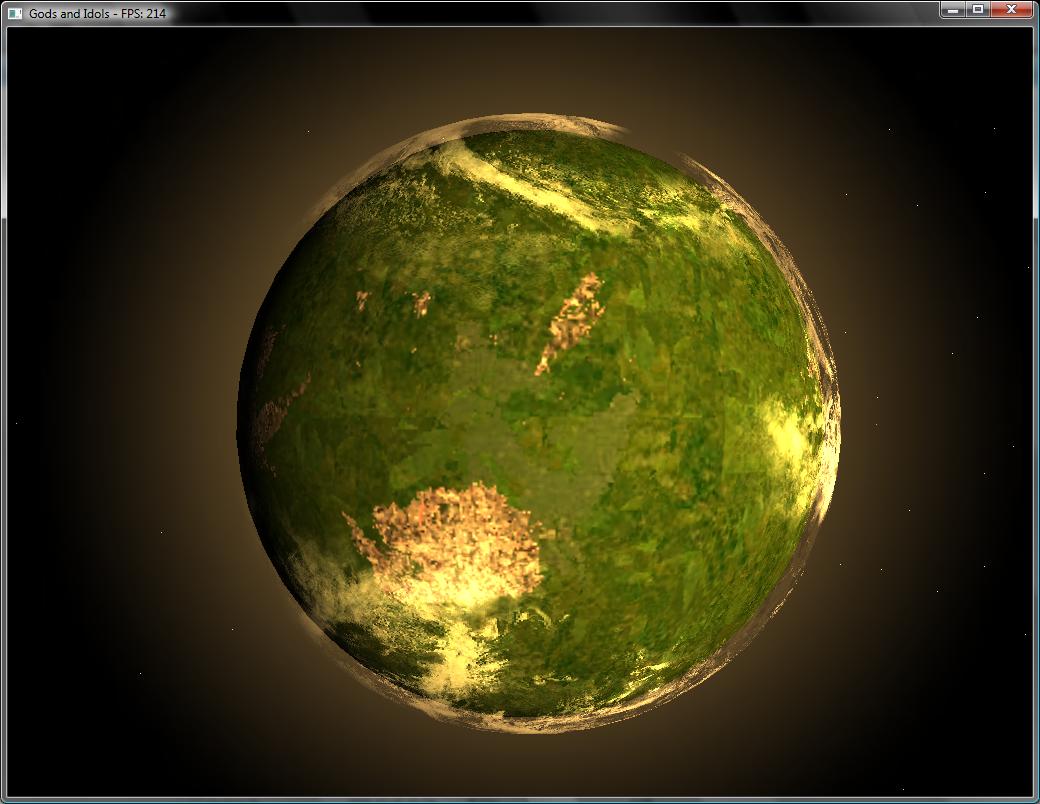
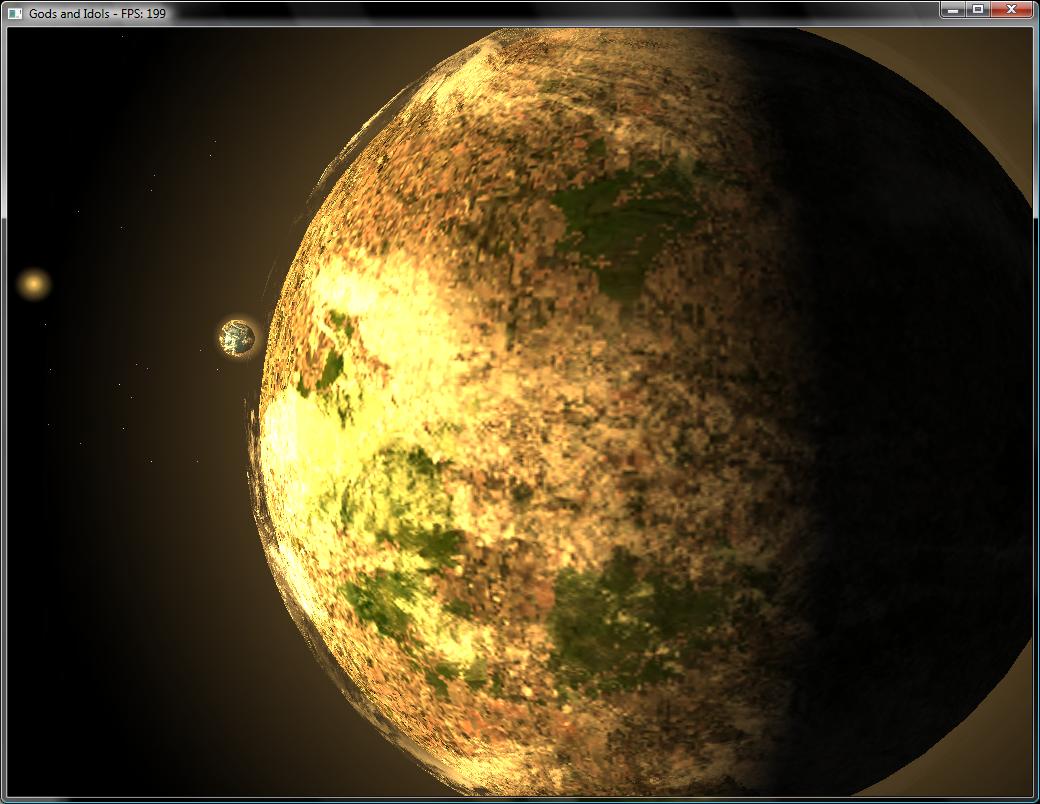
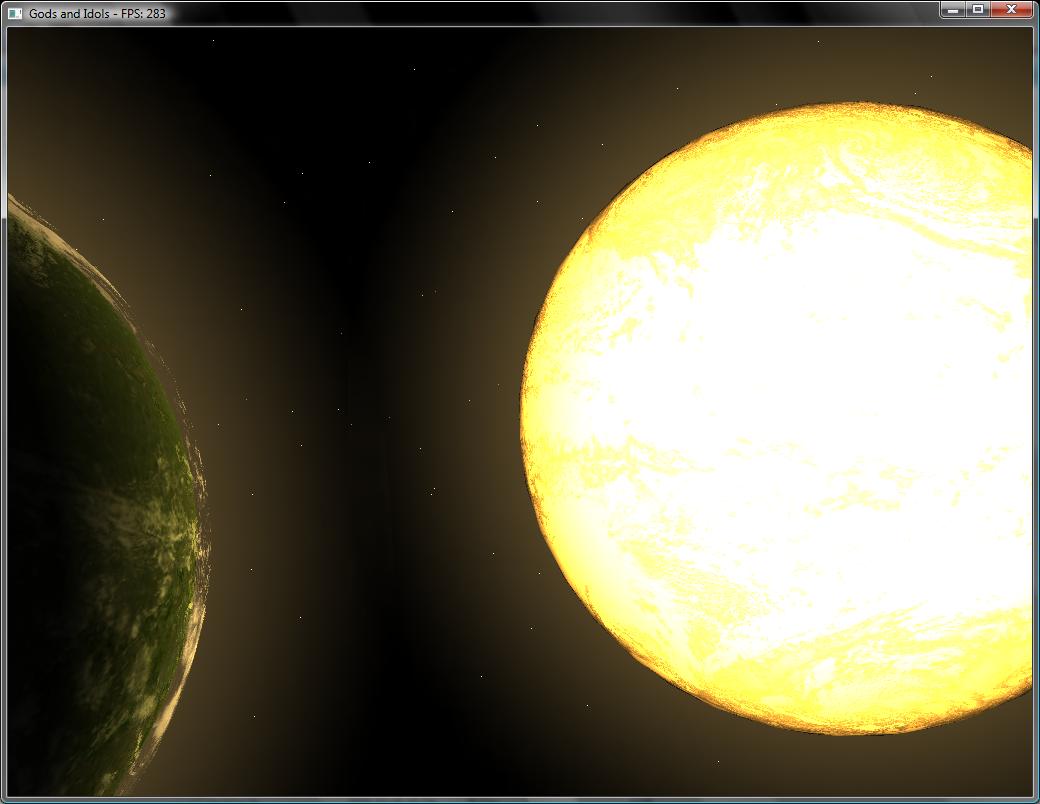
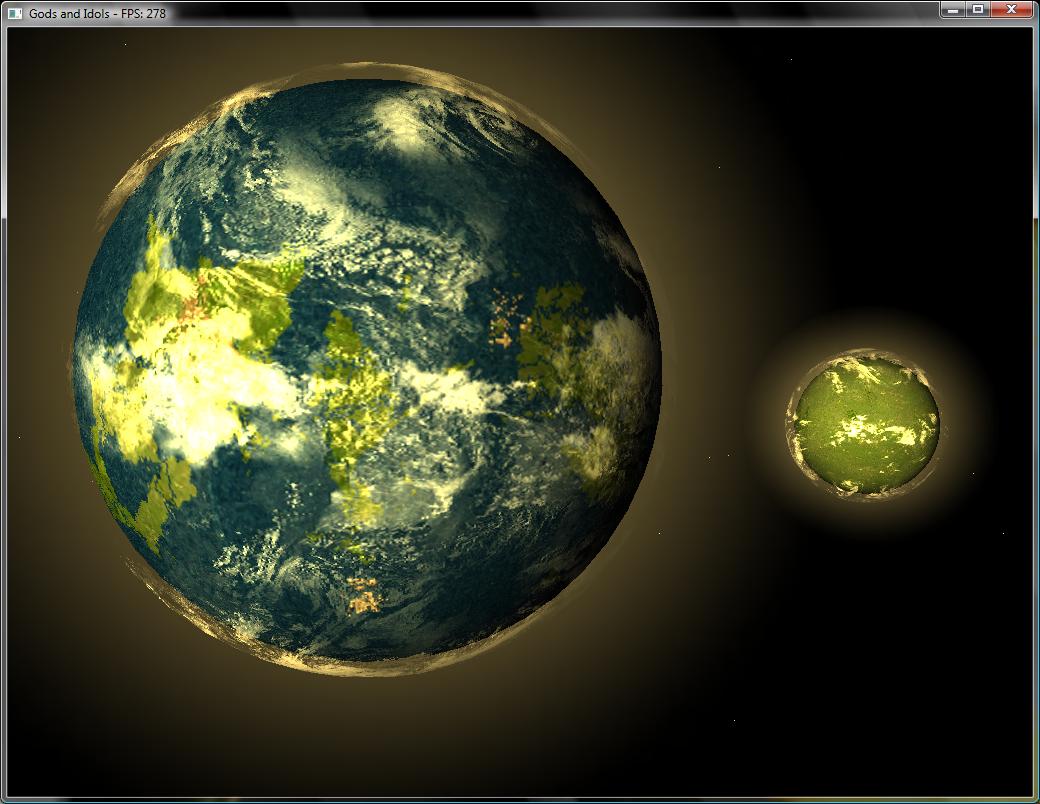
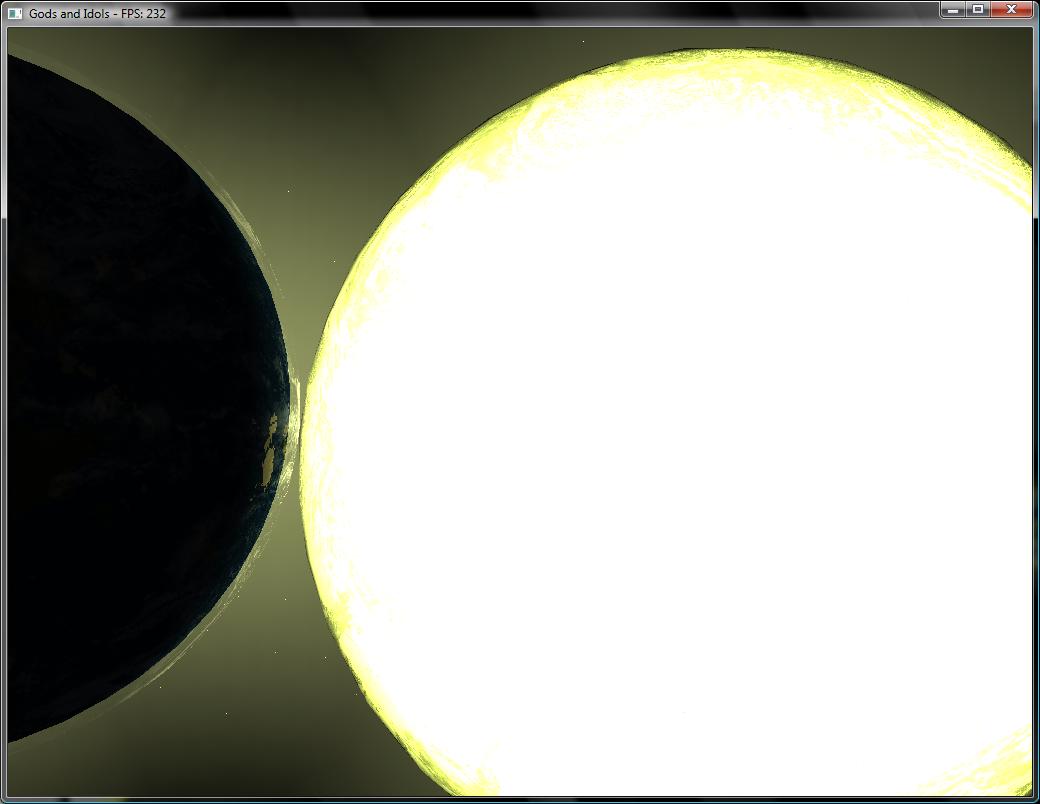
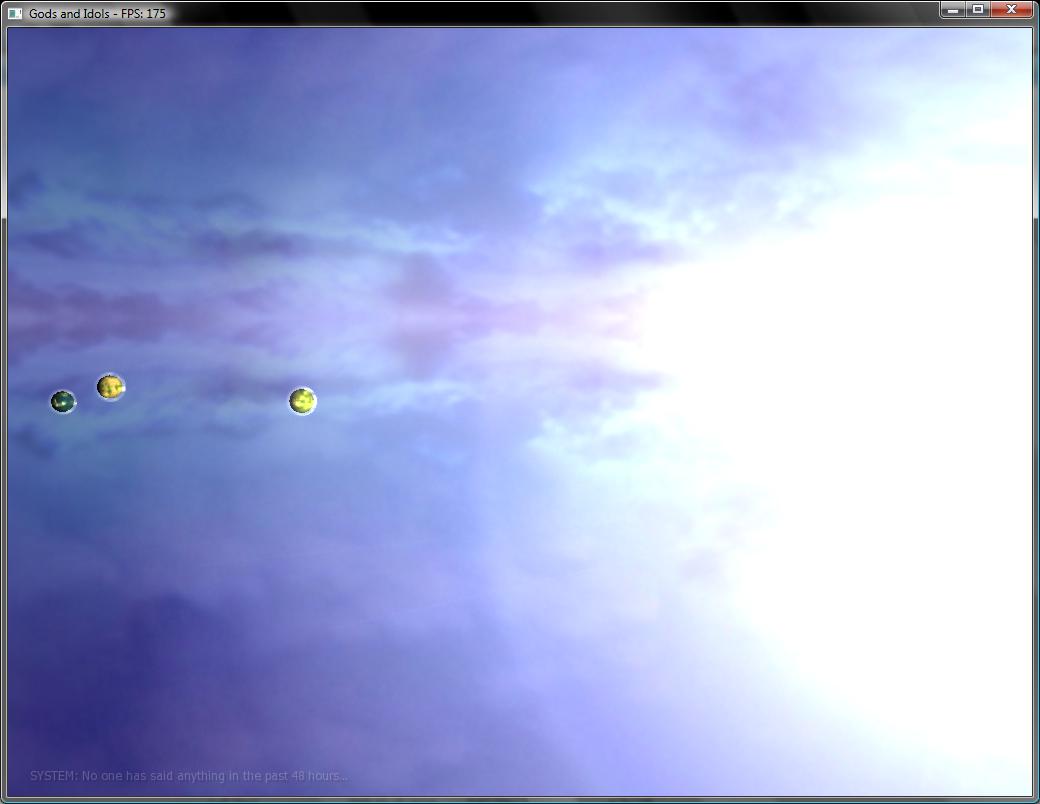
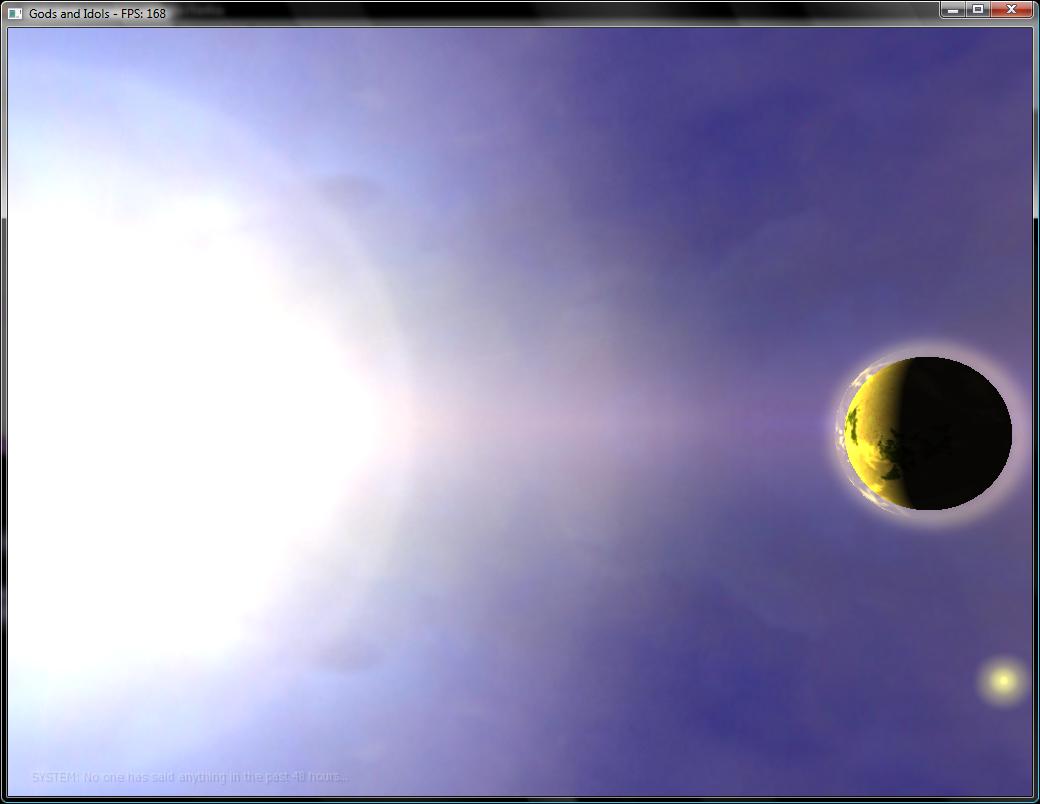
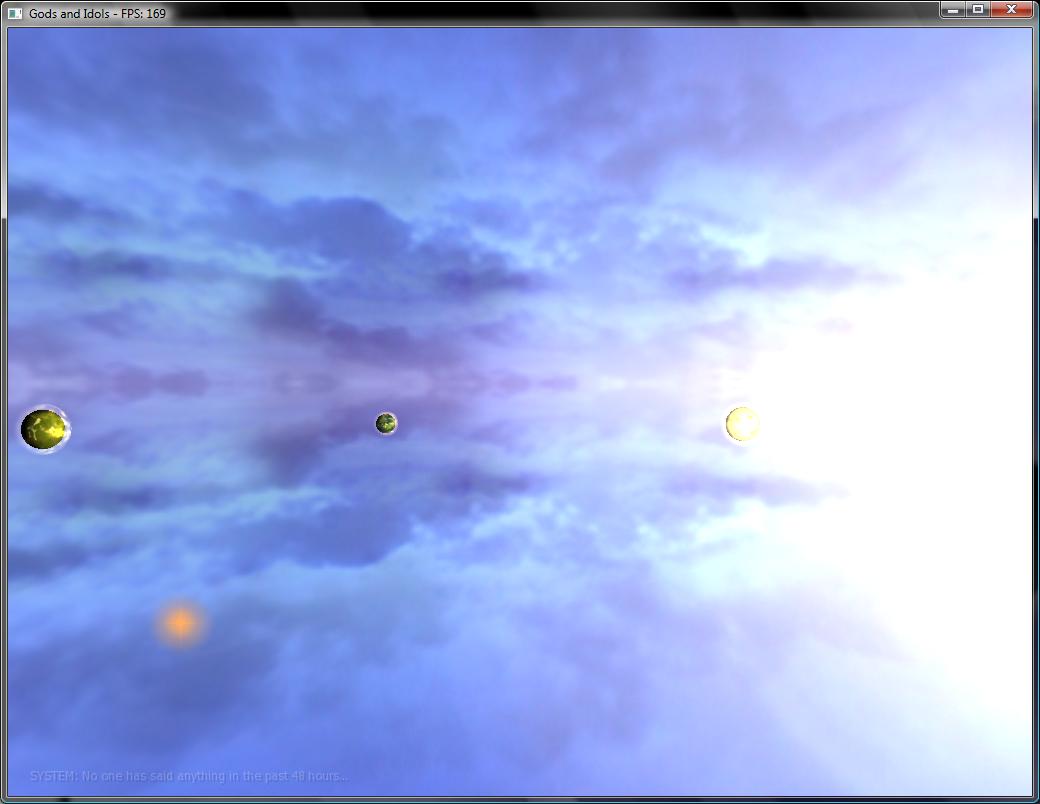
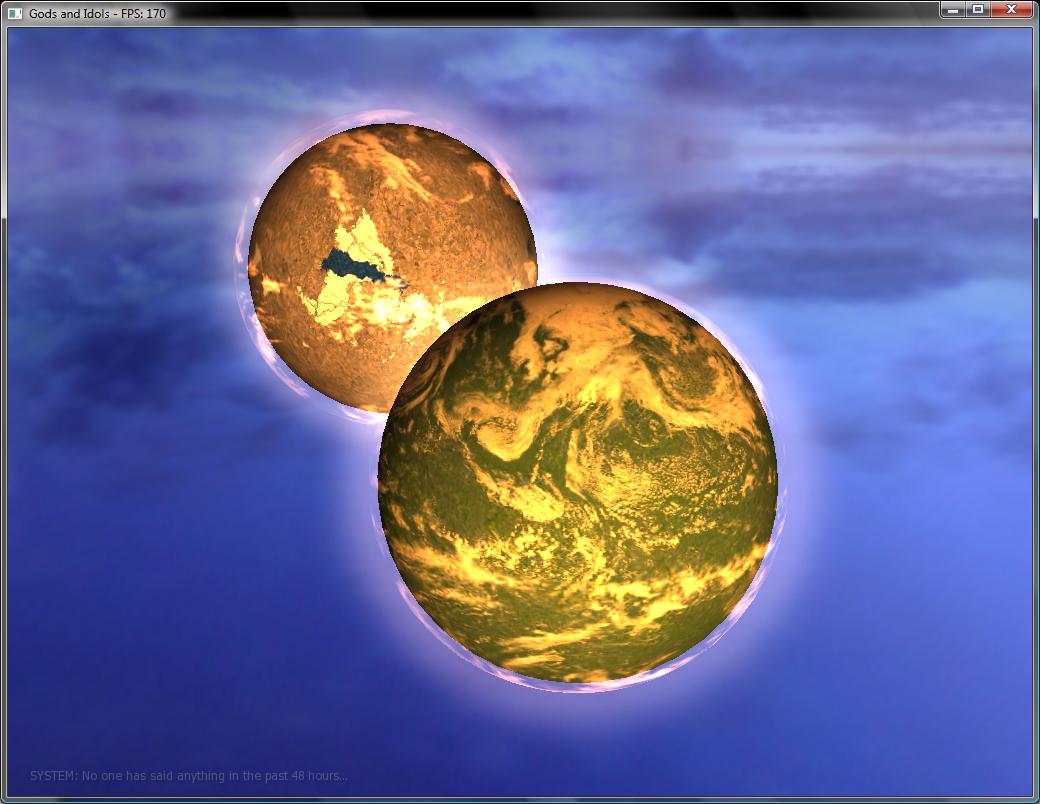
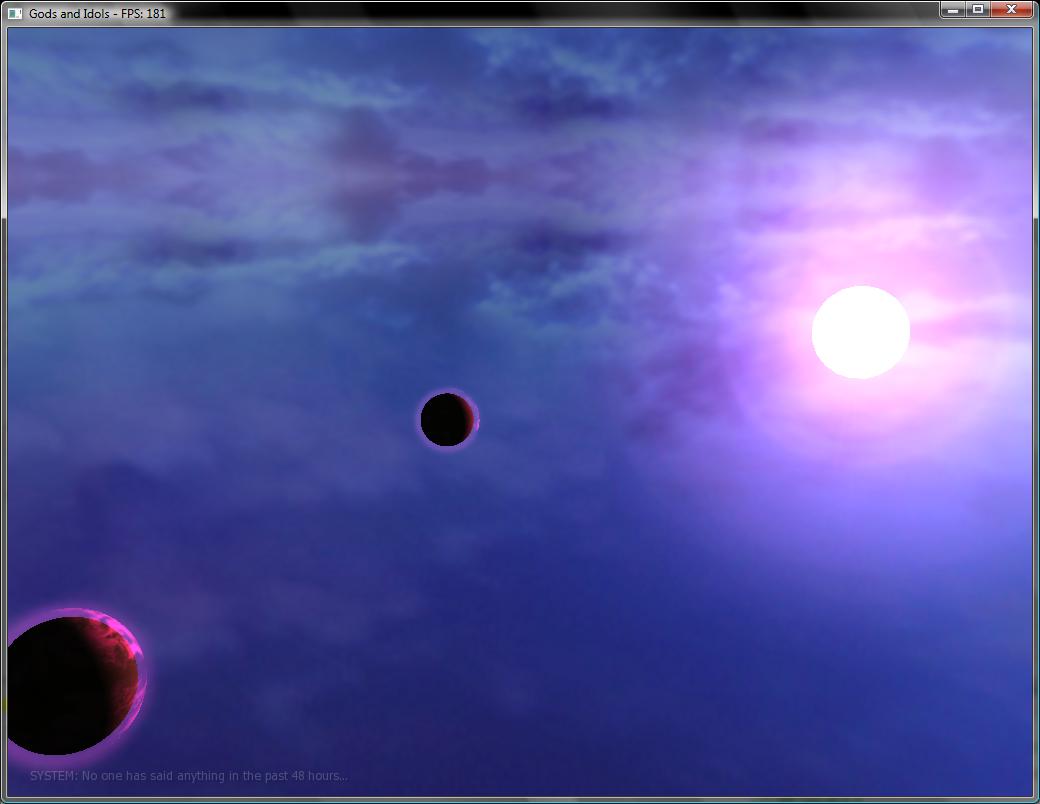
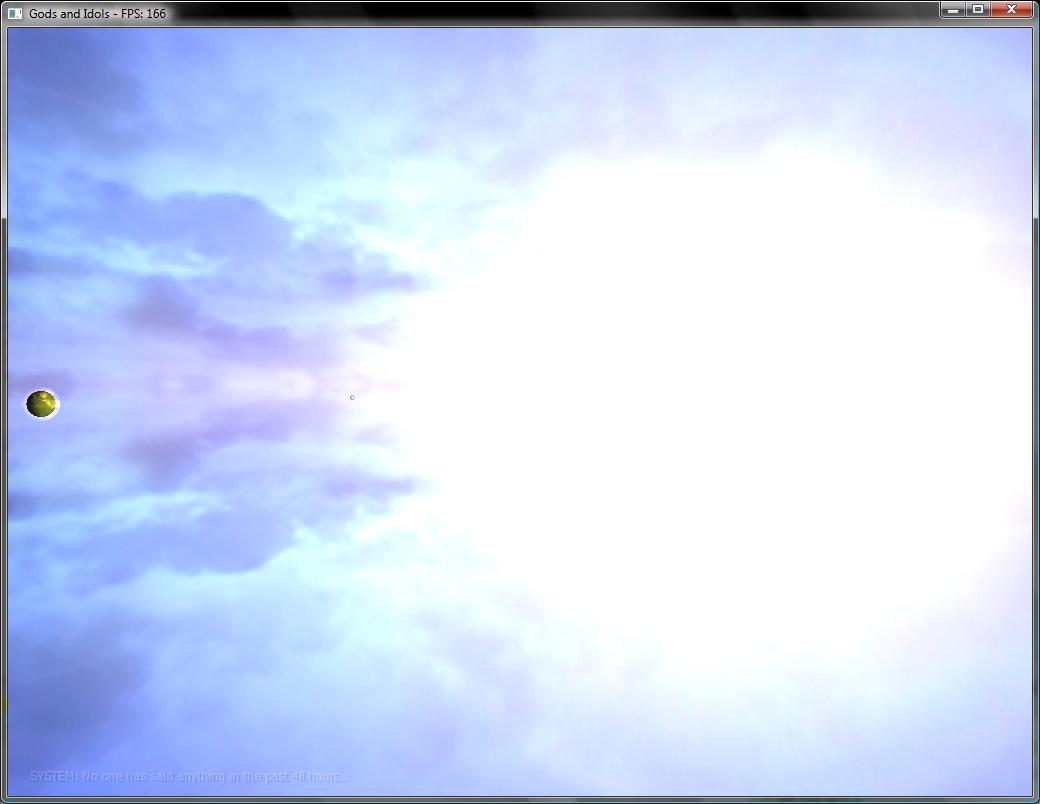
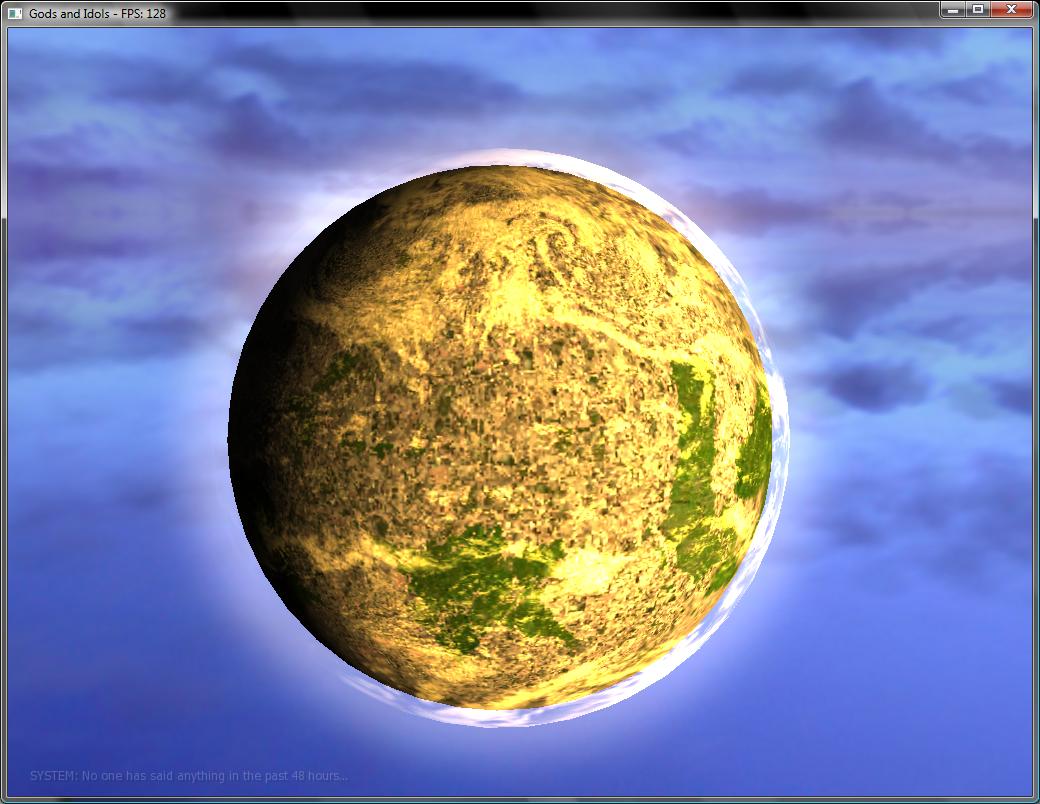

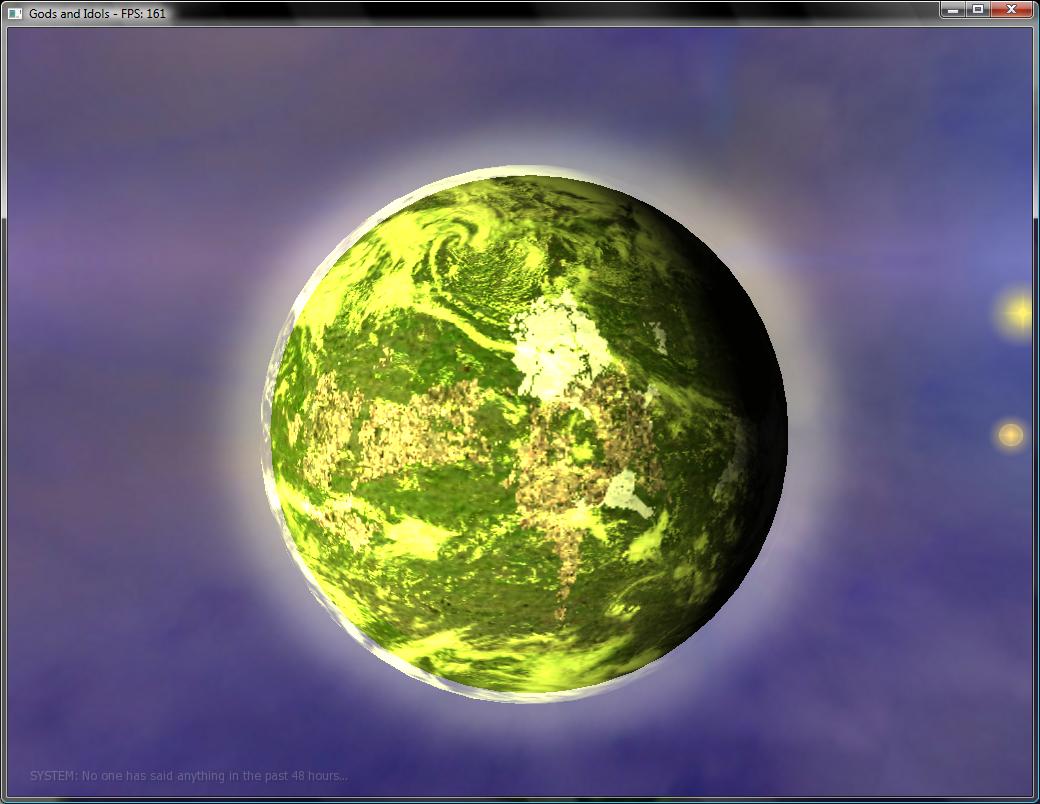

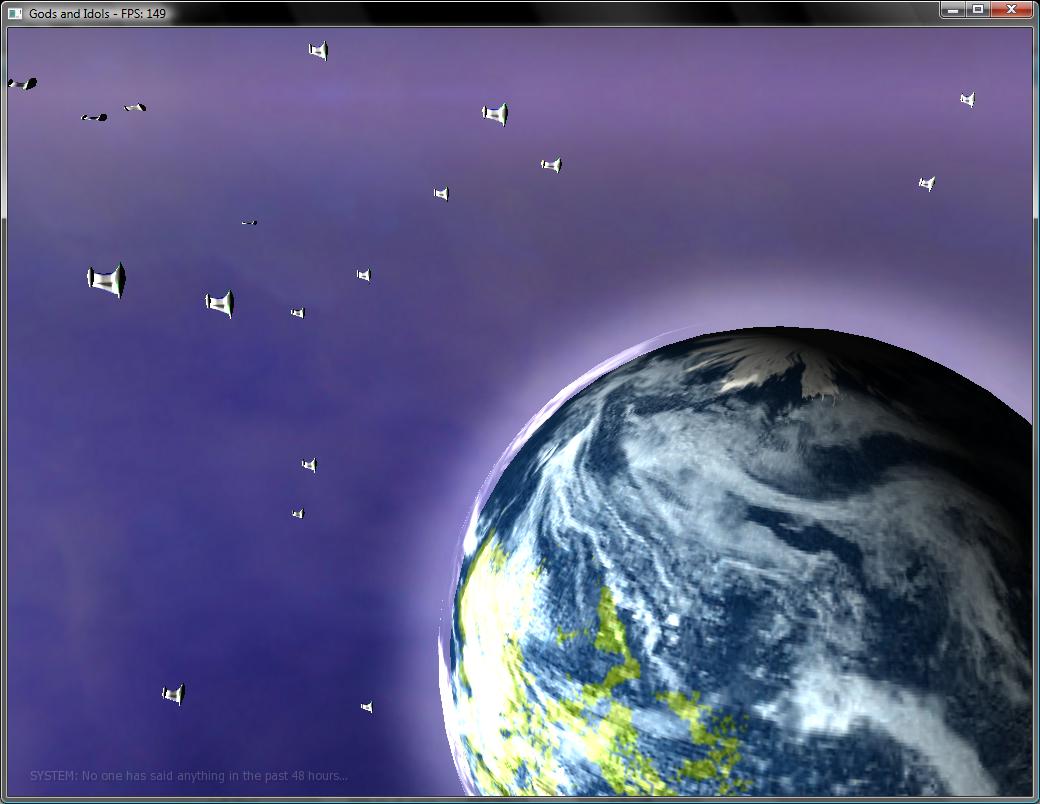
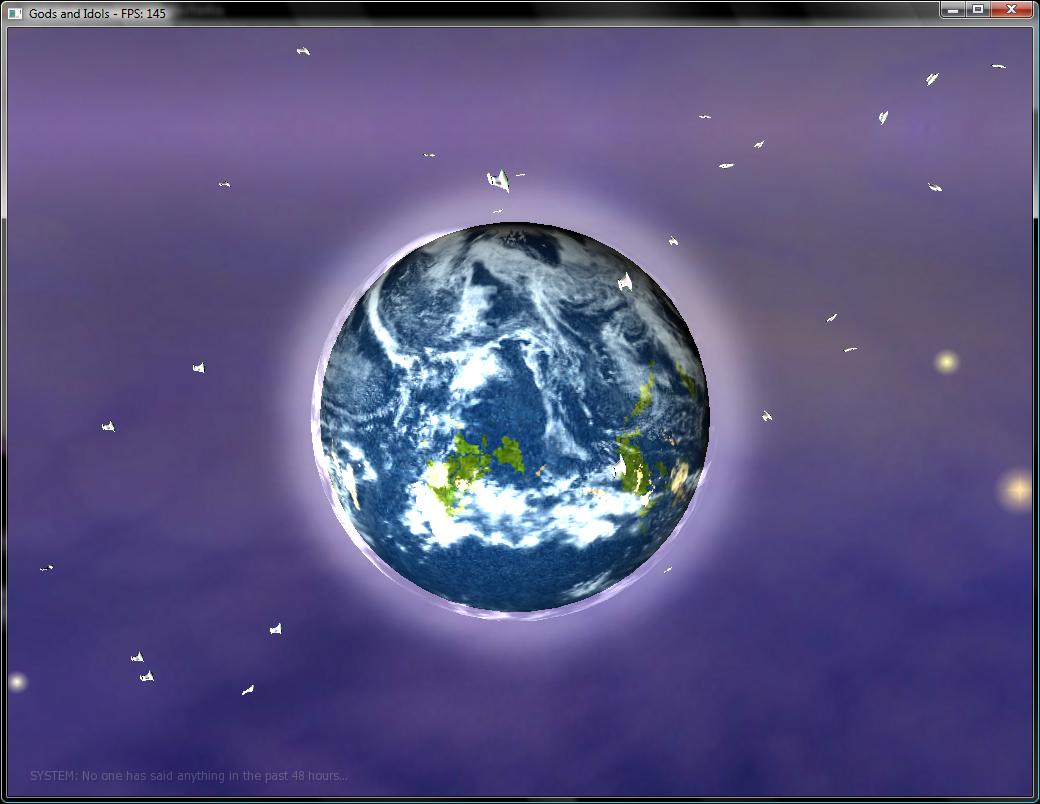
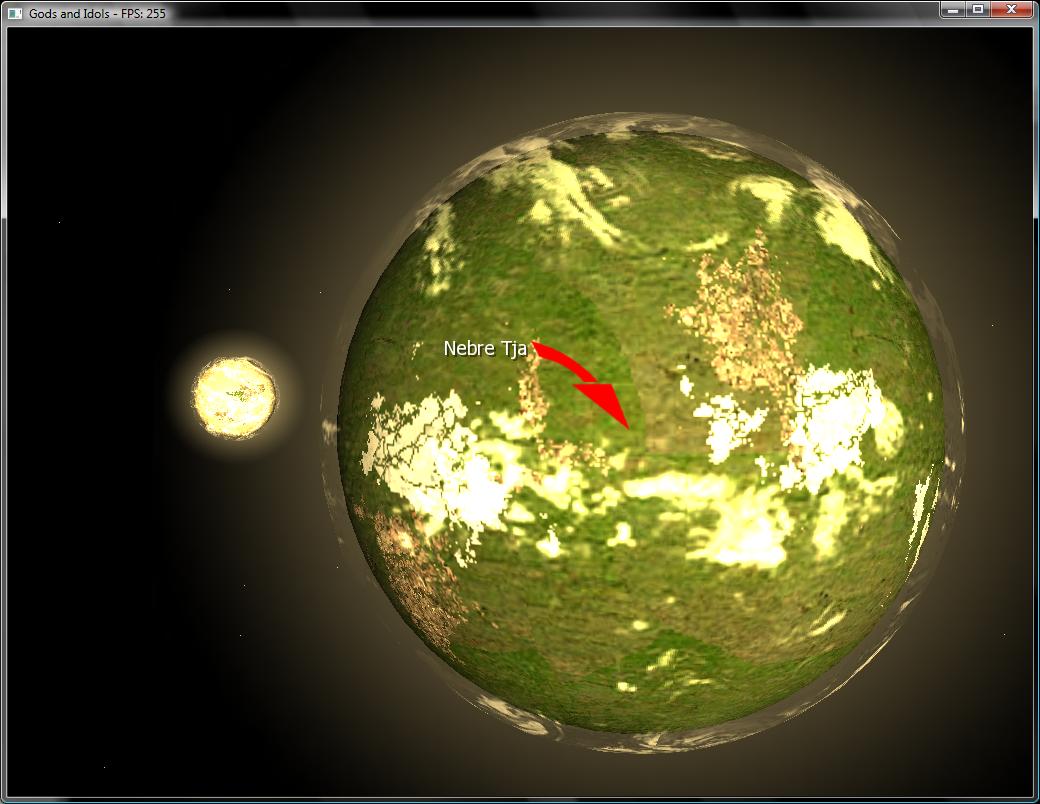

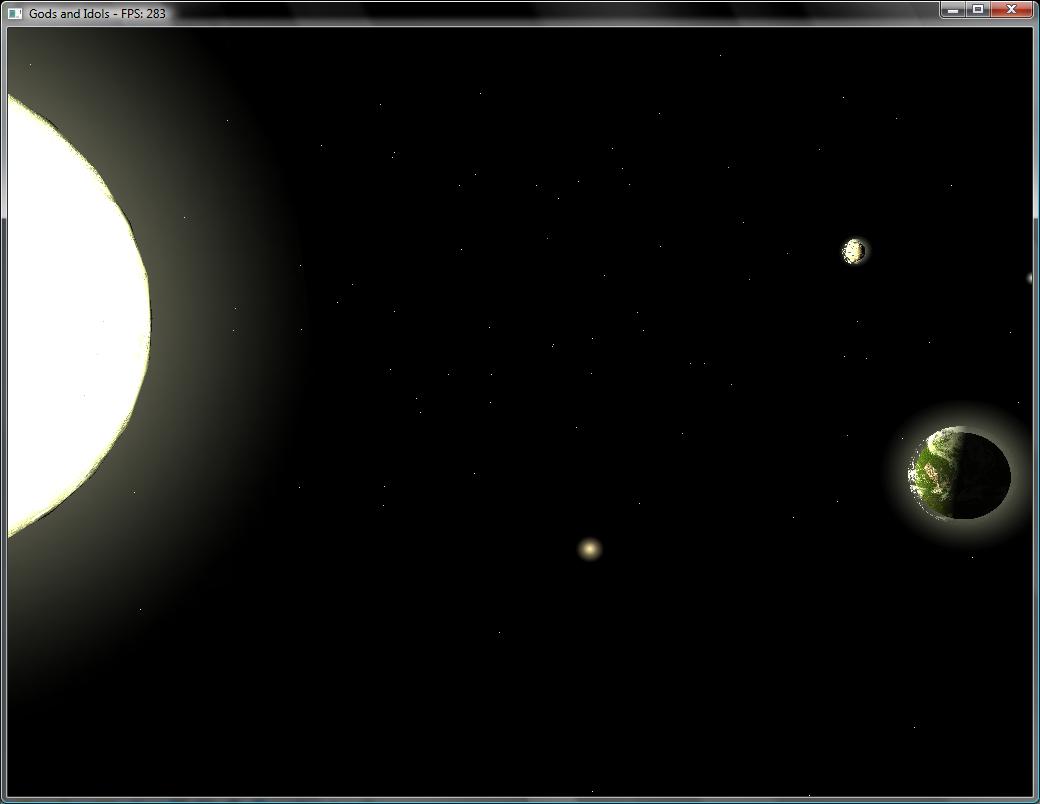