
Entering the 3d
dimension...
Hi there!
Relsoft again back with an article for you. :*). This article is the first of a
series of 3d articles that I'll be serializing in QBASICnews.com. I don't know how far I
could take you or how many chapters will I make. It depends upon the user
feedback and my free time. ;*)
I'm most likely to cover a lot of things that
after you've read the whole series, you're likely to be able to make your own
FPS render, a 3d strategy game or even a Ragnarok style engine.
;*)
I. Course
outline
What I will be
covering in this series are listed below:
1. 3d Projection
a. Theory
b. Camera
c. Translation
2. 2d and 3d rotations
a. Sin/Cos
b. Polar coordinates
c. Proof of rotation
d. Transformation
e. 3d Optimization
3. 3d coordinate systems
a. Cartesian
b. Spherical
c. Cylindrical
d. 3d Model generation
e. Polygon 101
4. Polygon fills
a. Vectors
b. wireframe
c. Flat
5. Normals and lightsourcing
a. More on Vectors
b. Cross product
c. Dot Product
Lambert shading
Gouraud shading
Phong shading
d. Moving Lightsource
e. Multiple Light
f. TextureMapping
6. Multiple objects
a. Sorting Methods
b. Visibility check
c. Depth-Buffering
7. Designing a 3d game engine
a. Camera as a vector
b. Matrices
8. I don't know yet. ;*)
II.
Introduction
The
purpose of this article is to try to explain the reasons behind 3d projection
and a little on 2d rotation. 3d is only as hard, or as easy, as you want it to
be. Don't be afraid as I'll take you to the world of 3d step by step.
What
you need to be able to run the sample programs that I will be throwing from time
to time is any flavor of QuickBASIC(QBASIC,QB4.5,7.1, etc). A little
experience in algebra and Trig is also a plus but not necessary. I will also try
to explain optimization techniques as we go along the whole series.
;*)
III. 3d cartesian coordinate
system
The
3d cartesian coordinate system is almost like the 2d cartesian coordinate system
that we grew up with, only with an extra dimension: The Z axis. *There are
several other 3d coordinate systems like spherical and cylindrical. I will
explain them to you in detail in future issues, but when I talk 3d coordinates
for now, its the cartesian coordinate system unless specified.
ie. a.
2d
p(x,y)
b.
3d
P(x,y,z)
But how do we
define a 3d coordinate? Where does the z-axis go? As we know already, in 2d
coordinate, the x-axis is going to the right and the y-axis is going up. The 2
axes(plural for axis) intersect at p(0,0). Read as "Point 0,0" where the first
value is the x(abscissa) and the second value is the y(ordinate).
P(0,0) is also called the "Origin". They are also PERPENDICULAR to
each other. Perpendicular means a line,plane or a ray(vector) which has a union
of 90 degrees. Meaning they form a "+" when they intersect.
See how all
the angles(1,2,3,4) are all 90 degrees? That's the essence of perpendicularity.
Also be sure that you understand this concept as perpendicularity is used on
almost all things that got to do with 3d. *Perpendicular lines/Planes/rays
are also called
"orthogonal".
There
is not that much difference in 3d, all the axes are perpendicular to each other.
ie:
Z axis is perpendicular to the XY Plane, Y axis is perpendicular to the
XZ plane as the X axis to the YZ plane. Now how about the directions the axes
go? Well, there are two ways to define a 3d system. The "RIGHT-HANDED"
and the "LEFT-HANDED" systems. The choice is yours to make, or me in this
case because I'm the one writing this article.
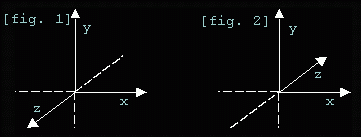
a. Left handed system(Fig.
2)
The left-handed system
means that when increased:
x goes
right
y goes
Up
z goes into the screen (away
from you)
b. Right Handed system(Fig.
1)
When
increased:
x
goes right
y goes
up
z goes out of the screen (Into
you)
Since most books
use the right handed system, I'll use that system. Another reason is that the
coordinates when plotted on the screen, resembles a real-world system. Hey, I'm
right handed. ;*)
IV. 3d to 2d
projection.
As you
might have guessed, QB has no PSET3d or LINE3d routine so we have to make one.
:*) The beauty of learning the theories and principles behind how things work is
that you won't get lost at discussions on forums. :*) So let me start by the
principle:
Normal way: "The farther the thing from the viewer the
smaller it gets"
Jocke's way: "I'm gonna kick this ball so far you
won't be able to see it."
Math way: "Distance is inversely
proportional to the size of an
object"
Trying to make an
equation using Jocke's or the English statement would be very hard. So we'll use
the Math way:
Size=1/distance
so:
Newsize=Size/Distance
assume:
a.
OrigSize =
100
Distance =
1
=
100/1
= 100
b.
Origize =
100
Distance =
50
=
100/50
= 2
*This is
just an approximation. Just to show you the relationship of size and
distance.
Now you would
want to project and object but how do we do it with the knowledge that we have
already learned? Well, First, we have to decide where z =0 is. Turns out that a
good way to define z=0 is a number of units away from you. Which means that you
can see it when you look at your monitor. A good value is 256. Why 256? Well,
this is not entirely the law since you could make it as small or as big as you
want it to be, but 256 is a good multiplier(or any power of 2 value) as you will
see later. Secondly, where to put the monitor in our 3d space. Think of your
monitor as a "camera" that points onto the 3d space and the screen as the
LENS(camera lens) perpendicular to the z-axis(Yes, your XY plane). Since (0,0,0)
or z=0 is at a distance of 256 looking at the negative direction, our Lens
should be 0+256. So that the coordinate of our lens is (0,0,256). Anything
more than 256 is behind the camera and should not be plotted. Remember that we
are looking on the negative z in right-handed systems.
And why did we use
256?
Seasoned programmers
would know that 256 is a power of two. Since you can use shifts to multiply and
divide, you could make your renders faster by miles as shifts are way faster
than divs or muls. ;*)
In
screen 13, the dimensions of the screen is 320*200 and its center is (160,100).
We know that at z =0, the relationship of each x,y,z units is that x and y is
one unit wide. So plotting (8,5,0):
Distance=
256
screenx =
160+x
screeny = 100-y (the screen
y-wise is reversed)
Then:
Screenx = 160 + 8 =
168
Screeny = 100 - 5 =
95
Pset(168,95),
col
How about if z = 128? (8,5,128)
then:
distance
= 256
-128
= 128
128 is nearer which
means the size of the units should increase. But how much? Since 128 is half of
256, our units should be 2x(twice) the size of the units at z = 0.
so..
screenx = 160+x*2 = 160+8*2
screeny = 100-y*2 = 100-y*2
Then:
Screenx = 160 + 16 =
176
Screeny = 100 - 10 =
90
Pset(168,95),
col
Pretty easy
huh? Putting it all together, the projection would look like this:
Distance= LENS-z
screenx
= xcenter+(LENS*x/Distance)
screeny =
ycenter-(LENS*y/Distance)
Now let me explain
how each component affects the whole projection formula:
1.
Lens
We know that LENS,
the lens of our camera or monitor in this case, is a multiplier to give your
projection a field of view(FOV) and since the camera is 256 units away from
(0,0,0) we would want the value of our lens to have a direct correlation with
distance. eg: z =
0
Distance = 256-0 =
256
Lens =
256
x = 8
xcenter =
160
=(256*8/256)+160 =168
(See the relationship
already?)
* some people use a
value of Lens=1 so that it weeds out 2 muls or shifts in the actual projection
fomulas but in my experience, the objects does not look
"natural".
2.
Distance
This is
just how far a 3d pixel is away from the camera. Since we look in the negative
direction, "The farther the distance, the smaller the z value. ie. p(0,0,-100)
is father than p(0,0,100). Let us see if this holds true in equation
form.
a. (0,0,-100)
Distance =
256-(-100)
'distribute the [-] sign:
Distance
= 256+100
Distance =
356
b. (0,0,100)
Distance =
256-(+100)
Distance =
256-100
Distance =
156
Ahem! 356>156.
;*)
What about z=>256 or
distance is 0 or less? Well, unless you want to poke yourself in the eye, you
wouldn't want to plot em. ;*) Plotting at distance=0 is technically correct but
You had to change your projection formula because n/0 is undefined. And in
geometry, "Distance is always positive :*)" Here's the
formula:
Distance =
0
screenx = xcenter +
(LENS*x)
screeny =
ycenter - (LENS*y)
To test your intelligence, I'll let
you think about it yourself. ;*)
FINAL PROJECTION
EQUATIONS!!!
Distance =
LENS-z
screenx =
xcenter+(LENS*x/Distance)
screeny =
ycenter-(LENS*y/Distance)
Now let's see if the projection equations would return the same values for
(8,5,128):
Remember that we returned x=176, y=90)
Distance =
256-128=128
screenx =
(256*8/128) + 160
screeny
=-(256*5/128) + 100
=
screenx = (2048/128) +
160
screeny =-(1280/128) +
100
=
screenx = (16) + 160 = 176
screeny =-(10) + 100 = 90
Ahem...;*)
V.
Translation
Translation
is just movement of a point from one location to another. To simplify things, I
put the translation coords in the form of a camera offsets,
camx,camy,camz.
Moving the
location of the point is just as simple as adding or subtracting values to the
camera offsets and subtracting those components; x,y & z from p(x,y,z)
ie:
Xtranslated= x -
camx
Ytranslated= y -
camx
Ztranslated= z -
camx
VI. Putting it in
action
Now for
the fun part, plotting!. Let's start by the simplest of all "models"(When I say
models I mean an array of points that define a 3d object), the plane. In this
case we want to plot a grid of 16*16 plane. As we would want the grid to be
centered at x=0 and y=0, the starting x and y values of our grid is negative. We
also would want to start at z=0 adding an increment(20) for every y-loop. We
also would want to scale the distance between each point, in this case
4.
QBcode:
Gsize =
16
size% = Gsize *
Gsize
'16 * 16 grid
DIM SHARED Plane(size% - 1) AS
Point3D 'dim out plane
Scale =
4
'scale
factor
'change to a smaller if you want
to
'reduce the size.
z =
0
'start 256 units away from screen
i =
0
'index for pixels
HalfSize = Gsize \
2
'1/2 of our grid for centering
FOR y = HalfSize - 1 TO
-HalfSize STEP -1 'loop through
it
FOR x = HalfSize - 1 TO
-HalfSize STEP -1 'and calculate each
coord
Plane(i).x = x * Scale 'make the
model
bigger
Plane(i).y = y *
Scale
Plane(i).z =
z
i = i +
1
'increment array index
NEXT
x
z = z +
20
'go out into the screen 20 units every line.
NEXT y
Now to project it,
1. start
2. read pixel at location
i
3. translate the pixel using p(x,y,z) -
cam(x,y,z)
4. project each pixel
5.
Plot
6. If I<maxpoints go to start else
end
QBCode:
FOR i = 0 TO UBOUND(Plane)
sx! =
Plane(i).x - camx%
'coords
sy! = Plane(i).y -
camy% 'sub tracted by
the
sz! = Plane(i).z -
camz%
'camera
'we can still directly
subtract
'camera offsets to our
original
'coords as we are not rotating yet.
;*)
Distance% = (LENS -
sz!) 'get
Distance
IF Distance% > 0
THEN 'if dist>>0
then
'Projection
formula
x%
= XCENTER + (LENS * sx! /
Distance%)
y% = YCENTER - (LENS * sy! /
Distance%)
PSET (x%, y%), 15 'Draw each
star
ELSE
'do
nothing
'you wouldn't wan't
to
'divide
by 0 would ya?
:*)
'and
in geometry, distance
is
'always
positive. ;*)
END
IF
NEXT i
Now here's the example
file of a projected plane:
(camera is controlled by AZSXDC)
Project.BAS
You
can even project texts:
Projchar.bas
Here's
how you can apply the projection equations to a starfield:
Projstar.bas
VII. Using sprites instead of
pixels
Pixels alone
tend to be boring after a while. So why not use sprites? Considering we also
have to project the size of the sprite or tile, we can't use the normal QB PUT
routine, so we have to make a stretch sprite routine for this purpose alone. The
algo behind the stretch sprite routine is pretty trivial so I won't explain it
here in detail. All you have to remember is that you could zoom or pan on a
sprite depending on the parameters, NewHeight and NewWidth.
For the
actual algo in calculating the new dimensions, here's the formula:
NewHeight =OldHeight *
LENS/Distance%
NewWidth =OldWidth *
LENS/Distance%
OldWidth
and OldHeight are the actual dimensions of the sprite. Ie. If you
GET(0,0)-(15,15),Array then the size of the sprite is 16*16. So OldHeight = 16
and OldWidth =16.
Distance is the
same distance in out projection equations. Same with the LENS.
I'll let you
figure out the rationale behind the equations yourself. :*)
Here are some
sample files:
Meteor.bas
Stars.bas
Hope you've learned
something from this. The best way to learn though is to just play with the
values, running the program and see the effect of the changed values.
Next
time, I will teach you 2d and 3d rotations, polar coordinates, other forms of
transformation besides translation, optimizations of 3d rotations using
constants, and probably if space will provide 3d model generation(The math way).
So you might want to read on:
1. Trig Functions
Sin and Cos
only
2. Trig Identities
Cos/Sin addition laws
3.
Right Triangle relationships in Trig functions
4. Polar to cartesian
coordinate conversion.
*Don't
worry even if you don't know a thing about those things I mentioned because I
will be teaching you all of those next issue as if you're am 8 year-old kid.
;*)
So until next time, Relsoft signing out. Happy
coding!!!!
Relsoft 2004
vic_viperph@yahoo.com
http://rel.betterwebber.com/