issue #11

Art by Gavan

By Gavan


First off, if you have not read last month’s article (issue 10), I suggest you do so now, as it covers several vital concepts not discussed here. That said, let us delve into more shading concepts. What is that I hear? Thousands crying "No, we hate shading, we don’t want any more freakin’ shading tutorials!" ? Worry not, this article concludes all that I know (or remember) about shading; in the following months I will discuss more interesting concepts like...explosions!!! (I sense that many have now gained interest).

Transparency, Refraction, and more


bump mapping
As the title above so bluntly states, the first shading technique we will be doing is bump mapping. Q: What is bump mapping? A: Bump mapping is that thing that makes things look bumpy…yeah! Actually, its the simulation of unevenly distributed, or diffused, light, which makes surfaces look like they have a rough texture to them. This is perhaps one of the most useful techniques for making your objects look more realistic. Without bump mapping, some objects may look a little bit too perfect, or computer-generated. Generally, no real-world object is perfect, it usually is marred, scratched, or smudged in some way, even if to a infinitesimal degree. Bump mapping is also useful, of course, for surfaces that are purely intended to be bumpy; such surfaces would include rock, fur, rust, and dirt, to name a few. There are several types of bump mapping, each having its own unique use.

diffusion mapping
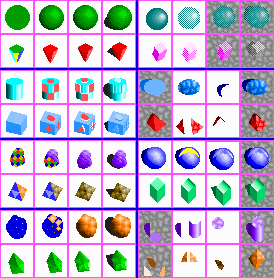
The first, and simplest type of bump mapping is called diffusion mapping. To start, draw and shade your object (1,1)-(2,1) as you normally would. Then "mix up" the shading regions a little by drawing pixels in the shade of one region into a neighboring region of a different shade (3,1)-(4,1). It is as simple as that. To make your object look more or less bumpy, mix up or do not mix up too much the shading regions, respectively. For flat surfaces, the process is fairly similar. Draw the base object (1,2)-(2,2) then mix up the shading regions (3,2)-(4,2). Make sure you do not just mix up the edges of the faces of your object, but the entire faces. You may have noticed that the diffusion is not random, but ordered, in the flat-surfaced object. You can either used ordered or random diffusion for any particular object, where appropriate. For example, a golf ball has evenly spaced valleys on its surface (hint: ordered diffusion), but sand paper has more randomly placed peaks (hint: random diffusion). What the hell are peaks and valleys, if not terrain features, you ask? Peaks are bumps that go outwards, and can be depicted by diffusing brighter shading regions onto darker ones, and valleys are bumps that go inwards, and can be depicted by diffusing darker shading regions onto brighter ones or some crap like that (:’).


Mmm...examples =)


extrusion mapping
Diffusion mapping is only useful for surfaces with tiny, indistinguishable bumps; extrusion mapping, conversely, is intended for making larger, more discernible bumps. As the name implies, extrusion mapping takes a given pattern and "extrudes" it relative to the base object. However, the more complex a extrusion map you have, the more difficult it will be to apply it to the object. Anyway, to begin, draw and shade your object (1,3), then draw the extrusion pattern on top of it (2,3). Next take each chunk of the pattern and move it outwards, on the axis perpendicular to the face or curve of your extrusion (3,3) (for example, outwards from the middle of the cylinder would be in the down direction, and to each side, the chunks would move in their respective direction; the piece on the cap of the cylinder moves upwards). Finally, shade the sides of the extruding pieces in distinguishable shades, and shade the tops of the extruding pieces in a slightly lighter shade, to give them depth. The process is the same for flat faced objects (1,4)-(4,4).

pattern mapping
Again, the title is fairly self-explanatory. Pattern mapping takes a given pattern, but instead of extruding it, each region of the pattern is individually shaded. As the regions approach the darker parts of the object, they become darker. Starting off, draw a matte (unshaded) version of your object with a bump pattern on it (1,5). Then shade in each region accordingly (2,5)-(3,5): the regions closer to your hotspot (Remember that thing? It’s your imaginary light source :^} ) use brighter ranges of shades, and the regions farther away use darker ranges of shades. Finally, draw the shadow, and...what the hell is that thing taking up slot (4,5)? It looks like a bunch of grapes (mmm) grapy-flavor >:D. Heh, no. Ahem, anyway, flat shading is the same (1,6)-(4,6), except the regions of each face use similar color ranges.

specular mapping
This is perhaps the only bump mapping type whose name is not completely obvious. Specular mapping uses a series of highlights to determine the peaks of an object, then shades around each of these highlights and molds the respective shading regions together. For round objects, use a series of points to determine the highlights (1,7); make sure that the highlights get darker around the edges farthest from the light. Next, shade around the highlights and converge the shading regions (2,7)-(3,7). Finally, draw the shadow (4,7), et voila: a cheesy-poof! Flat objects are fairly similar to their rounder counterparts. First draw your object (1,8). Then, instead of finding highlights, you must find peaks (2,8). On these peaks, the vertices of each face will connect to the peak, and the newly divided regions are shaded accordingly (3,8)-(4,8).

transparency and refraction
Transparency is the characteristic of not completely reflecting light, and therefore letting light pass through. Transparent objects allow whatever is behind them to be viewed, unless they are refractive, in which case the above is not necessarily true. Refractive objects bend and distort light; if you have ever looked through a fishbowl, or another curved, glass object, you probably noticed that everything behind it is either bent out of shape or not visible. This is refraction in effect. Flat faces can also be refractive; a diamond, for example, is very refractive, which gives it that "sparkly look" you always see on the home shopping network :^). How does refraction work? Well, in simpler terms, the faces or curved surfaces project the image or background behind and perpendicular to them. So a refractive plane parallel and above a floor would project the floor directly below it onto its surface. Confused?

Do not worry, it is not vital that you know all that garbage above, just follow the tutorial and pretend to know what you are doing :’). Before we examine the following articles, you must first understand a relatively simple concept: static objects and moving objects. Static objects do not move at all, therefore they can reflect their surroundings to any degree you wish. So, for example, if you were to have a reflective object on top of a given background, since it would only be staying in one place, you could render a perfect reflection of the background. If that same object were to move onto another background, the reflection would be inaccurate and look paradoxical. Static objects are generally things that will be glued in place in your game, like a torch on a wall (note that static objects can be animated). Moving objects, however, will be subject to any type of background change, since they can potentially move. Thus, you must draw moving objects according to only an approximation of their environment (we did this last issue with reflective objects). Now, on with show.


Specularly highlight *this*


dithered transparency
Dithered transparency combines an object with its background by dropping out every other pixel (in a "checker board" pattern). The beauty of this method is that dithered-transparent objects are not static, that is, they can be placed on any background and still look properly transparent. However, dithered transparency really only looks acceptable at higher resolutions (I would estimate 640x480 at the least), and it does not really work with small objects. To make a dithered-transparent object, first draw the object as you normally would (5,1), except the shadow should be a darker shade of the object’s base color. Next, drop out every other pixel of the object to the background color (6,1); the easiest way to do this is with diagonal lines of a 45 degree angle (slope of 1), in the background color. Flat objects are exactly the same (5,2)-(8,2).

hue/value (HV) transparency
HV transparency works in the following manner: the background hue (color) is changed to the object color, where the object and background meet (this is called colorizing, the process of changing one color to another). The background texture keeps the variations of its respective values (brightness levels) in each shading region of the sphere. So, for example, say the background texture has four values that make up its texture; whatever hues it has does not matter. In the brightest shading region of the object, the texture is turned to four bright values of the objects hue, to replace the four values that make up the background. HV transparency only works correctly on static objects. First we must have a background on which we can work with our HV transparency (I chose a rock texture in this tutorial). Once you have a suitable texture, cut out the shape of your object from one part of the texture, then cut out the shadow as another piece (5,3).

First we will work with the object cut out. If you do not have a "color replacer" tool in your paint program, you may find this part difficult (a color replacer replaces the secondary color with the primary color). You will want to replace the brightest region of this cut out with bright values of your object’s given hue, and the darker regions with subsequently darker values of the object’s hue (6,3). This should result in a shaded object that has a texture visible behind it (unless you messed up, which is most likely the case :0) ). Then the shadow piece is replaced with a fairly dark range of the object’s hue (7,3) (this makes sense because shadows cast by transparent objects are the color of the object). Then you piece the shadow and the object together in their respective places on top of the background where you cut them out (8,3). Flat objects (5,4)-(8,4) are similar, except the individual faces are cut out and replaced with single color ranges.

psuedo-refraction
Pseudo-refraction is not a static method, but on the other hand, it does not look as accurate as true refraction (explained shortly). Pseudo refraction is almost similar to the pseudo-reflection discussed last issue, except that the process is reversed. Where ever a face cannot reflect the ground, it refracts the ground. Thus, much of the upper hemisphere of a sphere would refract the ground below it, or the same with the top face of a cube. First, make a normal sphere (5,5), then find its refraction region (6,5), which should be a something like a crescent shape near the top. The crescent should not touch the top (it’s a little anomally of refraction, I’m not sure what physical law is behind it :] ). Anyway, next shade the region in whatever fashion suits you, so long as it is distinguishable from the rest of the object.

Flat-surfaced objects (5,6)-(8,6)refract slightly differently; Whichever faces point outwards away from the ground (usually the upper pieces of a flat object), these regions refract, or partially refract, given their angle. Shade these regions in some other way than their counterpart faces. You may wonder why the other faces of these objects are not transparent. Remember that refraction bends light, so the side and lower faces of an object cannot "see" the ground below them; the only thing the can "see" is air, so they are shaded normally. You may choose to make your refractive objects transparent, but it does not always look good and is simpler left alone.

true refraction
Finishing up, we have true refraction. True refraction is static because it refracts the texture below it, not just an approximation of the background. We will start by cutting out the refractive pieces for a cylinder and the cylinder’s shadow (5,7). Note that the bottom cap area of the cylinder is where the top will refract (refractive surfaces reflect directly below them, or in whichever direction the inside of the surface points), so we cut it out for a top piece. Next we draw the side regions normally, as they refract nothing; the shadow is colorized by a dark value of the object’s hue (6,7). Then the top (refractive) region is colorized according to how much light it recieves (7,7). Finally, everthing is pieced together. The flat object (5,8)-(8,8) follows the same rules as the one in (5,6)-(8,6), except that it uses true refraction, and the pieces refract chunks of the background in the opposite directions of their respective surfaces. That is it!

conclusion
These are all of the shading techniques I will tell you, but it does not stop there. You can combine any of the shading methods to produce unique objects (try making a texture mapped, bump-mapped, refractive, reflective, irregular object!). You can invent your own shading techniques for interesting objects. Anyway, count down the days to the next tutorial, because it is about one of the most important concepts to good game graphics: seemless tiling!

Beg Gavan once every 27 minutes to do art for your game too by emailing him here.


Back to Top