|
|
|
By Gavan
|
Welcome to the third art tutorial, written by…Me. This tutorial can be read independently of the previous two, although it is suggested that you read the others anyway, because they were written by Me (and you can pick up the conventions used in My tutorials). Is there a slight air of egotism in this article? =) This tutorial steps out of shading concepts and into the wonderful world of tiling. Tiles are (usually square) blocks of art that can be repititiously blitted to the game screen to make a world. The advantage to using tiles, as opposed to using very large bitmaps depicting entire areas, is that tiles take up much less space, and are easier to work with from a programming perspective (testing collision, for example). The downside to tiles is that they are not entirely flexible, and the final product they represent tends to look "blocky" or repititious. There are several methods of tiling, but first it is necessary to learn seamless tiling, the root of tiling techniques. One thing to note in this tutorial is that some of the larger coordinate blocks are depicted with cyan borders for the purpose of simplicity. |
A R T 3 |
Mmm...examples =) |

|
|
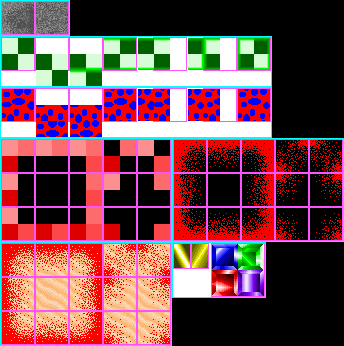
seamless tiling What is that you ask, grasshopper? What is a seamless tile? A seamless tile is a bitmap that can be copied and placed repeatedly in an adjacent fashion such that the viewer can not tell where the origin of the original bitmap is. In simpler terms, a seamless tile, when tiled, has no visible edges. One bitmap should line right up with the next with no awkward lines between if it is seamless. Look at A(2,1) for an example of a seamless tile, and its tiled output in B(2,1). Making a seamless tile can be very complex and frusterating, if you only use trial and error. However, a fairly simple trick can save you lots of work. I call it CAPEA, or "cut and paste edge alignment." It works like this: first, a tile is made, without regard to its seamlessness. Next it is cut in half horizontally…the upper half is place adjacently below the lower half. Then the edge between the two is "fixed," such that no seam appears in the currently visible tile. Then the lower half is placed in its original position, and the tile is cut vertically, the right half is placed adjacent to the other side of the left. Finally, the seam between the left and right halves is fixed, and the right half is placed back in its original position. This process may seem awkward, but it is the single most efficient way I know of making a seamless tile. To clear things up a bit, I made two examples. In the first example A(1,2)-A(7,2), the goal was to create a checker pattern that would blend completely along the edges, but not the inside (which is rather redundant for a checker tile, but it was intended for an easily visualized example). The resulting tiling can be seen in B(3,1). In the second example A(1,3)-A(7,3), a (more real-world) random ellipse pattern was made; the goal of course, was to have it tile seamlessly. This required, in some instances, slightly reshaping or resizing the ellipses. In the result B(4,1), there are several larger ellipses in the center of each tile…this results in a conspicuous pattern (the viewer can easily discern where each tile is, relative to the akward oval). In general, you will want to avoid making any sections of your tiles too different from other sections…no internal components of your tiles should be akwardly large, small, colored, or greatly varied in any other way from the rest of the tile components. I noticed in a certain game the bookshelf tile had a skull on it, next to several books. The skull did add a bit of atmosphere, but when I saw that every bookshelf in the game had the same skull on it…it made me wonder =). To make lots of jargon short, avoid this mistake.
blending tile regions There are sixteen possible combinations…but we do not want the one that is completely blank (all quadrants off); after all, how useful is a blank tile? Subtracting one, this leaves us with fifteen possible combinations. If you align these possible combinations A(1,4), you can easily distinguish that they form four sides, four corners, four inverse corners, two touching corners, and a whole tile. This is the base set we want to use for creating tiles that shift from one tile type to another. From this set, we can create a blender mask, a mask that will dither your base tile set onto any type of terrain. To create a blender mask, simply fade the black dot region onto the red, using less and less frequent dot dithering, and do the opposite with the red region A(2,4). Then, once you have a base tile, you can just make fifteen copies of the tile and place this blender mask over it A(3,4), dropping out the black color as a transparency. Then only the red region has to be dropped out from the transitioning tiles when they are placed on top of other tiles, as shown in B(1,5). As difficult as I may have made that simple process seem, I guarantee that it works great, and is very easy once you create the blender mask…or you can even copy mine if you are lazy =). |
More tiles for ya |

|
|
(not so?) trivial corrections from previous issues More tips for making cool tiles
summary
|