This is the third installment of a 3D software rendering series I am writing for the Back 2 BASIC e-zine. You will need the FreeBASIC compiler to compile the source code I will be presenting here. This series is from the ground up, so it will start with the very basics. How far I will go depends on time and feedback. This series is meant to fill the gap for 3D tutorials for FreeBASIC. I do not claim to be the best 3D programmer, so some of the techniques I use may seem strange, so I encourage you to keep exploring, and to read other tutorials.
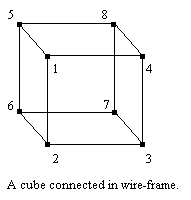
Okay, now wireframe is basically taking the 3D points we have learned about and connecting them together with lines. The way we go about this is that we make an array containing the coordinates of each point, and then we take another array containing the number of the point to connect. At least this is one way to do it, my brother has another method. ;)
To make this clearer:
So the way we implement this is by first storing the coordinates of the points of the cube into an array, and storing the points. After that, simply loop through the points and connect the dots. Now that you got that, go ahead and implement it. :P Hey, wait! I want to see some code! You can't do this to me! Alright. alright. I'll SHOW you how to do it:
Let's start with some new routines, namely, a CalcX, and CalcY. This will take the place of our previous PSET3D routine. You can then make many different routines which simply make calls to this function.
DECLARE FUNCTION CalcX(X AS INTEGER, Z AS INTEGER) AS INTEGER
DECLARE FUNCTION CalcY(Y AS INTEGER, Z AS INTEGER) AS INTEGER
CONST XCENTER = 320
CONST YCENTER = 240
CONST ZCENTER = 256
CONST FOV = 256
FUNCTION CalcX(X AS INTEGER, Z AS INTEGER) AS INTEGER
RETURN(FOV * X / (Z + ZCENTER) + XCENTER)
END FUNCTION
FUNCTION CalcY(Y AS INTEGER, Z AS INTEGER) AS INTEGER
RETURN(FOV * Y / (Z + ZCENTER) + YCENTER)
END FUNCTION
SCREENRES 640, 480, 16
DIM XCoord AS INTEGER
DIM YCoord AS INTEGER
DIM ZCoord AS INTEGER
DO
SCREENLOCK
CLS
FOR XCoord = -50 TO 50 STEP 10
FOR ZCoord = -50 TO 50 STEP 10
FOR YCoord = -50 TO 50 STEP 10
PSET (CalcX(XCoord, ZCoord), CalcY(YCoord, ZCoord)), RGB(255, 255, 255) 'We are now using PSET, but we are using our new CalcX, and CalcY vars.
NEXT
NEXT
NEXT
SCREENUNLOCK
LOOP UNTIL MULTIKEY(1)
What does this have to do with wireframe, you say? It is the same cube example, only without rotation! Patience, patience. I am coming to wireframe. Make sure you understand the changes to the code before proceeding. You do? Good. On to wireframe. What we are going to do next is store the coordinates for an 8 point cube in an array:
DIM CubeXPoints(8) AS INTEGER 'We have eight X coords for our 8 points.
DIM CubeYPoints(8) AS INTEGER 'We have eight Y coords for our 8 points.
DIM CubeZPoints(8) AS INTEGER 'We have eight Z coords for our 8 points.
Now that we have done that:
CubeXPoints(1) = -50 'First X point is -50
CubeXPoints(2) = -50
CubeXPoints(3) = 50
CubeXPoints(4) = 50
CubeXPoints(5) = -50
CubeXPoints(6) = -50
CubeXPoints(7) = 50
CubeXPoints(8) = 50
For Y:
CubeYPoints(1) = -50
CubeYPoints(2) = 50
CubeYPoints(3) = 50
CubeYPoints(4) = -50
Okay, I hope you can see that this is ridiculous. To much work. Fortunately, there is a much better way. We could use a type. Like so:
TYPE Point3D
X AS INTEGER
Y AS INTEGER
Z AS INTEGER
END TYPE
DIM CubePoints(8) AS Point3D
Cool isn't it? Now we can use each element like this:
CubePoints(1).X = -50
Now we don't have so many arrays! Let's also use a FOR...NEXT loop to make it easier:
DIM AS INTEGER X, Y, Z, PntNum
FOR X = -50 TO 50 STEP 100
FOR Z = -50 TO 50 STEP 100
FOR Y = -50 TO 50 STEP 100
PntNum = PntNum + 1
CubePoints(PntNum).X =  X
CubePoints(PntNum).Y = Y
CubePoints(PntNum).Z = Z
NEXT
NEXT
NEXT
This gives us the following code:
DECLARE FUNCTION CalcX(X AS INTEGER, Z AS INTEGER) AS INTEGER
DECLARE FUNCTION CalcY(Y AS INTEGER, Z AS INTEGER) AS INTEGER
DECLARE SUB LoadCube (PntArray() AS ANY)
CONST XCENTER = 320
CONST YCENTER = 240
CONST ZCENTER = 256
CONST FOV = 256
TYPE Point3D
X AS INTEGER
Y AS INTEGER
Z AS INTEGER
END TYPE
DIM SHARED CubePoints(8) AS Point3D
FUNCTION CalcX(X AS INTEGER, Z AS INTEGER) AS INTEGER
RETURN(FOV * X / (Z + ZCENTER) + XCENTER)
END FUNCTION
FUNCTION CalcY(Y AS INTEGER, Z AS INTEGER) AS INTEGER
RETURN(FOV * Y / (Z + ZCENTER) + YCENTER)
END FUNCTION
SUB LoadCube (PntArray() AS Point3D)
DIM AS INTEGER X, Y, Z, PntNum
FOR X = -50 TO 50 STEP 100
FOR Z = -50 TO 50 STEP 100
FOR Y = -50 TO 50 STEP 100
PntNum = PntNum + 1
PntArray(PntNum).X =  X
PntArray(PntNum).Y = Y
PntArray(PntNum).Z = Z
NEXT
NEXT
NEXT
END SUB
LoadCube(CubePoints())
SCREENRES 640, 480, 16
DIM XCoord AS INTEGER
DIM YCoord AS INTEGER
DIM ZCoord AS INTEGER
DO
SCREENLOCK
CLS
'And to render:
DIM PntNum AS INTEGER
FOR PntNum = 1 TO 8 'Loop for all points
PSET (CalcX(CubePoints(PntNum).X, CubePoints(PntNum).Z), CalcY(CubePoints(PntNum).Y, CubePoints(PntNum).Z)), RGB(255, 255, 255)
NEXT
SCREENUNLOCK
LOOP UNTIL MULTIKEY(1)
Okay, we now have the first steps toward wireframe! The next part operates on the same principles, it is only for the point connections data now. What we are going to do is take the data of three points for a triangle. When we do wireframe, we build everything out of triangles. So if a cube has 6 faces, it will have 12 triangles, each quad split in half. The following is the code:
DECLARE FUNCTION CalcX(X AS INTEGER, Z AS INTEGER) AS INTEGER
DECLARE FUNCTION CalcY(Y AS INTEGER, Z AS INTEGER) AS INTEGER
DECLARE SUB LoadCube (PntArray() AS ANY, TriArray() AS ANY) 'We need to add another argument to the LoadCube SUB
CONST XCENTER = 320
CONST YCENTER = 240
CONST ZCENTER = 256
CONST FOV = 256
TYPE Point3D
X AS INTEGER
Y AS INTEGER
Z AS INTEGER
END TYPE
TYPE Tri2D 'And we need another type for the tris.
P1 AS INTEGER
P2 AS INTEGER
P3 AS INTEGER
END TYPE
DIM SHARED CubePoints(8) AS Point3D
DIM SHARED CubeTris(12) AS Tri2D
FUNCTION CalcX(X AS INTEGER, Z AS INTEGER) AS INTEGER
RETURN(FOV * X / (Z + ZCENTER) + XCENTER)
END FUNCTION
FUNCTION CalcY(Y AS INTEGER, Z AS INTEGER) AS INTEGER
RETURN(FOV * Y / (Z + ZCENTER) + YCENTER)
END FUNCTION
SUB LoadCube (PntArray() AS Point3D, TriArray() AS Tri2D)
DIM AS INTEGER X, Y, Z
'We'll manually set up the coordinate data so you better understand what is going on.
'Next issue, we'll load from an external file.
PntArray(1).X = -50
PntArray(1).Y = 50
PntArray(1).Z = 50
PntArray(2).X = 50
PntArray(2).Y = 50
PntArray(2).Z = 50
PntArray(3).X = 50
PntArray(3).Y = 50
PntArray(3).Z = -50
PntArray(4).X = -50
PntArray(4).Y = 50
PntArray(4).Z = -50
PntArray(5).X = -50
PntArray(5).Y = -50
PntArray(5).Z = 50
PntArray(6).X = 50
PntArray(6).Y = -50
PntArray(6).Z = 50
PntArray(7).X = 50
PntArray(7).Y = -50
PntArray(7).Z = -50
PntArray(8).X = -50
PntArray(8).Y = -50
PntArray(8).Z = -50
'We'll manually set up the connection data. Next issue, we'll load from an external file.
TriArray(1).P1 = 6
TriArray(1).P2 = 5
TriArray(1).P3 = 1
TriArray(2).P1 = 6
TriArray(2).P2 = 1
TriArray(2).P3 = 2
TriArray(3).P1 = 7
TriArray(3).P2 = 3
TriArray(3).P3 = 4
TriArray(4).P1 = 4
TriArray(4).P2 = 8
TriArray(4).P3 = 7
TriArray(5).P1 = 7
TriArray(5).P2 = 6
TriArray(5).P3 = 2
TriArray(6).P1 = 7
TriArray(6).P2 = 2
TriArray(6).P3 = 3
TriArray(7).P1 = 8
TriArray(7).P2 = 1
TriArray(7).P3 = 5
TriArray(8).P1 = 8
TriArray(8).P2 = 4
TriArray(8).P3 = 1
TriArray(9).P1 = 7
TriArray(9).P2 = 8
TriArray(9).P3 = 5
TriArray(10).P1 = 7
TriArray(10).P2 = 5
TriArray(10).P3 = 6
TriArray(11).P1 = 1
TriArray(11).P2 = 4
TriArray(11).P3 = 3
TriArray(12).P1 = 2
TriArray(12).P2 = 1
TriArray(12).P3 = 3
END SUB
LoadCube(CubePoints(), CubeTris())
SCREENRES 640, 480, 16
DIM XCoord AS INTEGER
DIM YCoord AS INTEGER
DIM ZCoord AS INTEGER
DO
SCREENLOCK
CLS
'And to render:
DIM TriNum AS INTEGER
DIM AS INTEGER PX1, PX2, PX3, PY1, PY2, PY3, PZ1, PZ2, PZ3
FOR TriNum = 1 TO 12 'Loop for all tris
PX1 = CubePoints(CubeTris(TriNum).P1).X 'The first X coord of our triangle
PX2 = CubePoints(CubeTris(TriNum).P2).X 'The second X coord of our triangle
PX3 = CubePoints(CubeTris(TriNum).P3).X 'etc.
PY1 = CubePoints(CubeTris(TriNum).P1).Y
PY2 = CubePoints(CubeTris(TriNum).P2).Y
PY3 = CubePoints(CubeTris(TriNum).P3).Y
PZ1 = CubePoints(CubeTris(TriNum).P1).Z
PZ2 = CubePoints(CubeTris(TriNum).P2).Z
PZ3 = CubePoints(CubeTris(TriNum).P3).Z
LINE (CalcX(PX1, PZ1), CalcY(PY1, PZ1))-(CalcX(PX2, PZ2), CalcY(PY2, PZ2)), RGB(255, 255, 255) 'Lines for wireframe instead of points. We
LINE (CalcX(PX2, PZ2), CalcY(PY2, PZ2))-(CalcX(PX3, PZ3), CalcY(PY3, PZ3)), RGB(255, 255, 255) 'connect point 1 to 2, 2 to 3, and 3 back to 1.
LINE (CalcX(PX3, PZ3), CalcY(PY3, PZ3))-(CalcX(PX1, PZ1), CalcY(PY1, PZ1)), RGB(255, 255, 255)
NEXT
SCREENUNLOCK
LOOP UNTIL MULTIKEY(1)
That was a lot of work. But we're all done. A complete wireframe cube! Now I know this isn't the cleanest way to load a cube, but that will be fixed next time around. As a final challenge, and to see if you were paying attention last issue, try to make a rotating wireframe pyramid!
I hope you've enjoyed learning about wireframe. Next chapter, Building a reusable 3D engine. Until then, Happy Coding!
Email me at: david.primeproductions.gutierrez AT gmail DOT com with questions or comments.