FreeBASIC 3D Game Programming via Software Rendering: Part 1
By By David Gutierrez a.k.a. Prime Productions
Founder of UGH Soft. (Useless Game Horizons)
Chapter 1: Entering the world of 3D
Introduction:
This is the first installment of a 3D software rendering series I will be writing for the Back 2 BASIC e-zine. You will need the FreeBASIC compiler to compile the code I will be throwing in from time to time. I will be writing this series from the ground up, so it will start with the very basics. How far I will go depends on time and feedback. This series is meant to fill the gap for 3D tutorials for FreeBASIC. I do not claim to be the best 3D programmer, so some of the techniques I use may seem strange, so I encourage you to keep exploring, and to read other tutorials.
Software versus Hardware
Software Rendering is coding 3D without the help of a hardware accelerator. Some computers have a built-in 3D accelerator that has built-in functions for 3D. Software Rendering uses just the video card. You code the triangles, lines, math, etc. Now, I know that some of you will get right onto Software Rendering is OUT! This isn't 1990. It's 2010! Now that PC's can render a zillion polygons on the fly, why on earth would you want to do it the old way? Well, to start out, Software Rendering teaches the principles of 3D better than using DirectX. If I was to write a tutorial on 3D programming via DirectX, it would be mostly technical, or how to use DirectX, not what 3D is. Software Rendering is also a lot more fun.
An introduction to 3D:
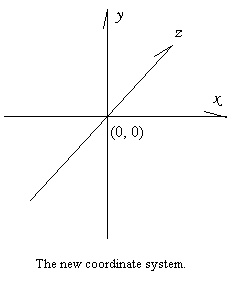
First of all, what is 3D? I am sure you already know this, but if for some reason acronyms were never really your thing, I will explain. 3D stands for three-dimensional. Roughly speaking, there are three axis of movement: up/down, left/right, and into/out of the distance. And, no, that is not 6D. up/down is still on only one plane. 2D (two-dimensional) simply had two axis of movement: up/down and left/right. 3D gives an added element of realism and is especially suited to simulations. The up/down axis is usually denoted by the variable Y. Left/right is usually X, and Into/Out of the distance is usually Z. Following is an illustration:


The 3D Projection Equations:
Now, you know that a computer doesn't by default have a Z axis. The purpose of 3D programming is to add one. Well, how do I do that? As it turns out, the answer is actually quite simple. But as with doing anything, the first thing is to figure out exactly what we want. So let's analyze:
Okay, we want to be able draw things close up and far away.
To draw things close up, they need to be drawn bigger than far away things.
In order to draw things bigger, pixels need to be drawn bigger on the X and Y coordinate.
In order to draw things smaller, pixels need to be drawn smaller on the X and Y coordinate.
This means movement on the X and Y axis.
So if we divide both X and Y by the same number, things will become smaller!
See how easy that was? We call this number Z.
Now in 3D, objects or "things" are drawn out of points. These points are simply pixels plotted in a 3D space. For example, consider the following:
PSET (X, Y, Z), 15
Wait! You can't do that. That is a "parameter count mismatch"! You're... Hold on a second. We are going to make our own PSET routine. This will let us plot points in a 3D space.
Start typing:
DECLARE SUB PSET3D(X AS INTEGER, Y AS INTEGER, Z AS INTEGER, Clr AS INTEGER)
SUB PSET3D(X AS INTEGER, Y AS INTEGER, Z AS INTEGER, Clr AS INTEGER)
     PSET (X/Z, Y/Z), Clr 'Remember to divide both axis by Z
END SUB
SCREENRES 640, 480, 16
PSET3D 100, 200, 10, RGB(255, 255, 255) 'A white point
SLEEP 'A little delay.
Stop typing.
Save this code as my3Dstuff.bas. Then compile and run.
That's boring, I can here you saying. Why on earth would I want to do this? True, let's make it a 3D plane! (New code is in bold red)
DECLARE SUB PSET3D(X AS INTEGER, Y AS INTEGER, Z AS INTEGER, Clr AS INTEGER)
SUB PSET3D(X AS INTEGER, Y AS INTEGER, Z AS INTEGER, Clr AS INTEGER)
     PSET (X/Z, Y/Z), Clr 'Remember to divide both axis by Z
END SUB
SCREENRES 640, 480, 16
DIM XCoord AS INTEGER
DIM YCoord AS INTEGER
DIM ZCoord AS INTEGER
YCoord = 90 'This won't change
FOR XCoord = 1 TO 100 STEP 10
     FOR ZCoord = 1 TO 100 STEP 10
          PSET3D XCoord, YCoord, ZCoord, RGB(255, 255, 255) 'A white point
     NEXT
NEXT
SLEEP 'A little delay.
Okay, I knew this would happen. Don't get me wrong. Let's see, what do we do? Hmmm. I'm trying to figure this out. Okay, I got it! We need to move it to the center to get the projection right! Like so:
DECLARE SUB PSET3D(X AS INTEGER, Y AS INTEGER, Z AS INTEGER, Clr AS INTEGER)
CONST XCENTER = 320
CONST YCENTER = 240
CONST ZCENTER = 256
SUB PSET3D(X AS INTEGER, Y AS INTEGER, Z AS INTEGER, Clr AS INTEGER)
     PSET (X / (Z + ZCENTER) + XCENTER, Y / (Z + ZCENTER) + YCENTER), Clr 'Divide both axis by Z and move to center.

END SUB
SCREENRES 640, 480, 16
DIM XCoord AS INTEGER
DIM YCoord AS INTEGER
DIM ZCoord AS INTEGER
YCoord = 90 'This won't change
FOR XCoord = 1 TO 100 STEP 10
     FOR ZCoord = 1 TO 100 STEP 10
          PSET3D XCoord, YCoord, ZCoord, RGB(255, 255, 255) 'A white point
     NEXT
NEXT
SLEEP 'A little delay.
Oh no! Now there is nothing! Just a tiny point in the distance! It went from bad to worse! No it didn't. It is now merely extremely far away, so all you see is a point. Remember, we are now dividing by Z * 256. This means we need a new variable. It doesn't matter what you call is, so long as it equals ZCENTER, or 256. I like to call this the field-of-vision, or rather FOV. We then multiply it to our projection equations.
DECLARE SUB PSET3D(X AS INTEGER, Y AS INTEGER, Z AS INTEGER, Clr AS INTEGER)
CONST XCENTER = 320
CONST YCENTER = 240
CONST ZCENTER = 256
CONST FOV = 256
SUB PSET3D(X AS INTEGER, Y AS INTEGER, Z AS INTEGER, Clr AS INTEGER)
     PSET (FOV * X / (Z + ZCENTER) + XCENTER, FOV * Y / (Z + ZCENTER) + YCENTER), Clr 'Divide both axises by Z and move to center.
END SUB
SCREENRES 640, 480, 16
DIM XCoord AS INTEGER
DIM YCoord AS INTEGER
DIM ZCoord AS INTEGER
YCoord = 90 'This won't change
FOR XCoord = 1 TO 100 STEP 10
     FOR ZCoord = 1 TO 100 STEP 10
          PSET3D XCoord, YCoord, ZCoord, RGB(255, 255, 255) 'A white point
     NEXT
NEXT
SLEEP 'A little delay.

Cool! It works now! Go ahead and use you new 3D knowledge and make a 3D cube. Hint, change the Y value.
Conclusion:
I know I haven't covered much ground this time, but the next part will be better. Up and coming, 3D rotations the easy way! Until then, Happy Coding!
-David Gutierrez
Email me at: david.primeproductions.gutierrez AT gmail DOT com
with questions or comments.