Copyright © 2000-2002 Mikael Andersson, Christopher S. Charabaruk and Matthew R. Knight. All rights reserved. All articles, tutorials, etc. copyright © by the original authors unless otherwise noted. QB Cult Magazine is the exclusive property and copyright of Christopher Steffan Charabaruk and Matthew R. Knight.
Well, last issue I promised I'd have my first real Editor's note in this issue, but I'm in a tired and boring mood, so believe me, it's best for you if I don't write one :)
I'll write something still though, and you may just skip this part if you don't like it.
Close to half a year has passed since last issue was released. During that time, many things have happened that I haven't been able to cover in QBCM as I haven't had the time and will to write a full issue. QBCM's second year has ended, and it's third year started, about a month ago. QB has advanced some farther, to a place where games like first person shooters are no longer viewed as impossible to make. FoX, a game I think many would agree is the best QB platform game yet, was finally released after like five years of waiting.
I think it's a shame I can't manage to release QBCM more often than this. I don't even know if people care wether I do or not. I've been thinking of leaving the responsibility of being the QBCM editor to someone else, but I don't know who I could trust, especially since practically noone shows interest in doing anything for QBCM. My motivation for making QBCM is stagnating, as I get practically no response from the readers. What is the motivation for writing if noone cares if you do?
I'm not there yet, but I know I could come to a point where I just give up editing QBCM, and before that I want to give the people who cares about QBCM a chance to change the situation so that QBCM continues.
I would really appreciate if people started participating again in making QBCM, cause I don't like my style of writing and the crappy english I fill my articles with.
Ah well, all this might just be cause I haven't had much sleep last week, so maybe you shouldn't care too much :)
Anyhow, please help QBCM by sending articles, news or whatever, cause it hardly gets any content at all (for proof, look at the list of writers in this issue)
Mikael Andersson (Sane), editor
Note: Regarding BASIC Techniques and Utilities, it was originally published by Ziff-Davis Press, producers of PC Magazine and other computer related publications. After ZD stopped printing it, they released the rights to Ethan Winer, the author. After communicating with Ethan by e-mail, he allowed me to reproduce his book, chapter by chapter, in QBCM. You can find a full text version of BASIC Techniques and Utilities at Ethan's website <www.ethanwiner.com>, or wait until the serialization is complete, when I will have an HTML version ready.
As usual, I didn't get any letters from the readers...
To place an ad, please e-mail <qbcm@tekscode.com>, subject QB Ads. Include your name (real or fake), e-mail address, and message. You may include HTML formatting (but risk the chance of the formatting being thrown out).
By Ethan Winer <ethan@ethanwiner.com>
Two very important BASIC keywords that are sadly neglected by many programmers are PEEK and POKE. Most people understand that these let you read from and write to memory locations. But what are they really good for? The whole point of a high-level language like BASIC is to avoid such direct memory access, and to many programmers these commands may seem like an enigma.
In most cases, you *don't* need to access memory with PEEK and POKE. Unlike C and assembly language that require direct memory operations to process strings and arrays, BASIC includes a full complement of commands for this. However, there is at least one important use for PEEK and POKE that cannot be accomplished in any other way: accessing low memory.
The portion of memory in every PC that begins at Hex address 0000:0400 is called the *BIOS Data Area*, and it contains much useful information. For example, the equipment word at address &H410 tells how many diskette drives are installed, and how many parallel and serial ports there are. The keyboard status flags at address &H417 can be read (and written), to reflect whether the Caps Lock and NumLock states are active.
In this chapter I will describe all of the low memory locations that are relevant to a BASIC program, and present numerous practical examples to show how this data can be utilized. This is by no means a complete list of every BIOS data address that is available in the PC. Rather, I have purposely limited it to those that I have found useful.
One potential limitation that needs to be addressed first is how to access full words of data. BASIC's PEEK and POKE operate on single bytes only, and reading or writing two bytes at a time is a messy proposition at best.
Chapter 9 introduced a pair of routines called PeekWord and PokeWord, that allowed accessing memory a word at a time. In the context those were presented, a fair amount of code could be saved by consolidating the necessary code into a subprogram or function. But in the interest of speed and even further code size reductions, the following assembly language routines are better still.
;PEEKPOKE.ASM, simplifies access to full words

.Model Medium, Basic
.Code

PeekWord Proc Uses ES, SegAddr:DWord
  Les  BX,SegAddr     ;load the segment and address
  Mov  AX,ES:[BX]     ;read the word into AX
  Ret                 ;return to BASIC
PeekWord Endp


PokeWord Proc Uses ES, SegAddr:DWord, Value:Word
  Les  BX,SegAddr     ;load the segment and address
  Mov  AX,Value       ;and the new value to store there
  Mov  ES:[BX],AX     ;write the value into memory
  Ret                 ;return to BASIC
PokeWord Endp
End
Both of these routines expect the parameters to be passed by value, for faster speed and smaller code. Therefore, you will declare them as follows:
   DECLARE FUNCTION PeekWord%(BYVAL Segment%, BYVAL Address%)
   DECLARE SUB PokeWord(BYVAL Segment%, BYVAL Address%, BYVAL Value%)
Then to read a word of memory--say, the address of the LPT1 printer adapter at address &H408--PeekWord would be invoked like this:
LPT1Addr% = PeekWord%(0, &H408)
And to write the letter "A" in the lower left corner of a color display screen in white on blue you could use PokeWord, thus:
CALL PokeWord(&HB800, 3998, &H1741)
Notice that PeekWord returns a negative value for numbers greater than 32767. This is normal, as explained in Chapter 2. However, the same negative value that PeekWord returns can be used as an argument to PokeWord with the correct results.
The sections that follow are organized by category, since this is how low memory is arranged in the PC. That is, one section discusses the RS-232 communications data area, the next shows the portion of memory used by the printer adapters, and so forth. Each address is listed in ascending order; by convention, Hex notation is used exclusively for these addresses. In all of the examples shown here, you will use a segment value of zero.
It is important to understand that besides memory addresses that are accessed with PEEK and POKE (or in this case their full-word equivalents), the IBM PC family also has a series of input and output ports. These ports are accessed using INP and OUT commands instead of PEEK and POKE. I mention this here because ports are referred to in several places in the discussions that follow. In particular, the communications ports that are exchanged in the next section are in fact port numbers, and not memory addresses. Some useful port numbers are given at the end of this chapter, along with code examples that show how to read from and write to them.
Table 10-1 provides a summary of all the low memory addresses that are described in this chapter.
Address   Meaning
=======   ==========================================
 &H400    2 bytes, COM1 port number
 &H402    2 bytes, COM2 port number
 &H404    2 bytes, COM3 port number
 &H406    2 bytes, COM4 port number

 &H408    2 bytes, LPT1 port number
 &H40A    2 bytes, LPT2 port number
 &H40C    2 bytes, LPT3 port number
 &H40E    2 bytes, LPT4 port number

 &H410    2 bytes, Equipment List
 &H413    2 bytes, installed memory (K)
 &H417    2 bytes, keyboard status
 &H418    2 bytes, enhanced keyboard status

 &H41A    2 bytes, keyboard buffer head pointer
 &H41C    2 bytes, keyboard buffer tail pointer
 &H41E    30 bytes, keyboard buffer

 &H43F    1 byte, diskette motor on indicator
 &H440    1 byte, diskette motor countdown timer

 &H449    1 byte, current video mode
 &H44A    2 bytes, current screen width (columns)
 &H44C    2 bytes, current video page size (bytes)
 &H462    1 byte, current video page number
 &H463    2 bytes, CRT controller port number

 &H46C    4 bytes, long integer system timer count

 &H478    4 bytes, LPT1 - LPT4 timeout values

 &H484    1 byte, EGA/VGA screen height (rows)
 &H485    2 bytes, character height (scan lines)
 &H487    1 byte, EGA/VGA Features bits

 &H4F0    16 bytes, Inter-Application Area

 &H500    1 byte, PrtSc busy flag

 &H504    1 byte, active drive for one-diskette PC
The four words starting at address &H400 hold the port numbers for each installed RS-232 communications adapter. For example, the port number for COM1 is contained in the word at address &H400, and the port number for COM3 is at address &H404. Because these port numbers are words rather than bytes, the COM1 port number is contained in both &H400 and &H401. Thus, COM2 starts at address &H402, and COM3 starts at &H404.
BASIC allows you to open only COM ports 1 and 2; however by exchanging these addresses you can substitute ports 3 and 4 if necessary. The complete program that follows first swaps the port numbers for COM1 and COM3, and then opens COM1 for output. Since the port numbers are swapped, it is actually COM3 that is being opened.
DEFINT A-Z
DECLARE FUNCTION PeekWord% (BYVAL Segment, BYVAL Address)
DECLARE SUB PokeWord (BYVAL Segment, BYVAL Address, BYVAL Value)

COM1 = PeekWord%(0, &H400)    'save COM1 port number
COM3 = PeekWord%(0, &H404)    'save COM3 port number
CALL PokeWord(0, &H400, COM3) 'assign COM3 to COM1
CALL PokeWord(0, &H404, COM1) 'and then COM1 to COM3

OPEN "COM1:1200,N,8,1,RS,DS" FOR RANDOM AS #1
PRINT #1, "ATDT 1-555-1212"   'dial information
CLOSE #1

CALL PokeWord(0, &H400, COM1) 'restore the original values
CALL PokeWord(0, &H404, COM3)
The four printer port numbers start at address &H408, and they are similar to those used to hold the communications ports and may also be exchanged if necessary. For example, if you have a program that uses LPRINT commands, all printed output will be sent to LPT1. If at some later time you want to use the same program with LPT2, you can exchange the port numbers instead of having to rewrite the program. A short code fragment that does this is shown following.
DEFINT A-Z
DECLARE FUNCTION PeekWord% (BYVAL Segment, BYVAL Address)
DECLARE SUB PokeWord (BYVAL Segment, BYVAL Address, BYVAL Value)

LPT1 = PeekWord%(0, &H408)    'save LPT1 port number
LPT2 = PeekWord%(0, &H40A)    'save LPT2 port number
CALL PokeWord(0, &H408, LPT2) 'assign LPT2 to LPT1
CALL PokeWord(0, &H40A, LPT1) 'and LPT1 to LPT2

LPRINT "This is printed on LPT2"
CALL PokeWord(0, &H408, LPT1) 'restore the original values
CALL PokeWord(0, &H40A, LPT2)
LPRINT "And now we're back to LPT1"    'prove it worked
Like the communications port addresses, each printer port address is a full word, so while the first is located at address &H408, the second is at &H40A. You will also find PeekWord useful because it does not require you to change the current DEF SEG setting. Although there is no harm in assigning a new DEF SEG value in most cases, it is not easy to restore it to the original setting. Therefore, when writing reusable subprograms and functions that need to access memory, you don't have to worry about affecting a subsequent PEEK or BLOAD in the main program.
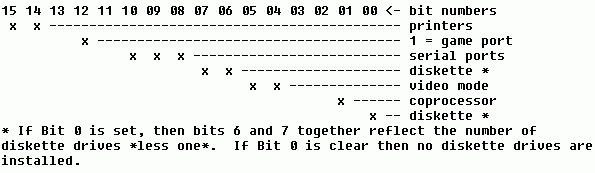
One of the most valuable data items in low memory is the equipment list in the word starting at address &H410. The information contained here is bit coded, to indicate which and how many peripherals are installed in the host PC. Figure 10-1 shows the organization of this word. Bits not identified are either reserved, or not particularly useful.
Because the data in this word is bit coded, you must use AND to extract the necessary information. For example, to see if a math coprocessor is installed you must turn off all but bit 1, and see if the result is zero or not:
   IF PeekWord%(0, &H410) AND 2 THEN
     PRINT "A coprocessor is installed."
   ELSE
     PRINT "Sorry, no coprocessor detected."
   END IF
This brings up an important point, because it is not immediately obvious what values you should use to isolate the various bits in a word. It would be terrific if Microsoft BASIC offered the ability to handle binary values directly. The Microsoft Macro Assembler allows this, as does PowerBasic. In the absence of &B and a BIN$ function, the following short function can be used to determine the correct integer value for a given sequence of binary bits.
FUNCTION Bin% (Bit$) STATIC
  Temp& = 0
  Length = LEN(Bit$)
  FOR X = 1 TO Length
    IF MID$(Bit$, Length - X + 1, 1) = "1" THEN
      Temp& = Temp& + 2 ^ (X - 1)
    END IF
  NEXT
  IF Temp& > 32767 THEN
    Bin% = Temp& - 65536
  ELSE
    Bin% = Temp&
  END IF
END FUNCTION
Given a string of binary digits of the form "01011001", the Bin function returns an equivalent integer value. You could add this function to your programs, or use it to determine constant values ahead of time. For example, to determine the number of diskette drives that are installed requires isolating bits 6 and 7. This is simple in assembly language, where you can specify an AND mask using 11000000b as a value. The example below obtains the equipment word, and then uses the Bin function to disable all but bits 6 and 7.
   Equipment = PeekWord%(0, &H410)
   Floppies = 1 + (Equipment AND Bin%("11000000")) \ 64
   PRINT Floppies; "diskette drive(s) installed"
Although the Bin function is used in the code, I recommend that you create a simple test program first, to determine the value of 11000000 (192) once ahead of time. Then, the Bin function can be omitted from the final program and the second line would be changed as follows:
Floppies = 1 + (Equipment AND 192) \ 64
Notice the use of parentheses to force BASIC to combine Equipment and the number 192 before dividing by 64 with AND. If these are omitted BASIC will instead combine Equipment with the result of 192 divided by 64, which is not correct.
One final technique you should understand is how to shift bits into the correct position to obtain the actual value the bits represent. Treated as bits alone, the number of diskette drives is represented as 00, 01, 10, or 11, and the decimal equivalents for these binary numbers are 0, 1, 2, and 3. But because of their positioning in the equipment word, the bits must be shifted to the right six places. After all, the value 11000000 (192) is certainly not the same as the value 11 (3).
This is handled simply and elegantly using integer division as shown. To shift a number right one position divide it by 2; to shift right 2 places divide by 4, and so forth. Since the diskette bits need to be shifted six places, the equipment variable is divided by 64 after AND is used to mask off the unrelated bits. Likewise, to shift bits left you can multiply by 2, 4, 8, and so forth. The number to use when dividing or multiplying can also be determined by raising 2 to the number of bits power. For example, to shift a number right five places you would divide by 2 ^ 5 = 32.
A problem arises when dealing with the highest order bit, because to BASIC this bit implies a negative number. Therefore, when bit 15 is set, dividing will not produce the expected results. One workaround that is admittedly clumsy is to test that bit explicitly, then mask it off and shift the bits as needed, and finally use an IF test to see if the bit had been set. The only place this is necessary in the equipment list is when reading the number of parallel printers that are present. The first example below reports the number of serial ports, and the second tells how many parallel ports are installed.
Equipment = PeekWord%(0, &H410)
Serial = (Equipment AND Bin%("11000000000")) \ 512
PRINT Serial; "serial port(s) installed"


IF Equipment AND Bin%("1000000000000000") THEN
  HiBitSet = -1
END IF
Parallel = (Equipment AND Bin%("0100000000000000")) \ 16384
IF HiBitSet THEN Parallel = Parallel + 2
PRINT Parallel; "parallel port(s) installed"
In the interest of completeness I should point out that it is not strictly necessary to manipulate bit 15 when accessing the equipment word. Since none of the information straddles a byte boundary, BASIC's PEEK can in fact be used to read just the high byte. Since a byte value is never higher than 255, the entire issue of saving and then masking that bit can be avoided. But there are other situations you may encounter where an entire word must be processed and the highest bit may be set.
The final useful item in the equipment word is the initial video mode. I've seen many programmers read use information to determine if a color or monochrome monitor is installed like this:
   DEF SEG = 0
   IF (PEEK(&H410) AND &H30) = &H30 THEN
     ' monochrome
   ELSE
     ' color
   END IF
There are two problems with this approach. The most serious is that this reflects the monitor that was active when the PC was first powered up. These days, many people have two monitors connected to their PC, and you usually need to know which is currently active. The other problem is this requires more code than the better method I showed in Chapter 6 which reads the port address of the currently active video adapter:
   DEF SEG = 0
   IF PEEK(&H463) = &HB4 THEN
     ' monochrome
   ELSE
     ' color
   END IF
Besides the equipment word at address &H410, another word at address &H413 holds the amount of memory that is installed in KiloBytes. Note that this word does not reflect any extended or expanded memory that may be present. Also note that a much better indicator of how much memory is actually available to a program is BASIC's FRE(-1) function. The short code fragment below shows how to determine the total DOS-accessible memory that is installed.
   TotalK = PeekWord%(0, &H413)
   PRINT TotalK; "K Bytes present in this PC."
As with the equipment word, the keyboard data area also maintains bit-coded information. However, this word indicates the setting of the various keyboard shift states. Unlike many of the other addresses in the BIOS data area, some of these bits may be written to as well as read from.
The byte at address &H417 shows the current status of all of the shift keys, and the upper four bits may be either read or written. The remaining bits in this byte should not be written to, nor should you alter any of the bits in the next byte at address &H418. Figure 10-2 shows the meaning of each bit in the byte at address &H417, and Figure 10-3 shows the bits at address &H418 that relate to extended keyboards only.

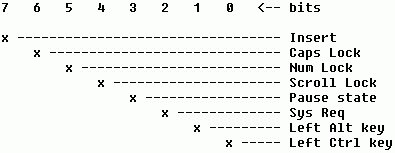
The various flags in the upper four bits at address &H417 are toggled on and off by the BIOS each time the corresponding keys are pressed. For example, bit 6 is set while the Caps Lock is active, and bit 5 is clear when Num Lock is not in effect. Note, however, that the Insert flag is of no practical use, and you should not rely on that bit in your programs. If you are writing an input routine (or using the one shown in Chapter 6) you should keep track of the insert status manually.
The lower four bits indicate the current state of the various shift keys, and they are set only while the associated key is actually being pressed. Bits in the next word at address &H418 let you determine which Alt and Ctrl keys are pressed, for keyboards that have more than one of those keys. In most cases you will probably just want to know if these keys are active, and not distinguish between the left and the right key. Therefore, you will usually ignore the extended keyboard information, unless you need to detect the SysReq key.
As with the equipment list, you will use a combination of PeekWord (or PEEK) to read all of the flags, and then use AND to isolate just those bits you care about. Because there is only one bit that corresponds to each keyboard state flag, it is not necessary to divide or multiply to convert multiple bits into a number.
The examples below show how to test each of the bits in the byte at address &H417, without regard to the extra Ctrl and Alt key information contained at address &H418.
CLS
PRINT "Press the various Shift and Lock keys, ";
PRINT "then press Escape to end this madness."
COLOR 0, 7

DO
  Status = PeekWord%(0, &H417)

  LOCATE 10, 1
  IF Status AND 1 THEN
    PRINT "RightShift"
  ELSE
    GOSUB ClearIt
  END IF

  LOCATE 10, 11
  IF Status AND 2 THEN
    PRINT "Left Shift"
  ELSE
    GOSUB ClearIt
  END IF

  LOCATE 10, 21
  IF Status AND 4 THEN
    PRINT "Ctrl key"
  ELSE
    GOSUB ClearIt
  END IF

  LOCATE 10, 31
  IF Status AND 8 THEN
    PRINT "Alt key"
  ELSE
    GOSUB ClearIt
  END IF

  LOCATE 10, 41
  IF Status AND 16 THEN
    PRINT "ScrollLock"
  ELSE
    GOSUB ClearIt
  END IF

  LOCATE 10, 51
  IF Status AND 32 THEN
    PRINT "Num Lock"
  ELSE
    GOSUB ClearIt
  END IF

  LOCATE 10, 61
  IF Status AND 64 THEN
    PRINT "Caps Lock"
  ELSE
    GOSUB ClearIt
  END IF

  LOCATE 10, 71
  IF Status AND 128 THEN
    PRINT "Insert"
  ELSE
    GOSUB ClearIt
  END IF

LOOP UNTIL INKEY$ = CHR$(27)
COLOR 7, 0
END

ClearIt:
  COLOR 7, 0
  PRINT SPACE$(10);
  COLOR 0, 7
  RETURN
As you can see, to read a single bit you use AND to isolate it from the rest, and then test if the result is non-zero. Setting a bit requires slightly more work, because it is important not to disturb the other bits in that byte. This requires that you first read the current information, change only the bit or bits of interest, and then write the modified data back to the same location. The next short example shows how to turn the CapsLock state on and then off again.
CurStatus = PeekWord%(0, &H417)
NewStatus = CurStatus OR Bin%("1000000")
CALL PokeWord(0, &H417, NewStatus)

PRINT "Press a key to turn off CapsLock"
WHILE INKEY$ = "": WEND

NewStatus = NewStatus AND Bin%("10111111")
CALL PokeWord(0, &H417, NewStatus)
Notice the difference between how OR is used in the first example, and how AND is used in the second one. In the first case we want to set a bit, so only that bit is specified in the binary mask. The remaining bits stay the same as they were--if they are already set then OR will leave them that way. But to turn off the CapsLock bit requires that all of the mask bits be set *except* the one you wish to force off. Other bits that were already on will remain on after being combined with AND and 1.
The next group of low memory keyboard addresses relate to the keyboard buffer. As you undoubtedly know, every PC has a keyboard buffer that can hold up to fifteen keystrokes. When a program is off doing something and is unable to read the keyboard, the BIOS keyboard routines will store keys that have been typed. Then, when the program finally gets around to reading the keyboard, they are waiting there to be read. The keyboard buffer is therefore also called the *type-ahead* buffer.
A series of 34 bytes are set aside for the keyboard buffer. Two words (four bytes) are used to hold the current head and tail pointers that show where the next key will be read from, and where the next will be stored. The current head address is stored at address &H41A and the tail at address &H41C. Thirty additional bytes are used to store the actual keystrokes, with two bytes used for each. The keyboard buffer is called a *circular buffer*, because the start and end points are constantly revolving.
When a PC is first powered up, the head of the buffer holds the address &H41E, which is the start of the buffer memory area. The tail is also initially set to that same address, until a key is pressed. When that happens, the tail pointer is advanced by 2, and the character and its scan code are placed into the buffer. Each time a new key is pressed the character and scan code are added to the end of the buffer and the tail pointer is advanced by two; each time a key is read by an application the word at the current head is returned and the head pointer is advanced.
Note that the head and tail addresses assume a segment of &H40, rather than zero. Therefore, the actual values stored range from &H1E through &H3A rather than &H41E through &H43A. Of course, address 0000:041E is the same as address 0040:001E, and you can think of the buffer address either way. I usually treat all of low memory as being located in segment 0, because that can often save a byte of code. BASIC (or assembly language, for that matter) can pass the number zero by value using only three bytes, compared to the four bytes needed to pass any other number.
The program below shows how to determine the number of keys that are currently pending in the buffer, and also which one will be returned next.
CLS
PRINT "You have two seconds to press a few keys..."
Pause! = TIMER
WHILE Pause! + 2 > TIMER: WEND

BufferHead = PeekWord%(0, &H41A)
BufferTail = PeekWord%(0, &H41C)

NumKeys = (BufferTail - BufferHead) \ 2
IF NumKeys < 0 THEN NumKeys = NumKeys + 16
PRINT "There are"; NumKeys; "keys pending in the buffer."

PRINT "The next key waiting to be read is ";
NextKey = PeekWord%(&H40, BufferHead)
IF NextKey AND &HFF THEN
  PRINT CHR$(34); CHR$(NextKey AND &HFF); CHR$(34)
ELSE
  PRINT "Extended key scan code"; NextKey \ 256
END IF
This program starts by waiting two seconds giving you a chance to press a few keys. It then reads the buffer head and tail pointers, and from that calculates the number of keys that are pending in the buffer. With a circular buffer the head address may be higher the tail address, so a separate test is needed to account for that.
Next, the word at the head of the buffer is retrieved, which indicates the next available key. Since the head and tail pointers assume segment &H40, I used that instead of segment 0. PeekWord%(0, &H41E) produces less code than PeekWord%(&H40, &H1E); however, PeekWord%(0, &H400 + BufferHead) is worse than PeekWord%(&H40, BufferHead) because of the addition needed.
Data in the keyboard buffer is always a full word, and it is up to you to determine if it is a normal ASCII key or an extended key's scan code. A normal key is indicated with a non-zero low byte, and the high byte then holds the physical hardware scan code which can usually be ignored. If the low byte instead holds a value of zero, it is an extended key and the scan code in the high byte indicates which one. Therefore, the BASIC statement NextKey AND &HFF masks the high byte, to test if the low byte is non-zero.
If the key is extended, then NextKey \ 256 returns the value in the high byte. This is similar to the earlier examples that shifted bits to the right by dividing. Unlike the earlier tests that examined only some of the bits in the equipment flag, we are interested in all of the bits in the upper byte. Dividing by 256 copies the upper byte to the lower byte, thus discarding the lower byte entirely.
You should also refer back to the StuffBuffer program shown in Chapter 6, which accesses the keyboard buffer directly and inserts new keystrokes.
There are several bytes in low memory that relate to the floppy and fixed disks in your PC, but most of them are best left alone. One exception, however, is the diskette drive motor timeout duration. Whenever a diskette drive is accessed, DOS first turns on the motor, and then waits a second or two until the motor has come up to speed. Once DOS is certain that the disk speed is correct, reading and writing are allowed.
Because of the time it takes the diskette to become ready, DOS also keeps the motor running for two more seconds after a read or write has been completed. This way, if another request comes along within that time, further delays can be avoided because the motor is already running. If you know that the data your program is accessing is on a floppy disk and there may be pauses in the reading or writing, you can force the motor to stay on longer than the normal two seconds.
The byte at address &H440 controls the motor hold time, and its value is decremented at every system timer tick [every 1/18th second]. When DOS has finished accessing a diskette, it places a value into this memory location. And when the value is decremented to zero the motor is turned off. The current motor on/off state is reflected by the byte at address &H43F. The program that follows shows how you can modify the timeout value by poking a new, higher value into address &H440 immediately after a command that accesses the disk.
PRINT "Place a diskette in drive A and press a key ";
WHILE INKEY$ = "": WEND
FILES "A:*.*"   'this starts the motor

DEF SEG = 0
POKE &H440, 91  'force drive motor on for five seconds

DO
  LOCATE 10, 1, 0
  PRINT PEEK(&H43F),
  PRINT PEEK(&H440)
LOOP WHILE PEEK(&H440)

BEEP            'watch the diskette light go out when you hear the beep
The value you store at address &H440 is the number of timer ticks that are to elapse before the motor is turned off. Since a new timer tick occurs every 18.2 seconds, you will multiply the number of seconds times this value using Value% = Seconds * 18.2.
As with the diskette data area, a lot of information is available that pertains to the video display, and most of it is of little use in an application programming context. Therefore, I will discuss only some of this data.
The byte at address &H449 holds the current video mode. Unfortunately, there is no easy way to relate the information in this byte to the current BASIC SCREEN setting. Table 10-2 shows all of the possible values that might be present.
Video Mode       Description
==========       =========================================
     0           40 by 25 16-color text
     1           40 by 25 16-color text, with color burst
     2           80 by 25 16-color text
     3           80 by 25 16-color text, with color burst
     4           320 by 200 pixels 4-color graphics
     5           320 by 200 pixels 4-color
     6           640 by 200 pixels 2-color
     7           80 by 25 monochrome text
    13           320 by 200 pixels 16-color graphics
    14           640 by 200 pixels 16-color graphics
    15           640 by 350 pixels monochrome EGA graphics
    16           640 by 350 pixels 16-color graphics
    17           640 by 480 pixels 2-color graphics
    18           640 by 480 pixels 16-color graphics
    19           320 by 200 pixels 256-color graphics
Since you will always have set the video mode yourself with a SCREEN statement, there is little reason to have to read the current mode manually.
The word at address &H44A tells how many columns are on the display, and the word at address &H44C holds the total size of the screen in bytes. In a normal 80 column by 25 line screen mode, the value at address &H44C will be 4096, even though the screen can hold only 4000 characters.
The byte at address &H462 holds the current video page number, starting at page 0. Please understand that BASIC lets you set pages individually for writing to and displaying, and the page reported here is that which is visible on the monitor.
We have already looked at the data at address &H463, which holds the CRT controller port address. Although this address is a full word, only the lower byte needs to be examined to know the type of display that is active. If the byte value at address &H463 is &HB4, then a monochrome monitor is connected and being used. If a color adapter is active the value at this byte will instead be &HD4.
Every 18th second the BIOS timer generates an interrupt that increments the master system timer count at address &H46C. This counter is stored as a four-byte long integer; the count is initialized to zero at midnight, and increases to a value of just over one 1.5 million at 11:59:59 pm.
In some cases using the BIOS timer count directly can help to reduce the size of your programs, because BASIC's TIMER requires floating point math. Chapter 9 discussed some of the issue involved in benchmarking a program, and the examples there used TIMER to know when a new 1/18th second period has just started and how long a sequence of commands took. The following short program times a long integer assignment within a FOR/NEXT loop, and it uses the PeekWord function to access the BIOS timer count directly.
Synch = PeekWord%(0, &H46C)
DO
  Start = PeekWord%(0, &H46C)
LOOP WHILE Synch = Start

FOR X& = 1 TO 70000
  Y& = X&
NEXT

Done = PeekWord%(0, &H46C)
PRINT Done - Start; "timer ticks have elapsed"
Note that it is possible for this program to report an incorrect elapsed time, since it considers only the lower of the two timer words. If the count exceeded 65,535 during the course of the timing, the lower word will have wrapped around to a value of zero. An enhancement to this technique would therefore be to create a PeekLong% function that returns the entire four bytes in one operation. You could write such a function in assembly language, or use BASIC like this:
FUNCTION PeekLong& (Segment%, Address%) STATIC
  PeekLong& = PeekWord%(Segment%, Address%) + 65536 * _
    PeekWord%(Segment%, Address% + 2)
END FUNCTION
Here, the PeekWord function is used to do most of the work, and the two words are combined into a single long integer. When many timing operations are needed using these functions can increase the speed of your programs, as well as help to avoid the inclusion of the floating point math library routines.
Whenever data is sent to a parallel printer it is routed through a BIOS service that handles the actual communications with the printer hardware. If the printer is turned off or disconnected, the BIOS can detect that immediately, and report the error to the calling program. But when the printer is turned on but deselected (off-line) or if it has run out of paper, the BIOS waits for a certain period of time before returning with an error condition. This gives the operator a chance to fix the problem.
The amount of time the BIOS waits varies from PC to PC, and even between different models of the same brand. The original IBM PC waited for only a very short time, and would occasionally report an error incorrectly when used with very slow printers. Modern PCs wait as long as two minutes before timing out, which is more than enough time to reload a new ream of paper. Unfortunately, if you want to test if a printer is ready before using it, your program may appear to hang if the printer is disabled.
Although BASIC provides ON ERROR to trap for printer errors, many programmers prefer to avoid ON ERROR because it makes the program larger and run more slowly. Also, ON ERROR cannot avoid the long wait the BIOS imposes. There are several solutions to this problem.
One is to print a flashing message at the bottom of the screen that says something like, "Turn on the printer!" immediately before printing, and then clear the message afterward:
   LOCATE 25, 1
   COLOR 23
   PRINT "Turn on the printer!";
   LPRINT Some$
   COLOR 7
   PRINT SPC(20)
If the printer is in fact on line and ready, the message will be displayed and cleared so quickly that it is not likely to be noticed. Otherwise, the operator will see the message and take the appropriate action.
This technique can be enhanced to instead test the printer, before sending any data. The most reliable way I have found to test a printer is to first send it a CHR$(32) space character, and if that is accepted print a CHR$(8) backspace to cancel the original space. A further enhancement alters the BIOS printer timeout values stored beginning at address &H478. The combined demonstration and function that follows performs this service using CALL Interrupt to circumvent BASIC's normal error handling routine.
DEFINT A-Z
DECLARE SUB INTERRUPT (IntNo, InRegs AS ANY, OutRegs AS ANY)
DECLARE FUNCTION LPTReady% (LPTNumber)

'$INCLUDE: 'REGTYPE.BI'

LPTNumber = 1

IF LPTReady%(LPTNumber) THEN
  PRINT "The printer is on-line and ready to go."
ELSE
  PRINT "Sorry, the printer is not available."
END IF
END

FUNCTION LPTReady% (LPTNumber) STATIC

  DIM Regs AS RegType                'for CALL INTERRUPT
  LPTReady% = 0                      'assume not ready

  Address = &H477 + LPTNumber        'LPT timeout address
  DEF SEG = 0                        'access segment zero
  OldValue = PEEK(Address)           'save current setting
  POKE Address, 1                    '1 retry

  Regs.AX = 32                       'first print a space
  Regs.DX = LPTNumber - 1            'convert to 0-based
  CALL INTERRUPT(&H17, Regs, Regs)   'print the space

  Result = (Regs.AX \ 256) OR 128    'get AH, ignore busy
  Result = Result AND 191            'and acknowledge
  IF Result = 144 THEN               'it worked!
    Regs.AX = 8                      'print a backspace
    CALL INTERRUPT(&H17, Regs, Regs) '  to undo CHR$(32)
    LPTReady% = -1                   'return success
  END IF

  POKE Address, OldValue             'restore original
                                     '  timeout value
END FUNCTION
There are several important points worth mentioning here. First, you must never use zero for the printer timeout value, or the timeout will be a *lot* longer than you anticipated. A value of zero tells the BIOS to continue trying indefinitely, and is equivalent to using the DOS MODE LPT1: command with the ",p" argument.
Another point is that you should not use this function many times in a row, without ever printing anything. All modern printers provide a buffer, which accepts characters as fast as the computer can send them. If the buffer fills with spaces and backspaces before any printable characters are sent, it may be impossible to clear the buffer. Therefore, you should perform the printer test only once or twice, just before you actually need to begin printing.
The seven bytes starting at address &H484 hold information about an installed EGA or VGA display adapter. This data should not be relied upon until you have determined that the adapter is in fact an EGA or VGA. The Monitor function shown in Chapter 6 can be used for this.
The first byte holds the number of rows currently displayed on the screen. The next word at addresses &H485 and &H486 tells how high each character is in scan lines. For a normal 80 by 25 line screen this value will be 16. After using WIDTH , 43 or WIDTH , 50 the height of each character is 8 scan lines. Notice that this value also includes the spacing between each line. Curiously, two bytes are set aside to hold this value, even though it is extremely unlikely that any video mode would ever require a number larger than 255.
The only other information you are likely to find useful in this data area is the amount of installed memory on the EGA or VGA adapter card. Bits 5 and 6 at address &H487 hold the number of 64K banks, and the code that follows shows how to turn this into a meaningful number:
   DEF SEG = 0             'look in segment zero
   Byte = PEEK(&H487)      'get the byte
   Byte = Byte AND 96      'keep what we need (96 = 1100000b)
   Byte = Byte \ 32        'shift the bits right five places
   Byte = (Byte + 1) * 64  'add 1 because 0 means 64K
   PRINT "This EGA/VGA adapter has"; Byte; "K memory"
After reading the EGA Features byte (listed earlier in Figure 10-1), the statement Byte = Byte AND 96 masks off all of the bits that are irrelevant. Byte is then divided by 32 to slide those bits into the lowest position. The number that results is coded such that 0 means 64K of installed video memory, 1 means 128K, 2 means 192K (which is never really possible), and 3 indicates 256K. Because this value is zero-based, 1 is added to Byte before multiplying by 64.
The 16-byte data area that begins at address &H4F0 is called the inter- application communications area, and it is available for any arbitrary use by a program. One possibility is for passing just a few parameters between separate programs, instead of having to use COMMON and CHAIN. Although this data area has been available since the original IBM PC was introduced, there is a risk involved with using it because it is possible that another program or TSR has stored information there. Chapter 9 described using the last 96 bytes in the display adapter's memory, which is both a larger buffer and is probably safer to use.
The byte at address &H500 is used as a flag by the BIOS Print Screen service to detect when it is busy. When you press Shift-PrtSc, the BIOS routine that handles that key sets this byte to a value of 1 before beginning to print the screen. This way if you press Shift-PrtSc again before it has finished printing, the second request can be ignored. When the printing has completed the flag is then reset to zero.
You can set this flag manually to disable the action of the PrtSc key, and then reenable it again later:
   DEF SEG = 0
   POKE &H500, 1
    .
    .
   POKE &H500, 0
In fact, you must be *sure* to reenable PrtSc before ending your program if you have disabled it. Otherwise, that key will be disabled until the PC is rebooted.
The last low memory address I'll describe is also one of the most potentially useful. For systems that have only one diskette drive, the byte at address &H504 tells which drive (A or B) is currently active. In this case, that drive serves as both A and B. Most PC users are familiar with DOS' infamous "Insert disk for drive B" message. This message is displayed whenever you attempt to access one of the logical drives while the other is currently active.
The problem is that this message will ruin an otherwise attractive screen design, and you have no control over where or if the message is displayed. Fortunately, you can determine if only one drive is available, and also which is currently active. Even better, you can set this byte to reflect either drive, and thus avoid the intervention by DOS.
If the byte at address &H504 is currently zero, then drive A is active; a value of 1 indicates drive B. The short complete program that follows shows how to detect which drive is current.
DEF SEG = 0
Floppies% = (PEEK(&H410) AND 192) \ 64 + 1
PRINT "This PC has"; Floppies%; "floppy disk drive(s)."

IF Floppies% = 1 THEN
  PRINT "The disk is now acting as drive ";
  CurDrive% = PEEK(&H504)
  IF CurDrive% THEN
    PRINT "B"
  ELSE
    PRINT "A"
  END IF
END IF
To change from drive A to B simply use POKE &H504, 1, assuming that the current DEF SEG value is already zero. Likewise, to change from B to A you will use POKE &H504, 0. Of course, you must also prompt the user to change disks as DOS would. But at least you can control how the prompt message is displayed. If you do switch drives behind DOS' back, it is up to you to prompt the user to exchange disks as necessary, and also to ensure that files are updated and closed correctly before each switch.
Besides the low memory addresses that are reserved for BIOS and DOS uses, every PC also has a collection of Input/Output (I/O) ports. Like memory, ports are addressed by number, and data may be read from or to written to them. In truth, some ports are write-only, others may only be read, and still others can be read and written.
Where conventional memory is often used by the operating system to hold flags, status words, and other values, ports are used to actually control the hardware. For example, port number &H3F2 controls the diskette drive motors, and appropriate OUT commands to that port can turn the motor for any drive on or off.
For the most part, you should not experiment with the ports unless you know what they are for, and which values are appropriate. As an example, it is possible to damage your monitor by sending incorrect values through the display adapter controller ports. Two useful ports I will describe here control the PC's speaker and the keyboard.
Although BASIC offers the SOUND and PLAY statements, using them can quickly increase the size of a program. Both of these commands can operate in the background, thereby continuing to produce sound after they return to your program. As you can imagine, this requires a lot of code to implement. An informal test showed that adding a single SOUND statement increased the program size by more than 11K. Therefore, if you do not need the ability to have tones play in the background, the combination demonstration and subprogram that follows can be used in place of SOUND. Besides avoiding the code to plays tones as a background task, this routine also avoids SOUND's inclusion of floating point math.
DEFINT A-Z
DECLARE SUB BSound (Frequency, Duration)

CLS

PRINT "Sweep sound"
FOR X = 1 TO 10
  READ Frequency
  CALL BSound(Frequency, 1)
NEXT
DATA 100, 200, 300, 400, 600, 900, 1200, 1500, 1800, 2100

PRINT "Press a key for more..."
WHILE INKEY$ = "": WEND

PRINT "Telephone"
FOR X = 1 TO 10
  CALL BSound(600, 1)
  CALL BSound(800, 1)
NEXT

PRINT "Press a key for more..."
WHILE INKEY$ = "": WEND

PRINT "Siren"
FOR X = 1 TO 2
  FOR Y = 600 TO 1000 STEP 15
    CALL BSound(Y, -1)          'negative values leave
  NEXT                          '  the speaker turned on
  FOR Y = 1000 TO 600 STEP -15
    CALL BSound(Y, -1)
  NEXT
NEXT
CALL BSound(600, 1)             'force the speaker off

SUB BSound (Frequency, Duration) STATIC

  IF Frequency < 33 THEN EXIT SUB

  IF NOT BeenHere THEN          'do this only once for a
    BeenHere = -1               '  smoother sound effect
    OUT &H43, 182               'initialize speaker port
  END IF

  Period = 1190000 \ Frequency  'convert to period
  OUT &H42, Period AND &HFF     'send it as two bytes
  OUT &H42, Period \ 256        '  in succession

  Speaker = INP(&H61)           'read Timer port B
  Speaker = Speaker OR 3        'set the speaker bits on
  OUT &H61, Speaker

  DEF SEG = 0
  FOR X = 1 TO ABS(Duration)    'for each tick specified
    ThisTime = PEEK(&H46C)      '  count changes again
    DO                          'wait until the timer
    LOOP WHILE ThisTime = PEEK(&H46C)
  NEXT

  IF Duration > 0 THEN          'turn off if requested
    Speaker = INP(&H61)         'read Timer port B
    Speaker = Speaker AND &HFC  'set the speaker bits off
    OUT &H61, Speaker
  END IF

END SUB
The BSound routine accepts the same frequency and duration arguments as BASIC's SOUND statement. Each time it is called it calculates the appropriate period based on the incoming frequency, which is what the timer ports expect. (Period is the reciprocal of frequency. Here, the period is related to the PC's clock frequency of 1,190,000 Hz.) BSound then turns on the speaker, waits in a loop for the specified duration, and finally turns off the speaker before returning.
Two extra steps are required to create a smooth effect when BSound is called rapidly in succession. One is that the speaker port is initialized only once, the very first time BSound is called. The other step lets you optionally leave the speaker turned on when BSound returns, to avoid the choppiness that otherwise results with sounds like the siren effect. To tell BSound to leave the speaker on, use an equivalent negative value for the Duration parameter. Just be sure to call BSound once again with a positive duration value, or use the same set of INP and OUT statements that BSound uses to turn the speaker off. This is shown in the last demonstration that creates a siren sound.
There are several ports associated with the keyboard, and one is of particular interest. The enhanced keyboards that come with AT-class and later computers allow you to control how quickly keystrokes are repeated automatically. There are actually two values--one sets the initial delay before keys begin to repeat, and the other establishes the repeat rate. By sending the correct values through the keyboard port, you can control the keyboard's "typematic" response. The complete program that follows shows how to do this, and Table 10-3 shows how the delay and repeat rate values are determined.
   OUT &H60, &HF3          'get the keyboard's attention
   FOR D& = 1 TO 100: NEXT 'brief delay to give the hardware time to settle
   Value = 7               '1/4 second initial delay, 16 CPS
   OUT &H60, Value
       AT-style keyboard delay and repeat rates
       ========================================

     initial delay --->    0.25    0.50    0.75    1.00
                           ====    ====    ====    ====
30 characters per second:    0      20      40      60
16 characters per second:    7      27      47      67
 8 characters per second:    F      2F      4F      6F
 4 characters per second:   17      37      57      77
 2 characters per second:   1F      3F      5F      7F

NOTE: All values are shown in Hexadecimal.
Table 10-3 shows only some of the possible values that can be used. However, you can interpolate additional values for delay times and repeat rates between those shown.
This chapter explained what the BIOS low memory data area is, and also discussed many of the addresses that are useful to application programs. A number of practical examples were given, including useful PEEK and POKE replacements that operate on data a word, rather than a byte, at a time. A simple binary conversion function was shown, to help you determine the correct values to use with AND and OR.
You learned how to exchange serial and parallel port addresses, and how to access communications ports 3 and 4 which BASIC normally does not allow. Exchanging printer ports lets you access any printer as LPT1, perhaps to avoid having to rewrite a large program that relies on existing LPRINT statements. Other useful printer data that can be accessed is the BIOS timeout value, and a routine was shown for testing the printer status without the usual delay.
The equipment list word was described in detail, showing how to determine the number of diskette drives and other peripherals that are installed. Another useful routine showed how to determine if drive A or B is active on a one-floppy system, and also how to change the current status of that drive. The various keyboard status bits were also described, and code fragments showed how to read and set the current state.
Finally, you learned how the hardware ports are read and written using INP and OUT commands. One example produced sound with much less generated code than BASIC's SOUND, and another showed how to alter the typematic rate on enhanced (AT) keyboards.
The next chapter explores using CALL Interrupt in great detail, using many examples that show how to access DOS and BIOS system services.
By Sane <sane@telia.com>
Note: I must confess that this article, in its original state, was one of my worst, if not the worst article I've ever done gramatically. Thanks go to Freedy for doing a load of corrections. In fact he needed to make corrections to most of the sentences.
Welcome folks, to the fifth part of this series. I don't remember exactly what I said I'd write in this part, and I'm too busy (a.k.a lazy) to find out since I'm writing an article. (duh)
Anyways... I know what I think I should be writing about; 3D rotations, backface culling and maybe something else I'll come up with as I write.
I don't think I need to tell you why 3D rotations are good, so I won't (email me if you still need reasons though). As you might already know if you've got some graphics programming experience, the following is used to rotate a point around coordinate (0,0) in 2D space:
X=X*COS(angle)-Y*SIN(angle)
Y=Y*COS(angle)+X*SIN(angle)
Since angle is actually representing the Z rotation angle, it's not all that hard to use the code to rotate around other axes by just changing place of the axes.
Here's how you do it:
Rotation around the Z axis:
X=X*COS(Zangle)-Y*SIN(Zangle)
Y=Y*COS(Zangle)+X*SIN(Zangle)
Z=Z
Rotation around the X axis:
X=X
Y=Y*COS(Xangle)-Z*SIN(Xangle)
Z=Z*COS(Xangle)+Y*SIN(Xangle)
Rotation around the Y axis:
X=X*COS(Yangle)+Z*SIN(Yangle)
Y=Y
Z=Z*COS(Yangle)-X*SIN(Yangle)
Of course you don't really need to write the code for the variables that don't change, I just wrote it cause it might help some of you understand it better.
The rotation that the previously shown code does is always around coordinate (0,0,0).
Now, you might wonder what you should do if you want to rotate something around another point. The answer is actually quite simple: If it isn't 0, make it 0! By that I mean that when you rotate some stuff you must first translate it (that is you subtract or add as needed) the point's coordinates so that the point you want to rotate around is mapped to 0,0,0. You do that by subtracting and adding before you rotate, and after you have done the rotation you just add what you subtracted and subtract what you added before.
If all else fails, you may understand how it's done by looking at this picture:

Backface culling is a way to avoid drawing the faces (polys) that are turned away from you. There are several reasons why that's good, but one main reason is that it'll realy decrease the amount of polys drawn. 'Cause of that, the program will run faster, and in most cases; a lot faster.
The difference between polys that are considered to be turned towards you and ones that aren't is the order of the points; clockwise or counter-clockwise. They will be turned towards or away from you, as they should when you rotate them, in this image you'll see why:

Here's some code for only drawing polys that have their vertices ordered in a counter-clockwise order(thanks go to Qasir who originally gave this code to me):
IF (y1-y2)*(x2-x3)<(x1-x2)*(y2-y3) THEN
 'Draw the stuff here
END IF
Note that the X and Y values need to be relative to the point of view for the code to work as it should, so if you have some kind of a camera implementation you should calculate the X and Y values according to the camera view. Next time I'll write about how to load 3D models, and maybe some stuff about animation or something. If there's anything special you want me to write about, always remember to email me at sane@telia.com.
-Sane
By Sane <sane@telia.com>
Note: Most of this article was written in December 2001. Now I've got a bigger hard drive, and some stuff I mention was new back then but isn't anymore. The article is still not redundant, just thought I should make these notifications.
Note: In this article I will mention negative sides of a couple of games, but that doesn't mean I dislike them, in most cases it's rather the opposite actually.
Lately I've been noticing a negative trend in the QB world. People are wasting loads of disk space for no good reason, and sure, people generally have more disk space than earlier, but still there's a big enough amount of reasons why you shouldn't waste space.
First of all, it slows down at least some parts of your programs a lot. Disk accessing is very slow when compared to a lot of other things.
Secondly, people won't download your stuff. Unless you get publicity to your game (or whatever you've done), most people won't waste the time downloading it in case it's too big, especially not the <=56k people. Sure, Zeta is large, but it's also got a lot of good publicity, so the size doesn't hurt it much (although I think they could've made it a good bit smaller)
Thirdly, at one point there's no more disk space. If your game wastes space, and the player has to choose between keeping your game and installing Counterstrike, what do you think he/she'd choose? Not very likely the game you've made... I for one run out of disk space all the time, and the big QB games, no matter how good they may be, often are the first to be deleted.
Now you know why there's a problem, although you might not think so, and now I'm gonna suggest some solutions to avoid space wasting.
Don't use PRINT/INPUT for file input/output. PRINT always writes numbers in string form, so that for example 127 needs three characters instead of the one character that would be needed if you instead used the ASCII number. PRINT also puts "" around strings, and spaces between all numbers. Another thing, although it's related to speed rather than space, is that binary access is faster than random/input/output/append access. As an example: when unpacked and with levels compiled, the 3D action game series ATTE, that's really awesome in every other aspect (when comparing to other finished QB games, not engine demos), takes about 30 megs per game, and after looking in the data files, I guess about half of that space is taken by spaces. Apparently the author used PRINT/INPUT for all the file accessing, which made it take somewhere around 15 megs (my guess) more space than needed...and still there's a lot more that could be done to make it more size efficient.
Another thing you should do is to make your file format more effective. Don't write INTEGERs or LONGs if the possible values are within the range of 0-255 and so on. Try to find better ways of storing the larger chunks of data in the format, like a map for example.
If you're using large files you should try to find a way of compressing them, and if I get enough response about it this issue, I will start a series about different kinds of file compressing.
I hope at least someone had use of this article. Please write to sane@telia.com and tell me if you thought this article sucked, was useful, made you think differently or if you just agree/disagree :)
-Sane
p>Return to MenuBy Steve Pavlina, CEO, Dexterity Software
This article originally came from http://www.dexterity.com/articles/
Procrastination, the habit of putting tasks off to the last possible minute, can be a major problem when running your own business. Missed opportunities, frenzied work hours, stress, overwhelm, resentment, and guilt are just some of the symptoms. This article will explore the root causes of procrastination and give you several practical tools to overcome it.
First, thinking that you absolutely have to do something is a major reason for procrastination. When you tell yourself that you have to do something, you're implying that you're being forced to do it, so you'll automatically feel a sense of resentment and rebellion. Procrastination kicks in as a defense mechanism to keep you away from this pain. If the task you are putting off has a real deadline, then when the deadline gets very close, the sense of pain associated with the task becomes overridden by the much greater sense of pain if you don't get started immediately.
The solution to this first mental block is to realize and accept that you don't have to do anything you don't want to do. Even though there may be serious consequences, you are always free to choose. No one is forcing you to run your business the way you do. All the decisions you've made along the way have brought you to where you are today. If you don't like where you've ended up, you're free to start making different decisions, and new results will follow. Also be aware that you don't procrastinate in every area of your life. Even the worst procrastinators have areas where they never procrastinate. Perhaps you never miss your favorite TV show, or you always manage to check your favorite online forums each day. In each situation the freedom of choice is yours. So if you're putting off starting that new program that you just "have to" do this year, realize that you are choosing to do it of your own free will. Procrastination becomes less likely on tasks that we openly and freely choose to undertake.
Secondly, thinking of a task as one big whole that you have to complete will virtually ensure that you put it off. When you focus on the idea of finishing a task where you can't even clearly envision all the steps that will lead to completion, you create a feeling of overwhelm. You then associate this painful feeling to the task and delay as long as possible. For instance, if you say to yourself, "I've got to release a new game this year," or "I must fix this bug," you're most likely going to feel overwhelmed and put the task off.
The solution is to think of starting one small piece of the task instead of mentally feeling that you must finish the whole thing. Replace, "How am I going to finish this?" with "What small step can I start on right now?" If you simply start a task enough times, you will eventually finish it. For example, if one of the tasks you want to do this year is to overhaul your web site, thinking that you have to finish this big project in one fell swoop will make you feel overwhelmed, and you'll put it off. Instead, ask yourself how you can get started on just one small part of the task. Maybe you could start just by jotting down a few ideas and making a list of goals for what you want the new site to accomplish. Don't worry about finishing anything. Just focus on what you can start now. If you do this enough times, you'll eventually be starting on the final piece of the task, and that will lead to finishing.
A third type of erroneous thinking that leads to procrastination is perfectionism. Thinking that you must release the perfect app or build the perfect web site will likely prevent you from ever getting started. Believing that you must do something perfectly will cause you to feel stressed and to associate that stress with the task, i.e. something you want to avoid. You then end up putting the task off to the last possible minute, so that you finally have a way out of this trap. Now there isn't enough time to do the job perfectly, so you're off the hook because you can tell yourself that you could have been perfect if you only had more time. But if you have no specific deadline for a task, perfectionism can cause you to delay indefinitely. If you've never started writing that program you always felt you were meant to create, could it be that perfectionism is keeping you from getting started?
The solution to perfectionism is to give yourself permission to be human. Can you think of any piece of software that you consider to be perfect in every way? I doubt it. Realize that an imperfect job completed today is always superior to the perfect job delayed indefinitely. Perfectionism is also closely connected to thinking of the task as one big whole. Replace that one big perfectly completed task in your mind with one small imperfect first step. Your first draft can be very, very rough. You are always free to revise it again and again.
A fourth mental block is associating deprivation with a task. This means that you believe that undertaking a project will offset much of the pleasure in your life. In order to complete this project, will you have to put the rest of your life on hold? Do you tell yourself that you will have to go into seclusion, work long hours, never see your family, and have no time for fun? That's not likely to be very motivating, yet this is what many people do, especially programmers. Picturing an extended period of working long hours in solitude with no time for fun is a great way to guarantee procrastination.
The solution to the deprivation mindset is to simply do the opposite. Guarantee the fun parts of your life first, and then schedule your work around them. This may sound counterproductive, but this reverse psychology works extremely well. Decide in advance what times you will allot each week to family time, entertainment, exercise, social activities, and personal hobbies. Guarantee an abundance of all your favorite leisure activities. Then limit the amount of working hours each week to whatever is left. The peak performers in any field tend to take more vacation time and work shorter hours than workaholics. By treating your working time as a scarce resource rather than an uncontrollable monster that can gobble up every other area of your life, you'll begin to feel much more balanced, and you'll be far more effective in using your working time. It has been shown that the optimal work week for most programmers is 40-45 hours per week. Working longer hours than this actually has such an adverse effect on productivity and motivation that less real work is done in the end. What would happen if you only allowed yourself a certain number of hours a week to work? What if I came to you and said, "You are only allowed to work 10 hours this week?" Your feeling of deprivation would be reversed, wouldn't it? Instead of feeling that work was depriving you of leisure time, you'd feel you were being deprived of work. You'd replace, "I want to play" with "I want to work," your motivation for work would skyrocket, and all traces of procrastination would vanish.
I also strongly recommend that you take at least one full day off each week with no work whatsoever. This will really recharge you and make you eager to start the coming week. Having a guaranteed work-free day will increase your motivation for work and make you less likely to procrastinate. If you know that the next day is your day off, you'll be less likely to put off tasks, since you won't allow yourself the luxury of allowing them to spill over into your day off. When you think that every day is a work day, however, work seems never-ending, and you always tell yourself, "I should be working." Thus, your brain will use procrastination as a way to guarantee that you get some form of pleasure in your life.
For tasks you've been putting off for a while, I recommend using the 30-minute method to get started. Here's how it works: First, select a small piece of the task you can work on for just 30 minutes. Then choose a reward you will give yourself immediately afterwards. The reward is guaranteed if you simply put in the time; it doesn't depend on any meaningful accomplishment. Example of rewards could be to watch your favorite TV show, see a movie, have a meal or snack, go out with friends, go for a walk, or do anything you find pleasurable. Because the amount of time you'll be working on the task is so short, your focus will shift to the impending pleasure of the reward instead of the difficulty of the task. No matter how unpleasant the task, there's virtually nothing you can't endure for just 30 minutes if you have a big enough reward waiting for you.
When you use this method, you may discover that something very interesting happens. You will probably find that you continue working much longer than 30 minutes. You will often get so involved in a task, even a difficult one, that you actually want to keep working on it. Before you know it, you've put in an hour or even several hours. The certainty of your reward is still there, so you know you can take it whenever you want. Once you begin taking action, your focus shifts away from worrying about the difficulty of the task and towards finishing the current piece of the task which now has your full attention.
When you do decide to stop working, claim your reward, and enjoy it. Then schedule another 30-minute period to work on the task with another reward. This will help you associate more and more pleasure to the task, knowing that you will always be immediately rewarded for your efforts. Working towards distant and uncertain long-term rewards is not nearly as motivating as immediate short-term rewards. By rewarding yourself for simply putting in the time, instead of for any specific achievements, you'll be eager to return to work on your task again and again, and you'll ultimately finish it.
The writing of this article serves as a good example of applying the above techniques. I could have said to myself, "I have to finish this 2000-word article, and it has to be perfect." So first I remember that I don't have to write anything; I freely choose to write articles. Then I realize that I have plenty of time to do a good job, and that I don't need to be perfect because if I start early enough, I have plenty of time to make revisions. I also tell myself that if I just keep starting, I will eventually be done. Before I started this article, I didn't have a topic selected, so I used the 30-minute method to get that done. Having dinner was my reward. I knew that at the end of 30 minutes of working on the task, I could eat, and I was hungry at the time, so that was good motivation for me. It took me a few minutes to pick the topic, and I spent the rest of the time writing down some ideas and making a very rough outline. When the time was up, I stopped working and had dinner, and it really felt like I'd earned that meal.
The next morning I used the same 30-minute method, making breakfast my reward. However, I got so into the task that I'm still writing 90 minutes later. I know I'm free to stop at any time and that my reward is waiting for me, but having overcome the inertia of getting started, the natural tendency is to continue working. In essence I've reversed the problem of procrastination by staying with the task and delaying gratification. The net result is that I finish my article early and have a rewarding breakfast.
I hope this article has helped you gain a greater insight into the causes of procrastination and how you can overcome it. Realize that procrastination is caused by associating some form of pain or unpleasantness to the task you are contemplating. The way to overcome procrastination is simply to reduce the pain and increase the pleasure you associate with beginning a task, thus allowing you to overcome inertia. And if you begin any task again and again, you will ultimately finish it.
Steve Pavlina is the CEO and founder of Dexterity Software and writes and speaks on software and computer gaming industry topics regularly. This article is Copyright © 2001 by Steve Pavlina.

Shippysite.com is our site of the month/issue or whatever this time. If you think your site is better just go on and complain or suggest it as site of the month for next issue, but I can't think of any active QB site that deserves it more. The reason why I chose this site is cause it was one of the few suggestions I got, and after all the design is nice and clean, it's got nice content, that is the game Shippy as well as some other projects, and well, that's it. I don't see anything more it would need to become QBCM's SotM.


This time we have a demo that was made by one of my fellow Hybrid buddies, Elf. For those of you who didn't know already - I guess that applies to most of you - Hybrid is one of the very few pure QB demo groups that are more or less active today.
Doesn't feature many effects, but what it's got is pretty neat, and it's also the only recent QB demo I know of. I don't really like to have stuff made by me or other Hybrid members in this section as it can give a impression that I'm unfair in my judgement of QBCM's DotM's, but I couldn't find any other new QB demo.
The demo, that's called "Hidas", is included with the downloadable version as hidas.zip (you can also download it by clicking the link)
When you're done watching the demo you could also check Elf's homepage at http://fly.to/mangaelf/
Due to certain reasons, we didn't have a new cultpoll this month.