How To Program A Game With FreeBASIC - Lesson #2
Written by Lachie D.(February, 2006)
Introduction
In this lesson I'll cover several topics that should introduce you with some real game design oriented programming. It's the programming that extends on the simple "walk around and do nothing" type of demos. Stuff like player to monsters/objects/whatever interaction, artificial intelligence as well as some basics like subroutines(declaration, usage, etc.). I'll also show you how to use the mouse routines with GFXlib. So these two lessons will include most of the statements, methods and routines I think you should know to code any DECENT game using GFXlib. Just don't fear to EXPAND on the knowledge you'll learn here.
This lesson continues on example #2 from lesson #1(download). Please download this archive since it contains the updated SPRITES.BMP file with the swing sprites corrected. They didn't blend well with the walking sprites and I only noticed that after implementing swinging.
We'll add sheep in our mini-game, implement artificial intelligence which will tell the sheep to run from the warrior and add the code that will allow the player to kill them. Poor sheep. :P I'll also add a menu in the code just to point out that it's BAD to end the program completely when the player loses a game. I've seen that in few QBasic games and found it very annoying. This menu will also be a nice opportunity to show you how the mouse routines work in GFXlib and write some more "generic" code. And that's just some of the things we'll cover.
A note: In the first tutorial I inputted a wrong link for the download of the first example. This is the first example program from lesson #1 that you should have been able to download: move_circle.zip
It's possible that this was fixed by Pete but I doubt he puts every article through a rigorous inspection having in mind the amount of articles he receives every month.
What are subroutines and how to use them?
This section is for real beginners so if you are familiar with this topic just skip to the next chapter.
SUBROUTINES are sections of code which execute any set of instructions placed inside them every time you call them(and only then). They are beneficial in many aspects. From reducing the size and complexity of your code to making it easier to write/read. What's important is that you can pass variables to them. I believe this will be more clear to you if you think of these variables as PARAMETERS. Let's say we want to have a subroutine that draws a circle on the position specified by the user. So we need to have a subroutine declared with two variables(parameters) which would flag(set) the circle's position. Here is a simple example of how this would work in FreeBASIC. We would first declare the subroutine like this:
DECLARE SUB DrawCircle (xpos, ypos)
Subroutine declarations go on the beginning of our code before the variable declarations. Some subroutines need to declared behind a user defined type but only if that subroutine includes parameters(variables) defined with this type.
The very subroutine would be formatted like this:
SUB DrawCircle (xpos, ypos)

CIRCLE (xpos, ypos), 10, 15

END SUB
Subroutines need to be placed after all the code in the main module. The concept of main module might not be clear to you since FBIDE(version 0.4.5) still doesn't separate the main module from the subroutines like QBasic IDE did. Just think of the main module as all the code before the first subroutine starts.
The user would call the subroutine like this:
DrawCircle 120, 55
This line would draw a circle on coordinates 120, 55, with a radius of 10 and color 15. We could make a sub that would pass the radius and the color too.
Of course, you will never create this kind of sub since the very CIRCLE statement is simple enough but this example illustrates the issue we are talking about very well.
FUNCTIONS work on a similar way like subroutines but functions can return a value(like be TRUE or FALSE). The most obvious example of a function(from a game design perspective) is a function which checks if the player is colliding with a colliding tile(or object) according to his position. If he is colliding we would flag the function as TRUE and according to this state tell the program to prevent the player to move. Check R.E.Lope's scrolling engine I ported to FreeBASIC to see how this type of function works(go to the end of this tutorial for the download).
Let's roll!
The first thing we'll do with our mini-game code is place all the graphics loading code in a subroutine named "LoadGraphics", the main loop in a subroutine named "MainLoop", lines that initiate player's position in a subroutine named "InitVariables" and create an extra subroutine named "MainMenu".
After these changes our code should look like this(reduced version):
#include "fbgfx.bi"

' Our subroutine declarations will go here!
DECLARE SUB MainMenu ' Sub that runs our main menu loop.
DECLARE SUB MainLoop ' Sub that runs our main game loop.
DECLARE SUB LoadGraphics ' Sub that loads all the program's graphics.
DECLARE SUB InitVariables ' Sub that initiates the game variables
                          ' (should be called before every new game).

' Useful constants(makes your code easier to read and write).
const FALSE = 0
const TRUE = 1

DIM SHARED background1(64004) AS INTEGER ' An array that will hold the
                                         ' background image
DIM SHARED WarriorSprite(12, 404) AS INTEGER ' An array that will hold
                                             ' the warior sprites.

SCREEN 13,8,2,0 ' 13 means 320*200 graphics resolution; 8 means
                ' 8bit color depth; 2 means two work pages and
                ' 0 means window mode(1 would be full screen mode).
                ' When your program is running you can toggle
                ' between full screen/window mode with ALT+ENTER.

SETMOUSE 0,0,0  ' Hides the mouse cursor.

' Our user defined type containing 8 variables.
TYPE ObjectType
X          AS SINGLE
Y          AS SINGLE
Speed      AS SINGLE
Frame      AS INTEGER
Direction  AS INTEGER
Move       AS INTEGER
Attack     AS INTEGER
Alive      AS INTEGER
END TYPE

DIM SHARED Player AS ObjectType ' Our player.

LoadGraphics ' Load the program's graphics.
MainMenu ' Initiate main menu.
END ' End program.

' MAIN MODULE ENDS HERE!
' **********************

SUB LoadGraphics

' Graphics loading code goes
' in here!

END SUB

SUB MainLoop

' Main loop code goes in here!

END SUB

SUB MainMenu

' We'll add code here later that calls
' the main loop after the player clicks
' on an option in the menu. For now
' the main loop is called right away.

' Load initial variables(player's position, etc.).
InitVariables
' Call the main game loop.
MainLoop

END SUB

SUB InitVariables

' Warrior's(player's) initial
' position, speed(constant)
' and direction(1 = right).
Player.X = 150
Player.Y = 90
Player.Speed = 1
Player.Direction = 1

END SUB
You can check the full code here: codever1.txt
I didn't want to input it directly in the tutorial since it's too long and repeats all the code from lesson #1.
Copy and paste the full code in a new FBIDE document. You can compile it and the result is the same as in lesson #1. But now our code is easier to read and manage. You will notice how the �MainMenu� subroutine runs the main loop right away(no conditions). In the final version the main loop will be called only after the player clicks on the right option(like "START GAME") in the main menu.
A subroutine that resets all the game variables(game variables in the sense of player's health, position, number of lives, score, etc.) is something you should always include. I've noticed in several QBasic games bugs which were the result of the programmer putting the initiation of some or all game variables on the beginning of the program and not on the place where the user starts a new game. This caused for some or all game variables not to reset properly when another new game was started(after the first was loss).
I also noticed quite few designers placing the main loop in the main module which is something I don�t understand. It always made their code more difficult to read and to me that kind of code is clumsy to manage. I mean, when the player loses a game the main loop ends and you need to return the program to the beginning of the main module(to the main menu or title screen sub) with a GOTO statement.
Before we continue we need to add new graphics into our program. The new graphics will be loaded from this image(click to enlarge):
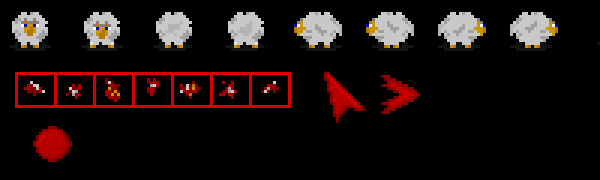
Download the original image(EXTRASPR.BMP). As you see it contains the sheep sprites(two sprites for each direction), bloody sheep pieces(7 of them), fireball sprite(the warrior will be able to shoot them at the sheep), a mouse cursor and a menu pointer we'll use on the main menu to flag graphically which option is active.
The code that loads this graphics needs to be inputted in the "LoadGraphics" sub but before that we need to create a generic sprite array that will hold all these sprites. We'll name it "ExtraSprite" and declare it where we declared the other graphics arrays("background1" and "WarriorSprite") with the following line:
DIM SHARED ExtraSprites(18, 900) AS INTEGER ' An array that will hold
                                            ' the additional sprites.
18 because in the new image file we have 18 sprites total and 900(30*30) just to be safe that every sprite will fit. Probably a smaller number would do but the difference in memory consuption is really ignorable. We don't need to be nitpicky here. We are only storing 18 small sprites.
Now we should add this code in the "LoadGraphics" sub(at the end of it):
' Load the image holding the additional sprites and store
' them into the "ExtraSprite" array on specific positions.
BLOAD "EXTRASPR.BMP", 0
' Load the sheep sprites.
FOR imagepos = 1 TO 8
GET (0+(imagepos-1)*24,0)-(19+(imagepos-1)*24,19), ExtraSprite(imagepos, 0)
NEXT imagepos
' Load the bloody sheep meat.
FOR meatpos = 1 TO 7
GET (6+(meatpos-1)*13,25)-(17+(meatpos-1)*13,34), ExtraSprite(meatpos + 8, 0)
NEXT meatpos
' Load the fireball.
GET (11, 42)-(23, 53), ExtraSprite(16, 0)
' Load the mouse cursor.
GET (108, 24)-(121, 40), ExtraSprite(17, 0)
' Load the menu pointer.
GET (127, 25)-(139, 37), ExtraSprite(18, 0)

' The sprites are saved in the "ExtraSprite" array as follows:
' ExtraSprite(1, 0) - sheep moving down image #1
' ExtraSprite(2, 0) - sheep moving down image #2
' ExtraSprite(3, 0) - sheep moving up image #1
' ExtraSprite(4, 0) - sheep moving up image #2
' ExtraSprite(5, 0) - sheep moving left image #1
' ExtraSprite(6, 0) - sheep moving left image #2
' ExtraSprite(7, 0) - sheep moving right image #1
' ExtraSprite(8, 0) - sheep moving right image #2
' ExtraSprite(9, 0) - ExtraSprite(15, 0) - 7 bloody meat pieces
' ExtraSprite(16, 0) - the fireball sprite
' ExtraSprite(17, 0) - the mouse cursor
' ExtraSprite(18, 0) - the menu pointer
I think this code speaks for itself. Note how I was able to use two FOR loops to capture the sheep and bloody meat sprites since I aligned them nicely in the BMP image.
Now we should create an array that will be used to control the sheep. Let's agree we'll have 10 of them in the playfield. This array should be declared with the following line and placed where the player array is declared('DIM SHARED Player AS ObjectType'):
DIM SHARED Sheep(10) AS ObjectType
10 stands for the maximum number of sheep we'll manage. If you want to have 100 sheep maximum on one map/location just change 10 to 100. Sometimes it's good to dimension this type of object with two dimensions, first representing the location/map/etc. Something like this:
DIM SHARED Sheep(15, 10) AS ObjectType
Let's image we would have a game with 15 locations max and with 10 sheep max on each location. This kind of declaring allows us to manage such type of objects(like NPCs) on a more efficient way. Every time the player would change location we would flag a specific "location" variable and according to its value manage the NPCs on THAT SPECIFIC locations(flagged with the first element in the array). But for our mini-game we'll only need one dimension(use the first line).
Note how we connected the "Sheep" array with "ObjectType" so we can use the variables inside "ObjectType" to control the sheep.
We'll add now the code that initiates sheep's positions and their mode(alive or dead) in the "InitVariables" sub. Sheep positions will be RANDOMIZED so the next piece of code shows how you do that too. Entire "InitiVariables" sub with the new code should look like this:
SUB InitVariables

RANDOMIZE TIMER

' Warrior's(player's) initial
' position, speed(constant)
' and direction(1 = right).
Player.X = 150
Player.Y = 90
Player.Speed = 1
Player.Direction = 1

' Initiate all the sheep(their positions, etc.).
FOR countsheep = 1 TO 10
' Randomize a number 1 to 300(sheep's X position).
Sheep(countsheep).X = INT(RND * 300) + 1
' Randomize a number 1 to 180(sheep's Y position).
Sheep(countsheep).Y = INT(RND * 180) + 1
' Randomize a number 1 to 4.
Sheep(countsheep).Direction = INT(RND * 4) + 1
' New game -> all sheep alive by deafult.
Sheep(countsheep).Alive = TRUE
' Speed of all sheep.
Sheep(countsheep).Speed = 0.6
NEXT countsheep

END SUB
All that RND does is returns a number from 0 to 1 based on the random seed. You set the seed with 'RANDOMIZE seed' and the best way to get unpredictable random numbers is to use 'RANDOMIZE TIMER' where TIMER returns the number of milliseconds past midnight. I also recommend you to use 'RANDOMIZE TIMER' every time you start a new game. INT converts the expression in brackets into an integer since we need WHOLE numbers. You can change ' + 1 ' in lines with RND to any number you want to be the minimum possible. For example, the following line would randomize a number from 50 to 60:
RandomNumber = INT(RND * 10) + 50
Ok, now we are fully read to create a sub that will draw and move the sheep according to player's position. We should declare a new sub named "MoveDrawSheep" with this line:
DECLARE SUB MoveDrawSheep
And at the end of our program we have to input the following lines:
SUB MoveDrawSheep

' Our "sheep" code goes in here!

END SUB
Now, let's create a code that will draw the sheep according to their positions and directions. We need to create a FOR loop that will "go through" all the sheep and according to their direction flag the proper sprite. And if the sheep is alive draw it! The variable that will cycle in the FOR loop(countsheep) will be connected with the Sheep array as you will see in the next peace of code.
SUB MoveDrawSheep

' Loop through all the sheep.
FOR countsheep = 1 TO 10

' The current sheep is not moving by default.
Sheep(countsheep).Move = FALSE

' Sheep(countsheep).Direction = 1 -> sheep moving right
' Sheep(countsheep).Direction = 2 -> sheep moving left
' Sheep(countsheep).Direction = 3 -> sheep moving down
' Sheep(countsheep).Direction = 4 -> sheep moving up

' The current sheep frame(sprite) by default(sheep not moving).
IF Sheep(countsheep).Direction = 1 THEN Sheep(countsheep).Frame = 7
IF Sheep(countsheep).Direction = 2 THEN Sheep(countsheep).Frame = 5
IF Sheep(countsheep).Direction = 3 THEN Sheep(countsheep).Frame = 1
IF Sheep(countsheep).Direction = 4 THEN Sheep(countsheep).Frame = 3

' If the current sheep is moving flag the proper sprite according
' to its direction.
IF Sheep(countsheep).Move = TRUE THEN
IF Sheep(countsheep).Direction = 1 THEN Sheep(countsheep).Frame = 6 + Frame1
IF Sheep(countsheep).Direction = 2 THEN Sheep(countsheep).Frame = 4 + Frame1
IF Sheep(countsheep).Direction = 3 THEN Sheep(countsheep).Frame = 0 + Frame1
IF Sheep(countsheep).Direction = 4 THEN Sheep(countsheep).Frame = 2 + Frame1
END IF

' If the current sheep is ALIVE draw it!
IF Sheep(countsheep).Alive = TRUE THEN PUT (Sheep(countsheep).X, Sheep(countsheep).Y), ExtraSprite(Sheep(countsheep).Frame, 0), TRANS

NEXT countsheep

END SUB
I think this sub is very illustrative a needs no clarifications. It works almost the same way like the code that draws the player. Just be aware that you can put a variable behind 'TO' with any FOR loop. Like you might want to have different maximum numbers of NPCs on different locations. On the other hand, you can always tag with "Alive" or some other variable NPCs you don't want to manage and draw on the screen. To play this sub we need to call it in the main loop. Just place 'MoveDrawSheep' right after the line that pastes the warrior on the screen('PUT (Player.X, Player.Y), WarriorSprite(Player.Frame, 0), TRANS'). Since we are now using the "Frame1" variable outside the main loop in another sub we need to make it SHARED by placing 'DIM SHARED Frame1' right after the player and sheep declarations. Without this declaration "Frame1" would be always 0 in the "MoveDrawSheep" sub as well as in any other sub where its value is not changed.
After all the changes the code should look like this: codever2.txt
Compile it and the sheep should appear on the screen. But that's not what we want. The sheep just sit there and do nothing. We need to implement an artificial intelligence so the sheep would react on the warrior. It sounds more complex than it really is. It�s just a set of lines which tells the sheep to move in this or that direction according to warrior�s position. We�ll also add some code that will prevent the sheep to walk off the screen like we did with the warrior. The updated "MoveDrawSheep" sub should look like this:
SUB MoveDrawSheep

' Loop through all the sheep.
FOR countsheep = 1 TO 10

' The current sheep is not moving by default.
Sheep(countsheep).Move = FALSE

' Sheep(countsheep).Direction = 1 -> sheep moving right
' Sheep(countsheep).Direction = 2 -> sheep moving left
' Sheep(countsheep).Direction = 3 -> sheep moving down
' Sheep(countsheep).Direction = 4 -> sheep moving up

' The next 4 IF clauses is the AI. In more demanding projects
' your AI will most likely be more complex so you will probably
' place it in a separate sub.
' Each IF checks if the player is less than 50 pixels away from
' the sheep in both directions(scope of detection - change all 50 to
' higher or less number to get a different scope of detection/reaction).
' The first condition in each IF checks where's the player according
' to sheep(in X or Y direction) and then we flag the sheep's direction
' if this condtition is met. The last two IFs have another condition
' inside them which is just nitpicking and gives a better feeling.
IF Player.Y < Sheep(countsheep).Y AND ABS(Player.Y-Sheep(countsheep).Y) < 50 AND ABS(Player.X-Sheep(countsheep).X) < 50 THEN
Sheep(countsheep).Move = TRUE
Sheep(countsheep).Direction = 3
END IF
IF Player.Y > Sheep(countsheep).Y AND ABS(Player.Y-Sheep(countsheep).Y) < 50 AND ABS(Player.X-Sheep(countsheep).X) < 50 THEN
Sheep(countsheep).Move = TRUE
Sheep(countsheep).Direction = 4
END IF
IF Player.X > Sheep(countsheep).X AND ABS(Player.X-Sheep(countsheep).X) < 50 AND ABS(Player.Y-Sheep(countsheep).Y) < 50 THEN
Sheep(countsheep).Move = TRUE
IF ABS(Player.X-Sheep(countsheep).X) > 20 THEN Sheep(countsheep).Direction = 2
END IF
IF Player.X < Sheep(countsheep).X AND ABS(Player.X-Sheep(countsheep).X) < 50 AND ABS(Player.Y-Sheep(countsheep).Y) < 50 THEN
Sheep(countsheep).Move = TRUE
IF ABS(Player.X-Sheep(countsheep).X) > 20 THEN Sheep(countsheep).Direction = 1
END IF

' If the current sheep is moving change its position
' according to its direction(flagged with the AI code).
' If the current sheep is out of bounds prevent it to
' walk off the screen. Note how the SELECT CASE statement
' works.
IF Sheep(countsheep).Move = TRUE THEN
SELECT CASE Sheep(countsheep).Direction
CASE 1
Sheep(countsheep).X = Sheep(countsheep).X + Sheep(countsheep).Speed
IF Sheep(countsheep).X > 300 THEN Sheep(countsheep).X = 300
CASE 2
Sheep(countsheep).X = Sheep(countsheep).X - Sheep(countsheep).Speed
IF Sheep(countsheep).X < 0 THEN Sheep(countsheep).X = 0
CASE 3
Sheep(countsheep).Y = Sheep(countsheep).Y + Sheep(countsheep).Speed
IF Sheep(countsheep).Y > 180 THEN Sheep(countsheep).Y = 180
CASE 4
Sheep(countsheep).Y = Sheep(countsheep).Y - Sheep(countsheep).Speed
IF Sheep(countsheep).Y < 0 THEN Sheep(countsheep).Y = 0
END SELECT
END IF

' The current sheep frame(sprite) by default(sheep not moving).
IF Sheep(countsheep).Direction = 1 THEN Sheep(countsheep).Frame = 7
IF Sheep(countsheep).Direction = 2 THEN Sheep(countsheep).Frame = 5
IF Sheep(countsheep).Direction = 3 THEN Sheep(countsheep).Frame = 1
IF Sheep(countsheep).Direction = 4 THEN Sheep(countsheep).Frame = 3

' If the current sheep is moving flag the proper sprite according
' to its direction.
IF Sheep(countsheep).Move = TRUE THEN
IF Sheep(countsheep).Direction = 1 THEN Sheep(countsheep).Frame = 6 + Frame1
IF Sheep(countsheep).Direction = 2 THEN Sheep(countsheep).Frame = 4 + Frame1
IF Sheep(countsheep).Direction = 3 THEN Sheep(countsheep).Frame = 0 + Frame1
IF Sheep(countsheep).Direction = 4 THEN Sheep(countsheep).Frame = 2 + Frame1
END IF

' If the current sheep is ALIVE draw it!
IF Sheep(countsheep).Alive = TRUE THEN PUT (Sheep(countsheep).X, Sheep(countsheep).Y), ExtraSprite(Sheep(countsheep).Frame, 0), TRANS

NEXT countsheep

END SUB
Few things I want to explain here. You will notice I used a new statement here - SELECT CASE. SELECT CASE works very simple and it's a nice substitute for IF clauses. In QBasic it was known as being faster than IF clauses. It functions like this:
SELECT CASE some_variable
CASE value1
' You put here the code that
' needs to execute if
' some_variable = value1
CASE value2
' You put here the code that
' needs to execute if
' some_variable = value2
CASE value3
.
.
.
END SELECT ' End every SELECT CASE with this.
Anyway, SELECT CASE comes in handy very often with certain problems that can be coded more illustrative and simpler than using several IF clauses.
Another thing I didn't point out the first time I pasted the "MoveDrawSheep" sub. In some cases you will need to add another variable to the user defined type you will connect with your enemy array("ObjectType" in our mini-game). I usually name that variable "Exists". You see, you might want to have a game where a corpse of a monster or an enemy is left in the playfield once the player kills it. So you need another variable together with "Alive". "Alive" would flag if the monster/enemy/whatever is alive or not and according to this status we would check for collision with it and similar. "Exists" would flag if this monster/enemy is activated(present) at all and if it's not the program wouldn't draw it! If "Exists" of that monster would be TRUE we would always draw it no matter if it's alive or not. If this monster would be dead(Alive = FALSE) we would tell the computer to paste the "corpse" sprite of that monster and not the regular "walking" sprite. In our mini-game when the player kills the sheep we'll spawn some bloody meat pieces in the playfield(be patient) so we don't need corpses. We WANT for the sheep to DISAPPEAR from the playfield once we kill it. Just have this in mind when working on your own project where your requirements might be different. Also, the more "smarter" enemies you want for your game to feature you will have to create a more complex AI and will probably place it in a separate sub. QB Express features quite few AI tutorials so if interested in this topic read your QB Express :P
Now I'll do some more coping and pasting of the current code. I know, this is probably annoying you on this stage but it needs to be done. I'll remove all the code that controls and pastes the warrior from the main loop and place it in a separate sub. We'll name this sub "MoveDrawPlayer". We also need to declare it and call it in the main loop. This new sub should look like this:
SUB MoveDrawPlayer

' Player.Direction = 1 -> warrior moving right
' Player.Direction = 2 -> warrior moving left
' Player.Direction = 3 -> warrior moving down
' Player.Direction = 4 -> warrior moving up

Player.Move = FALSE ' By deafult player is not
                    ' moving.

' According to pushed key move the
' player and flag the proper direction.
IF MULTIKEY(SC_RIGHT) THEN
Player.X = Player.X + Player.Speed
Player.Direction = 1
Player.Move = TRUE
END IF
IF MULTIKEY(SC_LEFT) THEN
Player.X = Player.X - Player.Speed
Player.Direction = 2
Player.Move = TRUE
END IF
IF MULTIKEY(SC_DOWN) THEN
Player.Y = Player.Y + Player.Speed
Player.Direction = 3
Player.Move = TRUE
END IF
IF MULTIKEY(SC_UP) THEN
Player.Y = Player.Y - Player.Speed
Player.Direction = 4
Player.Move = TRUE
END IF

' The following 4 conditions prevent
' the warrior to walk off the screen.
IF Player.X < 0 THEN
Player.Move = FALSE
Player.X = 0
END IF
IF Player.X > 300 THEN
Player.Move = FALSE
Player.X = 300
END IF
IF Player.Y < 0 THEN
Player.Move = FALSE
Player.Y = 0
END IF
IF Player.Y > 180 THEN
Player.Move = FALSE
Player.Y = 180
END IF

' Attack variable needs to reduce to 0 by 1 in
' each cycle since we want for the attack to
' "time out" once we initiate it(swing with the
' sword).
Player.Attack = Player.Attack - 1
IF Player.Attack < 0 THEN Player.Attack = 0

' When the player presses SPACE and the SPACE
' key is released from the last time you
' swung the sword(KeyPressed = FALSE)
' initiate new attack(Player.Attack = 10) and
' flag that SPACE is pressed(KeyPressed = TRUE).
' KeyPressed variable is used to prevent the
' player to be able to hold the SWING. This can
' be done on more ways like prevent the player
' to swing until Player.Attack = 0(replace
' KeyPressed = FALSE with this condition).
IF MULTIKEY(SC_SPACE) AND KeyPressed = FALSE THEN
KeyPressed = TRUE
Player.Attack = 10
END IF

' According to player's direction flag the
' proper sprite.
IF Player.Direction = 1 THEN Player.Frame = 6 + Frame1
IF Player.Direction = 2 THEN Player.Frame = 4 + Frame1
IF Player.Direction = 3 THEN Player.Frame = 0 + Frame1
IF Player.Direction = 4 THEN Player.Frame = 2 + Frame1

' If the player is attacking flag the proper attack
' sprite according to player's direction.
IF Player.Attack >0 THEN
IF Player.Direction = 1 THEN Player.Frame = 12
IF Player.Direction = 2 THEN Player.Frame = 11
IF Player.Direction = 3 THEN Player.Frame = 10
IF Player.Direction = 4 THEN Player.Frame = 9
END IF

' Pastes the warrior on Player.X and Player.Y coordinates,
' using sprite number Player.Frame and skips background color(TRANS).
PUT (Player.X, Player.Y), WarriorSprite(Player.Frame, 0), TRANS

' Flag KeyPressed as FALSE(pressing is not locked!) only when
' the player releases SPACE or ENTER.
IF MULTIKEY(SC_ENTER) OR MULTIKEY(SC_SPACE) THEN GOTO skipkeyrestore:
KeyPressed = FALSE
skipkeyrestore:

END SUB
You'll notice one new thing in this code - I implemented sword swinging! In our mini-game we'll control the sword swinging only with one variable - "Attack". When the player presses SPACE "Attack" is set as 10. As long as "Attack" is above 0 we'll treat this as a situation where the warrior is swinging with his sword - attack mode is active! We also must have two lines of code which reduce "Attack" to 0 so we can "time out" the attack. Change 10 to some other number if you want to have a longer or shorter period of swinging. This can be done one more ways. I often use two variables. One that "times" the attack(usually named "AttackTime") and one which flags if attack is TRUE or FALSE. But for the sake of our mini-game we'll use only one variable. With projects where you would have more sprites representing swinging, some even swinging and running you'll need to code this on a slightly different way. But in any game where you have a hero with a short range weapon you must have one main variable which will flag if swinging is happening or not so you can check for collision with the enemies. Also note how I used the "KeyPressed" variable to prevent the player to double press as well as to hold the swing all the time(he must push SPACE repeatedly). This method I use more often on places where I want to prevent double clicking(or double pressing). I recommend you to become familiar with this method since it's a simple and efficient solution for "double press" problems.
The updated "MainLoop" subroutine should look like this:
SUB MainLoop

DO

' Frame1 changes from 1 to 2 or vice versa every
' 16 cycles(set with Frame2 variable).
Frame2 = (Frame2 MOD 16) + 1
IF Frame2 = 10 THEN Frame1 = (Frame1 MOD 2) + 1
IF Player.Move = FALSE OR Frame1 = 0 THEN Frame1 = 1

' Pastes the background.
PUT (0, 0), background1(0), PSET

MoveDrawSheep ' Paste the sheep and move them.
MoveDrawPlayer ' Paste and control the player.

' Copy the work page(page 1) to the visible page(page 0).
SCREENCOPY
SCREENSYNC ' Wait for vertical blank(use always in all the game
           ' game loops to get 85 FPS).

SLEEP 2    ' Statement used to prevent 100% CPU usage(prevents
           ' the program to use up all the computer cycles - useful
           ' and recommended).

LOOP UNTIL MULTIKEY(SC_Q) OR MULTIKEY(SC_ESCAPE)
' Execute the loop until the user presses Q or ESCAPE.

END SUB
Now the main loop is easier to manage. For example, if you want for the sheep to paste OVER the player you should just place 'MoveDrawSheep' AFTER 'MoveDrawPlayer'. But we'll leave it like this.
The entire code now should look like this: codever3.txt
It's best you copy and paste all of this into FBIDE.
Ok, we have the warrior, we have the sheep, we have implemented swinging. So what now?
Let's first add collision(swing detection) with the sheep. When the player is swinging and a sheep is in range we will kill it(make this sheep's Alive = FALSE). We'll work in the "MoveDrawPlayer" sub now. We should place this code inside the 'IF Player.Attack > 0' clause above other IF clauses. We'll create a FOR loop which will go through all the sheep like in the "MoveDrawSheep" sub and check for distance between the sheep and the warrior according to warriors's direction. The new code is as follows:
' If the player is attacking...
IF Player.Attack >0 THEN

' If the player is swinging check for collision with the sheep.
' In our specific range detector we have 3 main conditions.
' First, the sheep must be alive for us to check collision with
' it. Second, the warrior and the sheep must be less that 15 pixels
' apart in horizontal direction. Third, the warrior and the sheep
' must be less than 15 pixels apart in vertical direction.
' You can tweak the pixel distances if you want and can get a
' better result. The secondary condition depends on the direction.
' For example, if the warrior is facing right(Direction = 1) sheep
' must be at least one pixel to the right from the warrior.
' Anyway, if all conditions are met the sheep is killed(Alive = FALSE).
FOR checksheep = 1 TO 10
IF Sheep(checksheep).Alive = TRUE AND ABS(Player.X-Sheep(checksheep).X) < 15 AND ABS(Player.Y-Sheep(checksheep).Y) < 15 THEN
IF Player.Direction = 1 AND Sheep(checksheep).X > Player.X THEN Sheep(checksheep).Alive = FALSE
IF Player.Direction = 2 AND Sheep(checksheep).X < Player.X THEN Sheep(checksheep).Alive = FALSE
IF Player.Direction = 3 AND Sheep(checksheep).Y > Player.Y THEN Sheep(checksheep).Alive = FALSE
IF Player.Direction = 4 AND Sheep(checksheep).Y < Player.Y THEN Sheep(checksheep).Alive = FALSE
END IF
NEXT checksheep

' If the player is attacking flag the proper attack
' sprite according to player's direction.
IF Player.Direction = 1 THEN Player.Frame = 12
IF Player.Direction = 2 THEN Player.Frame = 11
IF Player.Direction = 3 THEN Player.Frame = 10
IF Player.Direction = 4 THEN Player.Frame = 9
END IF
I belive this code is enough commented and needs no extra explanation. If you update the "MoveDrawPlayer" sub on this way and compile the code you'll be able to kill the sheep but they will simply disappear off the screen and that's boring.
This is where the real fun starts. I'm going to introduce now the "layering" method I re-invented. I'm using the expression "re-invention" since I know other people used/use something similar but I came up with this method myself. Anyway, I think mine is very user-friendly and versatile. What is this layering method? Well, it's based on two parts. Initiation subs and layer subs. Layer subs paste various particles on the screen(anything from bullets to blood spills) if they are active(a bullet shot out or a blood squired out). They "go through" the particles with a FOR loop like it's done in the "MoveDrawSheep" sub. You can have more particle layers for different types of particles(one for blood, one for bullets, one for explosions, etc.) or place all of them in one layer. Initiation subs INITIATE/SPAWN a free particle(not already activated) on a specific positions with a specific type. You are meant to call this sub on places where you want for a new particle to appear on the screen(monster killed so we need new blood, the player shot a projectile from a weapon, etc.).
We need first to declare our particles. We'll do this with the following line(place it after the player and the sheep declarations):
DIM SHARED Particle(100) AS ObjectType
As you see we connected this array with the "ObjectType" user defined type. We can create a new user defined type especially for the particles but for the sake of this tutorial we won't complicate. With 100 we have set the maximum possible number of particles on the screen. The more demanding your game will be in this perspective you will have to set a higher number. Since our particle layer will have other requirements than the "Sheep" and the "Player" array do we need to add few more variables in the "ObjectType" user defined type. "Typ" will flag the type of the particle and "Duration" generic duration from the duration of the very particle to the duration of its movement(will depend on the particle's type). Updated "ObjectType" user defined type should look like this:
TYPE ObjectType
X          AS SINGLE
Y          AS SINGLE
Speed      AS SINGLE
Frame      AS INTEGER
Direction  AS INTEGER
Move       AS INTEGER
Attack     AS INTEGER
Alive      AS INTEGER
Typ        AS INTEGER
Duration   AS INTEGER
END TYPE
In our mini-game we will feature only two types of particles - bloody meat pieces and the fireball. We'll start with the bloody meat pieces and say that they will be flagged with "Typ" value of 1. "Typ" value of 2 will flag the fireball(later).
We need to declare a new subroutine named "InitiateParticle". We'll declare it on this way(place this line together with other subroutine declarations):
DECLARE SUB InitiateParticle (xpos!, ypos!, parttype, partdirec)
This is our first sub with parameters(variables that are passed to it when it's called). Values that end with '!' are SINGLE and since we are going to pass the particle's position using the warrior's or sheep's positions(flagged with SINGLE variables) we need to declare xpos and ypos AS SINGLE. The easiest way is to put '!' at the end of them. "parttype" will flag the type of the particle we want to initiate(spawn) and "partdirec" its direction(not used with the bloody meat pieces but will be with the fireball). The concept of our mini-game doesn't require more variables to be passes but your project might so don't hesitate to declare this subroutine with more variables. The very "InitiateParticle" sub will seek for a free particle which is flagged with the "Alive" variable. Once a free particle is found its characteristics are set(some of the characteristics are passed with the sub parameters), it's flagged as taken(not free -> Alive = TRUE) and the sub is exited(with 'EXIT SUB'). It's usually better to create a special user defined type for particles where you would declare a variable named "Locked" which then would be used to flag the status of a particle(free or not). But to keep it simple we'll use "Alive" from the "ObjectType" user defined type. Just don't be confused with the way "Alive" is used with the sheep and with how "Alive" is used with the particles.
This is the first version of the "InitiateParticle" sub which for now only manages the bloody meat pieces(place this code at the end of our program):
SUB InitiateParticle (xpos!, ypos!, parttype, partdirec)

' Check the particles for a free one.
FOR countparticle = 1 TO 100

' If the current one is free(Alive = FALSE) activate
' it and pass certain values to it.
IF Particle(countparticle).Alive = FALSE THEN

Particle(countparticle).Alive = TRUE
Particle(countparticle).Typ = parttype ' Pass the particle type
                                       ' from parttype.
Particle(countparticle).X = xpos! ' Pass the particle's position
Particle(countparticle).Y = ypos! ' from xpos! and ypos!

' If the particle is type 1(bloody meat pieces)
' randomize its DIRECTION(from 1 to 8), set
' its DURATION(with bloody meat pieces it flags
' how much the piece will move once it's spawned),
' set its speed(from 0.1 to 1) and its FRAME(sprite
' from ExtraSprite array -> from 9 to 15, check
' LoadGraphics sub).
IF Particle(countparticle).Typ = 1 THEN
Particle(countparticle).Direction = INT(RND * 8) + 1
Particle(countparticle).Duration = 10
Particle(countparticle).Speed = (INT(RND * 10) + 1) / 10
Particle(countparticle).Frame = INT(RND * 6) + 9
END IF
EXIT SUB ' Once the particle is initiated exit this sub.

END IF

NEXT countparticle ' If a particle is not free in this slot
                   ' seek in the next.

END SUB
I think the comments say all you need to know at this point. I would just like to point out that the way you will pass values to a particle will depend on your project. What's mandatory in this method is a FOR loop which seeks for a FREE PARTICLE and 3 values you pass into the sub, particle's x and y position and its type. I really doubt you can work without these 3 variables. You will notice that we are not using "parttype" with bloody meat pieces since the direction of a spawned meat piece is randomized. So when you are initiating a bloody meat piece the last value can be any number since it won't be used.
What's also good about this method is that if you have the maximum number of particles already present on the screen(100 in our case) and you try to initiate a new one the program won't crash or interrupt. Simply, a new particle won't be initiated. Of course, this is the situation you should avoid in your programs.
Now we need a sub that will draw and manage(move if needed) activated particles. Place this code at the end of the program:
SUB ParticleLayer

' Go through all the particles...
FOR countparticle = 1 TO 100

' If the current particle is activated(Alive = TRUE)
' manage and draw it.
IF Particle(countparticle).Alive = TRUE THEN

' If the current particle is type 1(bloody meat piece)
' reduce its duration from 10 to 0. While duration is
' above 0 the particle it moved according to its
' direction.
IF Particle(countparticle).Typ = 1 THEN
Particle(countparticle).Duration = Particle(countparticle).Duration - 1
IF Particle(countparticle).Duration < 0 THEN Particle(countparticle).Duration = 0
' While duration is above 0 move the particle
' according to its direction with preset speed.
' Directions span from up(1), up-right(2), right(3), all
' the way to up-left(8).
IF Particle(countparticle).Duration > 0 THEN
SELECT CASE Particle(countparticle).Direction
CASE 1
Particle(countparticle).Y = Particle(countparticle).Y - Particle(countparticle).Speed
CASE 2
Particle(countparticle).Y = Particle(countparticle).Y - Particle(countparticle).Speed
Particle(countparticle).X = Particle(countparticle).X + Particle(countparticle).Speed
CASE 3
Particle(countparticle).X = Particle(countparticle).X + Particle(countparticle).Speed
CASE 4
Particle(countparticle).Y = Particle(countparticle).Y + Particle(countparticle).Speed
Particle(countparticle).X = Particle(countparticle).X + Particle(countparticle).Speed
CASE 5
Particle(countparticle).Y = Particle(countparticle).Y + Particle(countparticle).Speed
CASE 6
Particle(countparticle).Y = Particle(countparticle).Y + Particle(countparticle).Speed
Particle(countparticle).X = Particle(countparticle).X - Particle(countparticle).Speed
CASE 7
Particle(countparticle).X = Particle(countparticle).X - Particle(countparticle).Speed
CASE 8
Particle(countparticle).Y = Particle(countparticle).Y - Particle(countparticle).Speed
Particle(countparticle).X = Particle(countparticle).X - Particle(countparticle).Speed
END SELECT
END IF  ' End if duration is above 0.
END IF  ' End if particle is type 1.

' Draw the current particle on its position with its frame.
PUT (Particle(countparticle).X, Particle(countparticle).Y), ExtraSprite(Particle(countparticle).Frame, 0), TRANS

END IF ' End if particle is activated(Alive = TRUE).

NEXT countparticle ' Check next particle.

END SUB
Again, comments explain all of it. Be sure to declare this subroutine too with:
DECLARE SUB ParticleLayer
For particles to appear on the screen we need to call the "ParticleLayer" sub in the main loop. Place it before "MoveDrawSheep" and "MoveDrawPlayer" sub calls since we want for the warrior and the sheep to walk ON the blood(paste other sprites OVER the blood). Some particle layers need to be pasted over other sprites(for example, explosions). The updated "MainLoop" sub:
SUB MainLoop

DO

' Frame1 changes from 1 to 2 or vice versa every
' 16 cycles(set with Frame2 variable).
Frame2 = (Frame2 MOD 16) + 1
IF Frame2 = 10 THEN Frame1 = (Frame1 MOD 2) + 1
IF Player.Move = FALSE OR Frame1 = 0 THEN Frame1 = 1

' Pastes the background.
PUT (0, 0), background1(0), PSET

ParticleLayer ' Paste the particles.
MoveDrawSheep ' Paste the sheep and move them.
MoveDrawPlayer ' Paste and control the player.

' Copy the work page(page 1) to the visible page(page 0).
SCREENCOPY
SCREENSYNC ' Wait for vertical blank(use always in all the game
           ' game loops to get 85 FPS).

SLEEP 2    ' Statement used to prevent 100% CPU usage(prevents
           ' the program to use up all the computer cycles - useful
           ' and recommended).

LOOP UNTIL MULTIKEY(SC_Q) OR MULTIKEY(SC_ESCAPE)
' Execute the loop until the user presses Q or ESCAPE.

END SUB
No particles will appear if we don't initiate them. We have decided to initiate bloody meat pieces when a sheep is killed. We will spawn 7 bloody meat pieces every time a sheep is killed from the center of the killed sheep(with few pixels apart in all directions to get a better effect). This change happens in the "MoveDrawPlayer" sub:
' If the player is attacking...
IF Player.Attack >0 THEN

' If the player is swinging check for collision with the sheep.
' In our specific range detector we have 3 main conditions.
' First, the sheep must be alive for us to check collision with
' it. Second, the warrior and the sheep must be less that 15 pixels
' apart in horizontal direction. Third, the warrior and the sheep
' must be less than 15 pixels apart in vertical direction.
' You can tweak the pixel distances if you want and can get a
' better result. The secondary condition depends on the direction.
' For example, if the warrior is facing right(Direction = 1) sheep
' must be at least one pixel to the right from the warrior.
' Anyway, if all conditions are met the sheep is killed(Alive = FALSE).
FOR checksheep = 1 TO 10
IF Sheep(checksheep).Alive = TRUE AND ABS(Player.X-Sheep(checksheep).X) < 15 AND ABS(Player.Y-Sheep(checksheep).Y) < 15 THEN
IF Player.Direction = 1 AND Sheep(checksheep).X > Player.X THEN Sheep(checksheep).Alive = FALSE
IF Player.Direction = 2 AND Sheep(checksheep).X < Player.X THEN Sheep(checksheep).Alive = FALSE
IF Player.Direction = 3 AND Sheep(checksheep).Y > Player.Y THEN Sheep(checksheep).Alive = FALSE
IF Player.Direction = 4 AND Sheep(checksheep).Y < Player.Y THEN Sheep(checksheep).Alive = FALSE
IF Sheep(checksheep).Alive = FALSE THEN
' If the sheep is killed spawn 7 bloody meat pieces(particle type 1
' -> third parameter).
InitiateParticle Sheep(checksheep).X+10, Sheep(checksheep).Y+10, 1, 0
InitiateParticle Sheep(checksheep).X+13, Sheep(checksheep).Y+10, 1, 0
InitiateParticle Sheep(checksheep).X+9, Sheep(checksheep).Y+13, 1, 0
InitiateParticle Sheep(checksheep).X+8, Sheep(checksheep).Y+11, 1, 0
InitiateParticle Sheep(checksheep).X+12, Sheep(checksheep).Y+8, 1, 0
InitiateParticle Sheep(checksheep).X+11, Sheep(checksheep).Y+9, 1, 0
InitiateParticle Sheep(checksheep).X+11, Sheep(checksheep).Y+9, 1, 0
END IF
END IF
NEXT checksheep
Note where I placed 7 calls of the "InitiateParticle" sub and how the third parameter is 1(bloody meat piece). The last parameter with type 1 particles can be any number since we are not using it in initiation.
The last version of the entire code: codever4.txt
If you compile this you'll be able to kill the sheep and the blood will squirt out of them. The result is not the best and perhaps we should have implemented sheep corpses too. Still, we are not trying here to win an award. This IS a tutorial.
If you went through the code you might have noticed one more change. I inputted these lines in the "InitVariables" sub:
FOR countparticle = 1 TO 100
Particle(countparticle).Alive = FALSE
NEXT countparticle
This FOR loops sets all particles as free(not activated!). ALWAYS make sure that you reset all the particles from the last game every time you start a new game. In your case particles' status might be flagged with another variable like "Locked" or whatever you choose.
Next thing we'll do is implement a fireball in the game which will be controlled with the particle layer and which will be able to kill the sheep. This is mainly to show you how particle layers can be used to control projectiles too. First we need to modify the "InitiateParticle" sub by adding the code for particle type 2.
SUB InitiateParticle (xpos!, ypos!, parttype, partdirec)

' Check the particles for a free one.
FOR countparticle = 1 TO 100

' If the current one is free(Alive = FALSE) activate
' it and pass certain values to it.
IF Particle(countparticle).Alive = FALSE THEN

Particle(countparticle).Alive = TRUE
Particle(countparticle).Typ = parttype ' Pass the particle type
                                       ' from parttype.
Particle(countparticle).X = xpos! ' Pass the particle's position
Particle(countparticle).Y = ypos! ' from xpos! and ypos!

' If the particle is type 1(bloody meat pieces)
' randomize its DIRECTION(from 1 to 8), set
' its DURATION(with bloody meat pieces it flags
' how much the piece will move once it's spawned),
' set its speed(from 0.1 to 1) and its FRAME(sprite
' from ExtraSprite array -> from 9 to 15, check
' LoadGraphics sub).
IF Particle(countparticle).Typ = 1 THEN
Particle(countparticle).Direction = INT(RND * 8) + 1
Particle(countparticle).Duration = 10
Particle(countparticle).Speed = (INT(RND * 10) + 1) / 10
Particle(countparticle).Frame = INT(RND * 6) + 9
END IF

' If the particle is type 2(fireball) flag
' its direction according to partdirec, its
' duration and speed(modify this for faster
' or slower fireball) and sprite(only one
' image of fireball in the ExtraSprite array
' placed on position 16).
IF Particle(countparticle).Typ = 2 THEN
Particle(countparticle).Direction = partdirec
Particle(countparticle).Duration = 100
Particle(countparticle).Speed = 2
Particle(countparticle).Frame = 16
END IF

EXIT SUB ' Once the particle is initiated exit this sub.

END IF

NEXT countparticle ' If a particle is not free in this slot
                   ' seek in the next.

END SUB
The direction of the fireball we'll pass using the player's direction since the fireball needs to travel in direction where the player is facing. Another update must happen in the "ParticleLayer" sub. Place this code after line 'END IF ' End if particle is type 1.':
' If particle type is 2(fireball)...
IF Particle(countparticle).Typ = 2 THEN
' If the particle's life has expired(duration = 0) kill it(Alive = FALSE).
Particle(countparticle).Duration = Particle(countparticle).Duration - 1
IF Particle(countparticle).Duration < 0 THEN Particle(countparticle).Alive = FALSE
' According to particle's direction move it(right, left, down, up)
' with preset speed.
SELECT CASE Particle(countparticle).Direction
CASE 1
Particle(countparticle).X = Particle(countparticle).X + Particle(countparticle).Speed
CASE 2
Particle(countparticle).X = Particle(countparticle).X - Particle(countparticle).Speed
CASE 3
Particle(countparticle).Y = Particle(countparticle).Y + Particle(countparticle).Speed
CASE 4
Particle(countparticle).Y = Particle(countparticle).Y - Particle(countparticle).Speed
END SELECT

' If the fireball is off the screen kill it.
IF Particle(countparticle).Y < -12 OR Particle(countparticle).Y > 200 OR Particle(countparticle).X < -12 OR Particle(countparticle).X > 320 THEN Particle(countparticle).Alive = FALSE

' Check all sheep if the fireball is in collision with any of them.
' The collision is check from the centers of the sheep and the
' fireball and they need to be less than 11 pixel apart.
FOR checksheep = 1 TO 10
' If the fireball is active(not destroyed upon collision with
' the previous sheep), the current sheep is alive and they are
' in collision kill the fireball and the sheep.
IF Particle(countparticle).Alive = TRUE AND Sheep(checksheep).Alive = TRUE AND ABS(Particle(countparticle).X+5-Sheep(checksheep).X-10) < 11 AND ABS(Particle(countparticle).Y+5-Sheep(checksheep).Y-10) < 11 THEN
Sheep(checksheep).Alive = FALSE ' Kill the fireball.
Particle(countparticle).Alive = FALSE ' Kill the sheep.
' If the sheep is killed spawn 7 bloody meat pieces(particle type 1
' -> third parameter).
InitiateParticle Sheep(checksheep).X+10, Sheep(checksheep).Y+10, 1, 0
InitiateParticle Sheep(checksheep).X+13, Sheep(checksheep).Y+10, 1, 0
InitiateParticle Sheep(checksheep).X+9, Sheep(checksheep).Y+13, 1, 0
InitiateParticle Sheep(checksheep).X+8, Sheep(checksheep).Y+11, 1, 0
InitiateParticle Sheep(checksheep).X+12, Sheep(checksheep).Y+8, 1, 0
InitiateParticle Sheep(checksheep).X+11, Sheep(checksheep).Y+9, 1, 0
InitiateParticle Sheep(checksheep).X+11, Sheep(checksheep).Y+9, 1, 0
END IF
NEXT checksheep ' Check next sheep for collision.

END IF ' End if particle is type 2.
The code speaks for itself. There is the code that moves the fireball according to its direction, the code that "kills" it if it's off the screen and the code that checks for collision with the sheep, very similar to the one that checks for collision with the sword. All we need now is the code that spawns the fireball. The fireball will be spawn when the player pushes ENTER. Place this code in the "MoveDrawPlayer" sub above the PUT statement:
' If the player pushes ENTER initiate a fireball but only
' if another one is NOT ACTIVE(flagged with the FireBFree variable).
IF MULTIKEY(SC_ENTER) THEN
FireBFree = TRUE ' By deafult the fireball is free.
' Go through all the particles and check if an active one is
' the fireball.
FOR countparticle = 1 TO 100
IF Particle(countparticle).Alive = TRUE AND Particle(countparticle).Typ = 2 THEN FireBFree = FALSE
NEXT countparticle
' Note how player's direction is passed into the sub(4th parameter).
IF FireBFree = TRUE THEN InitiateParticle Player.X+4, Player.Y+5, 2, Player.Direction
END IF
As you see I coded this part on the way it prevents the player to fire a fireball if another one is already present on the screen. This is to prevent the abuse of the fireball feature and not to allow the player to fire fireballs one after another. You can solve this "problem" on more ways. Like add another variable which would be set as 100 every time the player would fire a fireball and then reduce it in every loop(like the "Attack" variable). And then the player wouldn't be able to shoot another fireball until this variable reaches 0. Think of this as "reload" feature in games with firearms which can be shorter or longer for different weapons.
We are coming close to finishing the very mini-game. What I still want to do is add a millisecond precise timer and print the playtime so we can "score" the game after all the sheep are killed. The very timer should be placed in the main loop(naturally). Just put it right after 'DO':
' Our timer(millisecond precise).
' starttime variable checks if
' a millisecond has passed
' using the TIMER statement.
' & is used with variables
' you want to return DOUBLE
' PRECISION values. When 10
' milliseconds has passed
' add one seconds and return
' the milliseconds to 0.
IF starttime + 0.1 <= TIMER& THEN
milsec = milsec + 1
IF milsec > 9 THEN
seconds = seconds + 1
milsec = 0
END IF
starttime = TIMER&
END IF
This is a peace of very simple code. The only new thing about this code is that it uses DOUBLE PRECISION variables(they end with & or you declare them as DOUBLE in your program). "seconds" will store the number of seconds passed in the round and "milsec" the number of milliseconds which are used to change seconds every time 10 of them passes(naturally). For this code to work we should declare "starttime", "seconds" and "milsec" on the beginning of our program together with other variable declarations as shared. The code:
DIM SHARED seconds, milsec
DIM SHARED starttime AS DOUBLE
"starttime" needs to be DOUBLE because we are counting MILLISECONDS using the TIMER statement! Also, with every new game the timer needs to be reset so these lines need to be in the "InitVariables" sub:
milsec = 0
seconds = 0
We would like for the playtime to print on the screen while we are playing the game. We'll use the PRINT statement for this. At the end of this tutorial I'll give you a link to a better CUSTOM FONT printing routine but to make this simple we'll use PRINT in our mini-game. Put these two lines before 'SCREENCOPY' in the main loop:
LOCATE 1, 1
PRINT "Playtime: " + STR$(seconds) + "." + STR$(milsec)
LOCATE sets the console cursor to the row and column given(1 and 1 in the above line). You'll only use it when using the PRINT statements. Very handy if you are making an ASCII game but in other situation not really.
The last thing we'll do is add a score screen which will print the playtime(how much seconds it took the player to kill all the sheep) and some message according to this time. We'll create another sub named "PrintScore" which should be declared like all the rest and looks like this:
SUB PrintScore

' This sub is executed when a game round
' is completed.

CLS ' Clear the screen.

' If any of the sheep is alive EXIT this sub since
' the user aborted the game and no sense in
' printing the score.
FOR checksheep = 1 TO 10
IF Sheep(checksheep).Alive = TRUE THEN EXIT SUB
NEXT checksheep

' Play a loop which ends until the use
' pushes escape.
DO

' Print the number of seconds the round took
' to complete.
LOCATE 2, 1
PRINT "You needed " + STR$(seconds) + "." + STR$(milsec)+" seconds"
LOCATE 3, 1
PRINT "to kill all the sheep."

' According to this time print a different
' message. More time it took the player
' to finish a round print a less
' complimenting message.
message$ = "An ok score...for a granny!"
IF seconds < 16 THEN message$ = "Not bad!"
IF seconds < 11 THEN message$ = "Good job!"
IF seconds < 8 THEN message$ = "Excellent job!"
LOCATE 5, 1
PRINT message$
LOCATE 7, 1
PRINT "Press ESCAPE to return to main menu."

' Standard statements in every loop.
SCREENCOPY
SCREENSYNC
SLEEP 2

' End loop when ESCAPE is pushed.
LOOP UNTIL MULTIKEY(SC_ESCAPE)

END SUB
Nothing groundbreaking here and it's all said in the comments. We need to call this sub when the game ends in the main menu sub(after the main loop call). The updated main menu sub:
SUB MainMenu

' Will add code here later that calls
' the main loop after the player clicks
' on an option in the menu. For now
' the main loop is called right away.

' Load initial variables(player's position, etc.).
InitVariables
' Call the main game loop.
MainLoop
' Show the score screen if all sheep are killed.
PrintScore

END SUB
We aren't done yet because if you remember the main loop ends only when the player pushes ESCAPE. We need to add another condition. We'll add a variable in the main loop named "GameEnd". We'll input that it's TRUE by default and then right after it add a FOR loop which will check if any of the sheep is alive. If any alive sheep is found "GameEnd" is changed to FALSE. An condition is added to the main DO loop which should end it when "GameEnd" is TRUE. So until all the sheep are dead "GameEnd" will always be changed to FALSE and the loop won't end. The changed end of the "MainLoop" sub:
' Copy the work page(page 1) to the visible page(page 0).
SCREENCOPY
SCREENSYNC ' Wait for vertical blank(use always in all the game
           ' game loops to get 85 FPS).

SLEEP 2    ' Statement used to prevent 100% CPU usage(prevents
           ' the program to use up all the computer cycles - useful
           ' and recommended).

' A round is over by deafult.
GameEnd = TRUE
' Check all the sheep. If any of them is alive the
' game should not end(round not completed).
FOR checksheep = 1 TO 10
IF Sheep(checksheep).Alive = TRUE THEN GameEnd = FALSE
NEXT checksheep

LOOP UNTIL MULTIKEY(SC_Q) OR MULTIKEY(SC_ESCAPE) OR GameEnd = TRUE
' Execute the loop until the user presses Q or ESCAPE or the game ends.

END SUB
That's it. The mini-game is completed! And I must say, it came out better than I thought. There is actually some play value there. Or not. Not important. Like I already said, this is a tutorial.
The entire code done so far: codever5.txt
The final touches
We could end here now but I won't. I really want to add a main menu. It will contain a bunch of generic code and some new code that uses the mouse routines. It should allow you to start and exit the game and when a round is completed or aborted the program should get back to the main menu again.
For the main menu screen we'll use this image(link). Don't get excited by it. Only two options("Play Sheep Massacre" and "Exit") will be active. Other two mini-games I originally planed for the next lessons but I doubt I'll complete them since I want to keep my sanity.
To store the main menu image we need to declare another memory array(memory buffer).
We can re-dimension the "background1" array and add another dimension but to keep it simple we'll declare another array named "background2". Put this with other variable declarations:
DIM SHARED background2(64004) AS INTEGER
We also need to load this image into memory. Put these lines in the "LoadGraphics" sub:
BLOAD "mainmenu.bmp", 0
GET (0,0)-(319,199), background2(0)
All is ready for the new "MainMenu" sub:
SUB MainMenu

startmloop:
' Default menu position is 1(first from
' the top).
MPos = 1

DO

' If the user pushed up and the key pushed
' last time is released reduce menu
' position by 1. Minimum menu position is 1.
IF MULTIKEY(SC_UP) AND KeyPressed = FALSE THEN
MPos = MPos - 1
KeyPressed = TRUE
IF MPos < 1 THEN MPos = 1
END IF
' If the user pushed down and the key pushed
' last time is released increase menu
' position by 1. Minimum menu position is 1.
IF MULTIKEY(SC_DOWN) AND KeyPressed = FALSE THEN
MPos = MPos + 1
KeyPressed = TRUE
IF MPos > 4 THEN MPos = 4
END IF

' If the user pushed enter execute
' the current menu option(flagged
' with MPos).
IF MULTIKEY(SC_ENTER) THEN
SELECT CASE MPos
CASE 1 ' Play Sheep Massacre option
' While ENTER is being hold loop.
WHILE MULTIKEY(SC_ENTER)
SLEEP 2
WEND
' Load initial variables(player's position, etc.).
InitVariables
' Call the main game loop.
MainLoop
' Show the score screen if all sheep are killed.
PrintScore
GOTO startmloop:
CASE 2
' Inactive!
CASE 3
' Inactive!
CASE 4 ' Exit option
END
END SELECT
END IF

' Pastes the menu background.
PUT (0, 0), background2(0), PSET

' Pastes the menu pointer according to MPos. The menu
' pointer is stored on position 18 in the ExtraSprite
' array.
PUT (88, 75+((MPos-1)*13)), ExtraSprite(18, 0), TRANS

' Key pressing variable won't be restored(key pressing
' unlocked) until the user releases all these keys
' (doesn't hold any of them).
IF MULTIKEY(SC_ENTER) OR MULTIKEY(SC_UP) OR MULTIKEY(SC_DOWN) THEN GOTO skipkeyrestore2:
KeyPressed = FALSE
skipkeyrestore2:

' Standard statements in each loop.
SCREENCOPY
SCREENSYNC
SLEEP 2

LOOP
Most of code is explained in the comments. Yet another DO...LOOP. "MPos" is used to flag the active option and "MPos" is changed with UP/DOWN arrow keys. "Play Sheep Massacre" option is under "MPos" value of 1(CASE 1) and "Exit" under "MPos" value of 4(CASE 4). The other two options are inactive(unused). When the user pushes ENTER an option is executed according to "MPos". The final thing I'll do is add mouse control to the menu. This is not NEEDED but I want to show you how to use the GFXlib's mouse routines.
The statement that returns the mouse status is GETMOUSE and you should place it in all the loops where you want to check for the mouse status. Just put this line in the "MainMenu" sub right after 'DO':
GETMOUSE mx, my, , buttons
This line stores mouse cursor x position in "mx", mouse cursor y position in "my" and button status in the "buttons" variable. The last parameter returns 1 for left mouse click and 2 for right mouse click. The third parameter is the mouse wheel counter and it's not used in our menu. Check GFXlib's documentation for more details on this statement.
You should put the following code after the PUT statement that pastes the menu pointer:
' Paste the mouse cursor(image number 17)
PUT (mx, my), ExtraSprite(17, 0), TRANS

' If the mouse cursors is on any of the options
' change the current option to the one
' on which the mouse it.
IF mx > 87 and mx < 250 THEN
IF my > 75 and my < 87 THEN MPos = 1
IF my > 88 and my < 100 THEN MPos = 2
IF my > 101 and my < 113 THEN MPos = 3
IF my > 114 and my < 126 THEN MPos = 4
' If the user has clicked with the left
' mouse button and the cursors is on
' one of the options PAUSE until the
' user releases the click and go to
' the IF clause with SELECT CASE MPos.
IF buttons = 1 AND my > 75 AND my < 126 THEN
WHILE buttons = 1
GETMOUSE mx, my, , buttons
SLEEP 2
WEND
GOTO optionactivated:
END IF
END IF
The first statement is most important and it draws the mouse cursors using the "mx" and "my" variables. Always import your own custom cursor when developing a mouse controlled game/application. This shows how this is easy to do. The rest of the code simply changes the menu option if the mouse cursor is on any of them. The mouse in our menu is above the keyboard in hierarchy so while the mouse cursor is on any of the options you can't change it with the keyboard. optionactivated: label is placed under 'IF MULTIKEY(SC_ENTER) THEN' so when you click with the mouse it's just like you pushed ENTER. It is recommended that you declare variables returned by GETMOUSE as shared("mx","my" and "buttons").
And that's it. We are really done now with the mini-game! Yippee! But this is not yet the end of the tutorial(aaargh!).
Check the final code of the mini-game here: codever6.txt
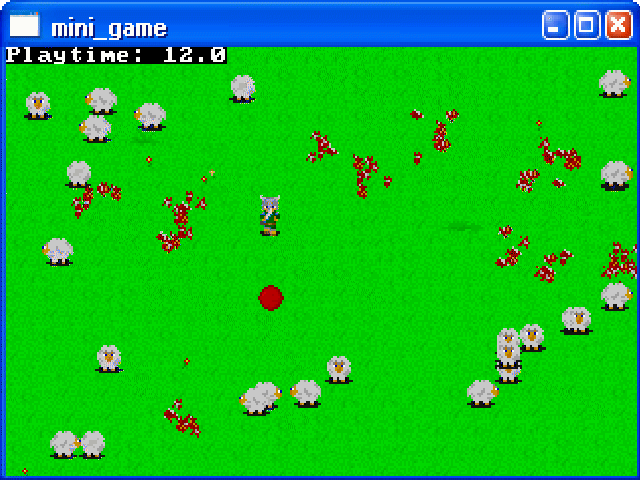
I did one final change in the code in the last version. Every 'TO 10' in the sheep FOR loops I changed to 'TO numofsheep', made the "numofsheep" variable shared and set it as 10 in the "InitVariables" sub. I also re-dimensioned the "Sheep" array to hold 100 elements and the "Particle" array to hold 1000 elements(as well as changed all the particle FOR loops to loop to 1000). This change allows us to alter the number of sheep inside the game simply by changing 10 in the line 'numofsheep = 10' to the desired number of the sheep you want in the game. We don't need to go into every sheep FOR loop and change 'TO 10'. Always try to connect as many values in your game with variables since then you can change your game's "characteristics" very easily if needed. Be sure that you don't loop to higher numbers than you dimensioned your arrays with. Like in our mini-game "numofsheep" shouldn't be above 100 as we dimensioned the "Sheep" array to hold 100 elements. Stay in bounds of your arrays! I've re-dimensioned the "Particle" array since in the most extreme situation(100 dead sheep on the screen + the fireball) we would have 701 particle on the screen. Yes, I could dimension the "Particle" array to hold 701 particle but 1000 is a nice round number. It just shouldn't be smaller than the maximum number of particles that might occur in the game. This is a screenshot with 40 sheep(enlarged):
Download the compiled mini-game with the source and all the graphics files here: mini_game.zip
File manipulation in FreeBASIC - A lite tutorial
I feel I should say something about loading and storing data into files since you will most likely use it in any larger project. I don't want to attach this tutorial on the mini-game since it's really unnecessary and I feel this can be explained better in a separate example program.
St�phane Richard wrote an excellent series about file manipulation(QB Express issues #4, #6 and #8) so if interested in a more deep-through tutorial on this check them out. In this tutorial we'll cover the basics. Simple raw data retrieving and storing from/to plain text files. External data files are a must have with more ambitious projects where you have huge numbers of variables that need to be initiated before every new game. Like NPCs positions on every map/location in the game. Not to mention the very map files that hold the information about tile positions and numbers.
First, let's create a file which will contain these numbers(use Notepad):
50
50
100
100
1
120
120
2
130
155
1
160
150
4
Name it "data.txt".
Now we'll create two objects, "Player" and "NPC" and connect them with a user defined type that will include 3 variables("X", "Y", and "Typ"):
TYPE ObjectType
X    AS INTEGER  ' Will hold the object's X position.
Y    AS INTEGER  ' Will hold the object's Y position.
Typ  AS INTEGER  ' Will flag the object's type.
END TYPE

DIM SHARED Player AS ObjectType ' A generic player object.
DIM SHARED NPC(4) AS ObjectType ' A generic NPCs array.
Let's say that the first two entries in the file are the player's x and y position and the rest 12 entries hold the NPCs' x and y positions and types(one after another). The way you would load this data into the desired variables is as follows:
' Open data.txt for retrevieng data on
' file handle #1
OPEN "data.txt" FOR INPUT AS #1
INPUT #1, Player.X
INPUT #1, Player.Y
' Loop through 4 NPCs and load
' the variables for each one.
FOR countNPC = 1 TO 4
INPUT #1, NPC(countNPC).X
INPUT #1, NPC(countNPC).Y
INPUT #1, NPC(countNPC).Typ
NEXT countNPC
CLOSE #1 ' Close the file handle
         ' after retrieving data.
When you are LOADING data use "FOR INPUT" when opening a file and then pass the data from the file to variables like it's done in the code above. #1 represents the file handle. Be sure you are not opening one already opened. A good way to avoid this is to close each file after you got the data from it. You can also you the function "FREEFILE" which opens a free file handle.
You save data into files on a very similar way. Instead of "FOR INPUT" you need to use "FOR OUTPUT" and when writting data into a file you need to use "PRINT #filehandle". Like this:
OPEN "data.txt" FOR OUTPUT AS #1
PRINT #1, Player.X
PRINT #1, Player.Y
FOR countNPC = 1 TO 4
PRINT #1, NPC(countNPC).X
PRINT #1, NPC(countNPC).Y
PRINT #1, NPC(countNPC).Typ
NEXT countNPC
CLOSE #1
A simple program that illustrates this:
#include "fbgfx.bi"

TYPE ObjectType
X    AS INTEGER  ' Will hold the object's X position.
Y    AS INTEGER  ' Will hold the object's Y position.
Typ  AS INTEGER  ' Will flag the object's type.
END TYPE

DIM SHARED Player AS ObjectType ' A generic player object.
DIM SHARED NPC(4) AS ObjectType ' A generic NPCs array.

SCREEN 13, 8, 2, 0

' Open data.txt for retrevieng data on
' file handle #1
OPEN "data.txt" FOR INPUT AS #1
INPUT #1, Player.X
INPUT #1, Player.Y
' Loop through 4 NPCs and load
' the variables for each one.
FOR countNPC = 1 TO 4
INPUT #1, NPC(countNPC).X
INPUT #1, NPC(countNPC).Y
INPUT #1, NPC(countNPC).Typ
NEXT countNPC
CLOSE #1 ' Close the file handle
         ' after retrieving data.

DO

' Print player's x and y position.
LOCATE 1, 1
PRINT "Player's X position: "; Player.X
PRINT "Player's Y position: "; Player.Y

' Print NPC 1 and 2 data.
LOCATE 4, 1
PRINT "NPC 1, X position:" ; NPC(1).X
PRINT "NPC 1, Y position:" ; NPC(1).Y
PRINT "NPC 1, type:" ; NPC(1).Typ
PRINT "NPC 2, X position:" ; NPC(2).X
PRINT "NPC 2, Y position:" ; NPC(2).Y
PRINT "NPC 2, type:" ; NPC(2).Typ

LOCATE 12, 1
PRINT "Use arrow keys to change the player's"
PRINT "position and S to save this new"
PRINT "information into data.txt."
PRINT "Press ESC to end the program."

' Change the player's position according to
' pushed arrow key.
IF MULTIKEY(SC_RIGHT) THEN Player.X = Player.X + 1
IF MULTIKEY(SC_LEFT) THEN Player.X = Player.X - 1
IF MULTIKEY(SC_UP) THEN Player.Y = Player.Y - 1
IF MULTIKEY(SC_DOWN) THEN Player.Y = Player.Y - 1

' If the letter "S" is pushed
' save the new data into
' the same file. Only Player's
' X and Y position can be
' changed.
IF MULTIKEY(SC_S) THEN
WHILE MULTIKEY(SC_S)
SLEEP 2
WEND
OPEN "data.txt" FOR OUTPUT AS #1
PRINT #1, Player.X
PRINT #1, Player.Y
FOR countNPC = 1 TO 4
PRINT #1, NPC(countNPC).X
PRINT #1, NPC(countNPC).Y
PRINT #1, NPC(countNPC).Typ
NEXT countNPC
CLOSE #1
END IF

SCREENCOPY
SCREENSYNC
SLEEP 2

LOOP UNTIL MULTIKEY(SC_ESCAPE) ' End loop when ESC is pushed.

END
This program allows you to change the player's x and y position and save this change in "data.txt"(by pushing the letter "S"). If you start the program again you will see that the change is saved. You can't change the NPC data. The NPC array is there just to show you how you can load large amounts of data from files with a FOR loop and store it into arrays. Download this example packed: file_usage.zip
What also wouldn't be bad for you to know is how to convert strings into integers and vice-versa. Something often done when data is being load/stored to files.
To convert an integer into a string use:
YourString$ = STR$(YourInteger)
To convert a string into an integer use:
YourInteger = VAL(YourString$)
Where YourString$ can be "124" or something like that. A string like "dssdsd" would return a 0 when converted into an integer.
Again, this is just the surface of file manipulation. For more information on this like using binary files read St�phane Richard's tutorials.
A note on compiling
When compiling a graphics application(that's what we are doing) with FreeBASIC you will most likely want to get rid of the console window(that ugly thing behind the program window; you noticed it when running the compiled programs from this tutorial). To get rid of it you need to compile your .bas files with:
fbc yourfile.bas -s gui
In FBIde you set this in the View -> Settings -> FreeBASIC window. The "Compiler command" input box. Just put '-s gui' behind 'filename> '. Omit the apostrophes.
Routines/tools I think you should know about
I will list here few routines/tools that you might find very useful, especially if you are going to stick to using GFXlib.
- customfont.zip (332 KB)
This is a set of custom font printing routines I wrote some month ago. It allows you to print text in custom fonts in 8 and 16 bit color depth modes. The fonts need to be saved as BMP files in a special format(a grid) so it's very easy to edit them. This package comes with 6 already made fonts of different sizes. The routines are very easy to use and the package comes with documentation as well as with 3 demos. The last time I was online this was the only routine of such type for GFXlib. Highly recommended!
- FMODExample.zip (661 KB)
Most likely you will use FMOD sound library(http://www.fmod.org) to play the sound and music in your games. FMOD is easy to use, multi-platform and supports a wide range of music file formats(WAV, MOD, MID, MP3, OGG, ...). Few FMOD-FB tutorials were written but I'm not in the situation where I can look for them(I'm writing this offline). Anyway, many of them might be incompatible with FreeBASIC today because of a change in version 0.15. It's easy to "fix" this incompatibility which is very nicely illustrated in this FMOD example program I wrote. This demo STREAMS a background sound and allows you to play two sound effects at your input. It also allows you to change the master volume. So it includes the basics and most likely all you will use. What I also want to accomplish with this example program is to get people in a habit of STREAMING long music files since they take a lot of memory if stored directly in it. And if you really need to store a music file into memory PLEASE store only one and then switch between them when needed. Don't store all your sound/music files into memory together(hello Syn9!) because that's a disrespect of your user's memory. This package also includes FMOD's official help file(FMOD.chm).
- FBScrollEd1.zip (142 KB)
Richard Eric Lope's pixel by pixel scrolling engine ported to FreeBASIC by me in June 2005. It was originally coded in RelLib, a QuickBasic graphics library. Two fixes of the engine were released later so this is the latest version compatible with FreeBASIC ver.0.15 and includes comments why it was not originally compatible. What's specific for this demo is that is loads sprites and tiles(as well as the custom font) from PIXELplus 256's graphic files(known as PUT format). PIXELplus 256 is a sprite/tile editor originally made for QBasic developers in 1995. Very long it was an excellent sprite editor for QBasic developers but today is lacking in many aspects. One single PUT file can't be longer than 64 KB nor it can be managed/saved in 16 bit or higher color depth mode. So all of the flaws of PP256 are therefore the flaws of this scrolling engine. Still, it wouldn't be difficult to port the engine so it would load sprites and tiles from plain BMP images though the pixel perfect collision featured in it would then have to be cut out. I don't currently have the time nor will to do this. The engine is heavily commented so it might be interesting to those who want more after this lesson and don't mind working in 8 bit color depth mode. Also, you will have troubles in finding another FreeBASIC pixel scrolling engine out there, free to use and so well commented. Then again, I might be wrong(I hate being offline).
- pp256.zip (444 KB)
PIXELplus 256, a sprite/tile editor for QBasic developers but thanks to Richard Eric Lope's PUT routines from the scrolling engine above you can use it with 8 bit color depth FreeBASIC projects. This is a DOS program but runs very sexy and smooth on my PC(with Windows XP installed).
- Audacity - http://audacity.sourceforge.net
Excellent program for editing audio files. I found it very handy when editing sound effects and converting them to desired formats. A must tool for every game designer. Freeware.
- FBIde - http://fbide.sourceforge.net
Once more I'm recommending this IDE. I had the opportunity to try out two other FreeBASIC IDEs and they didn't appeal to me like FBIde did. Maybe it's a thing of habit. What's great is that FBIde since the version 0.4.5 includes FreeBASIC Wiki, a wonderful FreeBASIC encyclopedia. And if I'm not mistaken it's still growing.
Final words
Dear God, I completed the tutorial! I though this would never happen. :P
76 KB of pure text. I hope there are people out there who actually need this and will find it useful. Err...I also hope nobody won't mind if I skip "what we learned" section in this edition. I just covered too much and a lot of generic stuff.
I doubt another lesson will ever be written because I feel I said all that needed to be said in the first two lessons. I also don't have any more free time. At least the amount one tutorial of this kind consumes. I really need to hit the books and get heavy on my college project.
But if you are really curious in the next lesson(s) I planned to learn you few more sophisticated methods of using external files. The idea was to reproduce the method I used in Legacy Of Noname General(a project of mine; still incomplete) to show you how you can create point and click environments(adventure game) using data from external files. Nothing new. Just this knowledge enriched. I also planned to code another simple game entitled Choper Attack which wouldn't introduce anything new and would only serve as a practice.
With hopes I opened that "magical door" at least to one person, stay among the living!